CartFlows is one of the most popular shopping cart software tools for sites built with WordPress, and in this blog post, I will provide you with my detailed CartFlows review.
If you are unsure about using CartFlows for your online business, this blog will help you reach a decision.
Let’s get started.
You must have heard about the sales funnel if you are selling products online. A sales funnel is a process that a potential customer goes through to complete a purchase. Sales funnels are essential to any business, whether it is offline or online.
You can create a sales funnel in online businesses by adding certain features like upsells, down-sell, cross-sells, and order bumps on your checkout pages.
All these features help increase conversion.
There are tools like Kartra, GrooveFunnels, ClickFunnels, etc., for building sales funnels, and there are tools like ThriveCart and SamCart used for creating checkout pages.
These checkout tools are great, but with WordPress, not so useful. This is where CartFlows comes in.
Let’s see what it has for us.
CartFlows Review
CartFlows is a shopping cart software for WordPress-based sites. Adam Preiser and Sujay Pawar created this software as they wanted to create “the best sales funnel plugin for WordPress.
”However, to use CartFlows, you need to install WooCommerce first.WooCommerce is a plugin (an add-on) that helps you sell products on the WordPress platform. However, WooCommerce does not provide the best-optimized checkout page.
So, you need CartFlows to fill this gap.
What Can You Do With CartFlows?
CartFlows is a great way to create checkout pages on WordPress-based sites. With it, you can create any type of sales page for your website. You can create high-converting landing pages that will convert your potential customers into recurring clients.
Since WooCommerce is an e-commerce plugin, you can sell both digital and physical products, and with CartFlows, you can create a swift checkout flow to improve your customer’s experience. This increases your conversion rate and ensures maximum profit.
It’s not just checkout pages and sales funnels that you can build with CartFlows.
You can create different funnels with it, including product launch funnels, lead magnet funnels, webinar list funnels, 2-step tripwire funnels, and much more.
Other than that, CartFlows is equipped with several advanced features that help increase conversions and boost revenue from sales.
How to Use CartFlows
Now in this CartFlows review, I’ll start from scratch and walk you through setting up your first checkout page using CartFlows.
Setting Up the Website
To use CartFlows, you first need to have a website on WordPress.
You set up a domain name, pay or not pay for it, and your account is created. Note here that you need to upgrade your account to the Business plan or the eCommerce plan if you want to add any plugins. The Business plan is for small entrepreneurs, and the eCommerce plan is suitable for an established business.
As of writing this CartFlows review post, the domain name registration is free with any paid plan.
Setting up WooCommerce
Now for CartFlows to work, you need to install WooCommerce.
Go to plugins, and you will see WooCommerce. Click on ‘Install now,’ and you are directed to a page. From there, you can set up your store, products, shipping, taxes, among many other things.
If you wish, you can skip this part for now. You can later install WooCommerce and make the changes you want.
Also, if you don’t want to install WooCommerce first, you can do that after installing CartFlows.
Setting Up CartFlows
Just like the WooCommerce plugin, you can easily install CartFlows.
You also don’t have to pay for WooCommerce since it’s free.
After installation, you’ll be taken to the setup wizard.
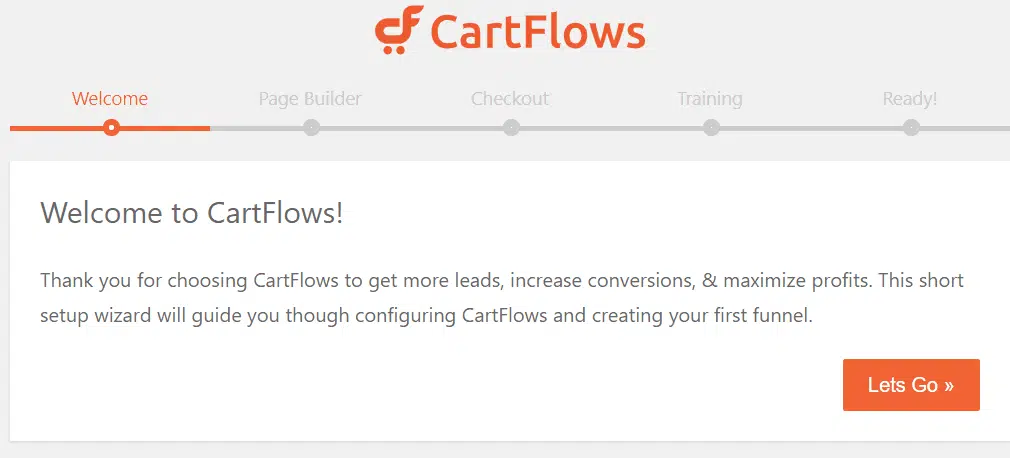
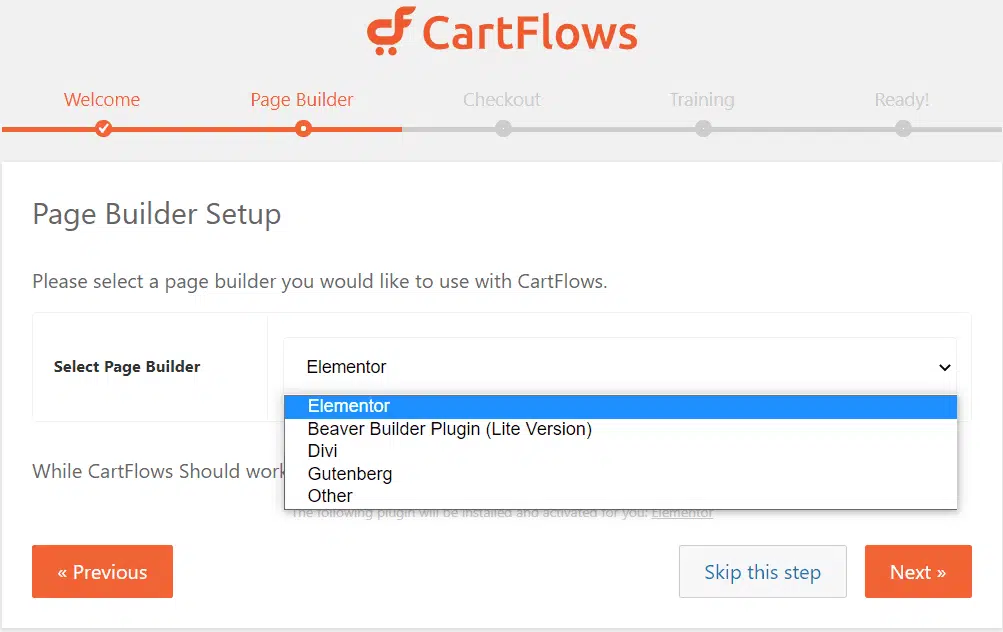
First, you will choose a page builder that you want to use with CartFlows.
You can choose from Elementor, Beaver Builder, Divi, and Gutenberg (as you can see from the image below).
Second, you have to choose a checkout. There you’ll be asked if you want a WooCommerce store to sell physical or digital products online.
If you click on Yes, you’ll be directed to the training page where you’ll be asked if you want their training course or not.

Finally, you’ll be taken to the ‘Ready’ page, and you have successfully signed and installed the plugin.
It is also where you’ll be asked to ‘Create a Flow’ first. Now, to create a flow, you need to create a product first.
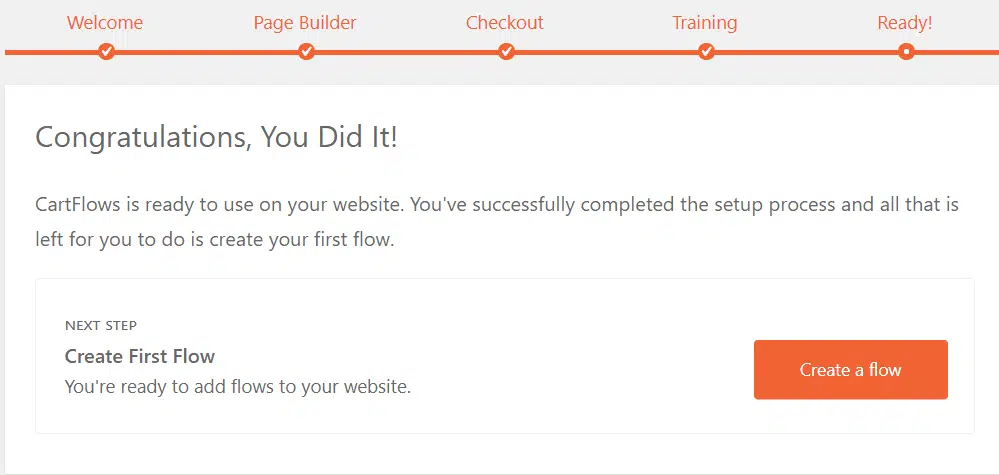
Don’t worry if you haven’t created a product, though. You can still use CartFlows to create a flow, but connecting it to a product lets you sell that product.
Before moving on to the product part, let’s discuss a couple of CartFlow’s distinguishing features.
Dashboard and Insights
As you can see, the dashboard looks very simple. You can see the overview of the revenues you have made.
You can see the Total Revenue, Order Bump Revenue, Offers Revenue, Total Orders, and Total Visits. However, some of these are only available in the Pro version.

Connecting with a Payment Processor
CartFlows works with WooCommerce, so you can only accept payments by integrating with payment processors in WooCommerce itself.
Click on WooCommerce on the left side of the panel. Clicking on the ‘Payments’ tab, you can see a list of processors.
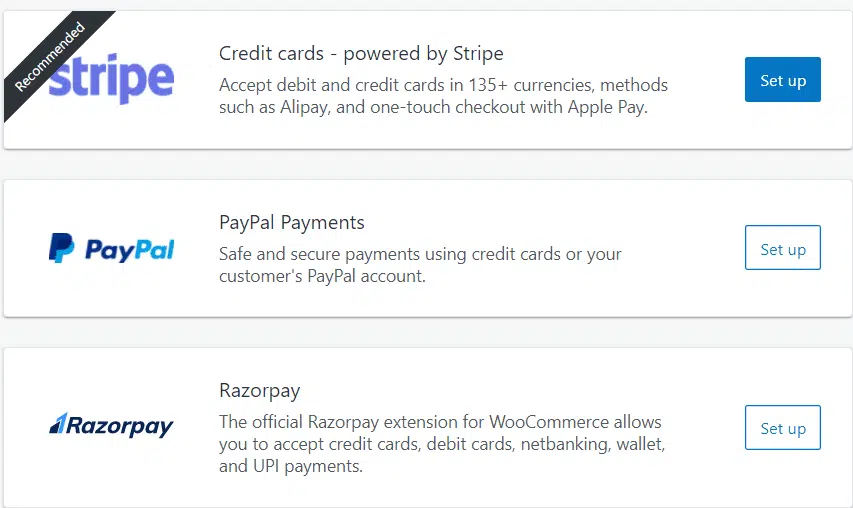
Other than direct bank transfers, you can accept payment through checks and even cash on delivery.
Stripe is the most popular one since there are quite a several platforms that you can connect through its integration:
- Stripe Bancontact
- Stripe SOFORT
- Stripe Giropay
- Stripe EPS
- Stripe iDeal
- Stripe Multibanco
- Stripe Alipay
- Stripe P24
You also have PayPal, AmazonPay, Square, Braintree, and more.
Get your Shopping Cart today!
They are affordable, and they have a beginner-friendly interface and an easy shopping cart setup process.
Key Features of CartFlows
Ready to Use Templates
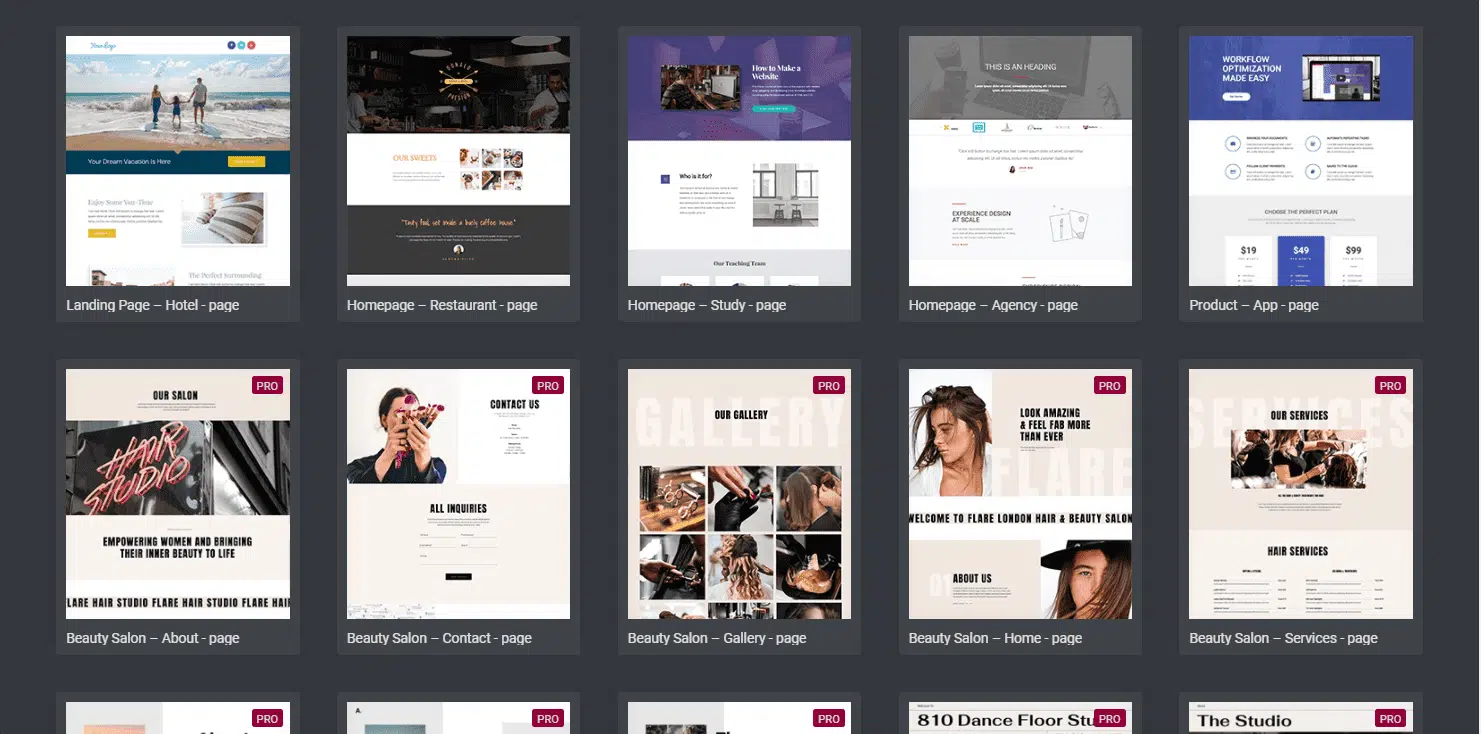
You can create your pages from scratch, but using templates helps you complete the design quickly.
CartFlows has 15 pre-built templates as of now— seven free and eight premium. As you might have already guessed, you need to have a Pro account to import and use premium templates.
You can edit templates with most landing page builders, including Elementor, Beaver Builder, Divi Builder, Thrive Architect, and Gutenberg. Even if you can’t use the premium templates, the free ones work just fine.
Once you import your desired template, you can change the layout and rearrange them the way you want.
Custom Fields Checkout

Sometimes, you might want to add a custom field at your checkout. Most checkout builders lack this feature that lets you add additional form fields, and it can be a downer. Very few CartFlows competitors have this feature.
In CartFlows, you can change your checkout pages like edit, rearrange, and add new fields. The new field could be anything like age or gender or subscribe to newsletters, etc.
This feature is available only in the Pro version.
Global Checkout

CartFlows offers a global checkout option. Using this option, you can redirect your audience from any part of your website or your social media page to the CartFlows checkout page.
This replaces the traditional WooCommerce checkout page.
So, every time customers purchase a product; they will be directed to a customized checkout page instead of the usual WooCommerce checkout page.
Here’s how you can do that:
- First, create a new flow.
- Configure the first step to be the checkout page. Do not assign a product now.
- Rename the step to something distinguishable; for example, “global checkout page.”
- You may add order bump, upsell or downsell in the next steps.
- Next, go to CartFlows settings and select the newly created flow from the drop-down option of the global checkout.
Thus, when customers want to check out, they will be taken straight to your CartFlows checkout page.
Easy-to-Add Order Bumps
This is a premium feature of CartFlows that lets you add additional products to your checkout page to increase sales.
Here you can offer similar products or add-ons at one-time offers with heavy discounts. Here’s how you can order bumps in CartFlows:
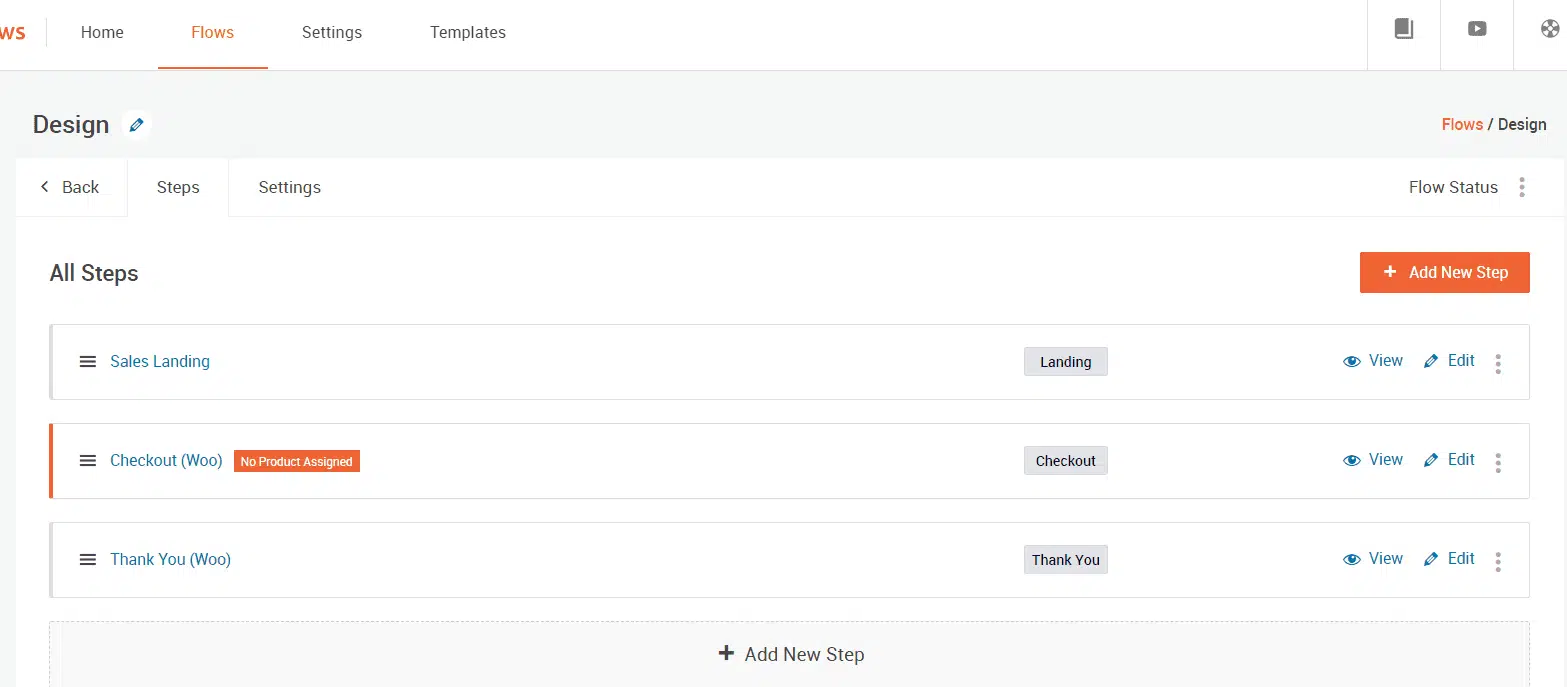
Under the CartFlows plugin, click on ‘Flows,’ then ‘Edit’ on the flow you want to add the order bump.
Now go to edit the Checkout page.
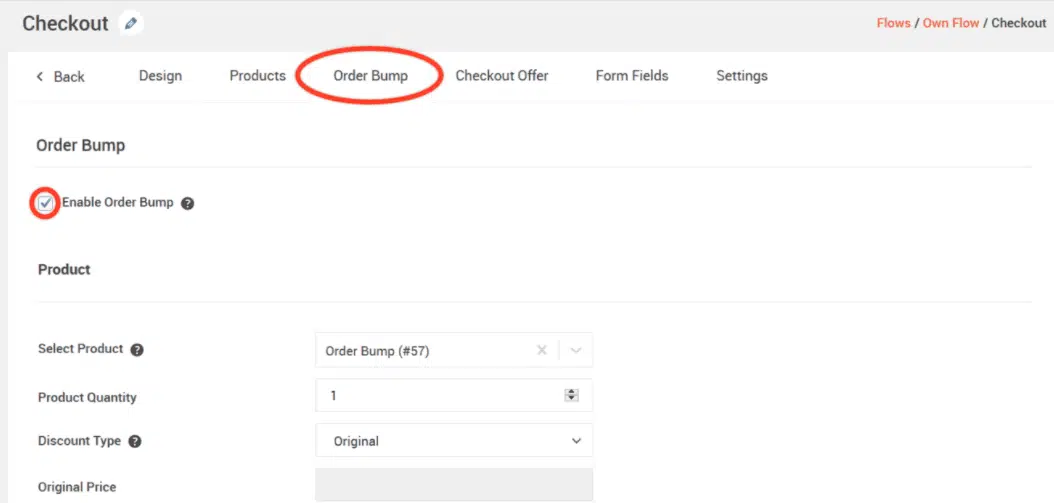
Under the ‘Order Bump’ tab, you have several options:
- Bump Order Skin – You can change the skin of the bump.
- Select Product – To display the product for your order bump.
- Bump Order Position – You can choose to place it before or after checkout, after billing, or after order.
- Product Image – Select an image that represents your product.
- Checkbox Label – Can customize the label if you want to.
- Highlight Text – This is the title of the bump.
- Product Description – To add details of the product.
- Discount Type – You can offer the product at a discounted price by a percentage, a fixed amount, or coupons.
- Bump Order Style – Can change the style of the bump order like color, background color, label color, label background color, and more.
One-click Upsells/Downsells
Upsells and Downsells are an integral part of the sales funnel. When used correctly, they can increase sales and bring in more revenue.
CartFlows lets you present additional offers to your customers once they have made a purchase.
Since it’s an upsell, the customers don’t have to fill in their information once again. CartFlows redirects them to the checkout page, where they can complete the purchase process. Similarly, you can add Downsell to your page.
This especially comes in handy when a customer is about to skip the purchase. With a down-sell, you can motivate them to purchase a lower-priced product and keep them engaged in the sales funnel.
Here’s how you can achieve this: First, you need to go to the required ‘Flow’ and edit it. From there, you’ll need to “Add New Step.”
You can choose to upsell or down-sell and click on create. This will create the upsell/down-sell, and you can start building with your checkout page. You can rearrange the order of the steps as desired through drag and drop.
Afterward, you can edit the ‘Next Step Link.’ This decides which page the customer will be redirected to next. So after the Checkout, you can show the upsell page.
You also have shortcodes, which adds a condition to the next step. For example, in the ‘Yes Link’ setting of the upsell page, you can set the link to the Thank You page.
So when the customer agrees to buy the upsell product, they will be directed to the Thank You page. Likewise, with the ‘No Link,’ you can send prospects to the down-sell page.
CartFlows lets you add several upsells and downsells.
CartFlows Split Testing
Split testing lets you test two versions of the same web page against each other, and then you can select the best performer. With CartFlows, you can test any element of your checkout pages, including button colors or prices or offers, etc.
In CartFlows, you can set up split testing in four steps:
#1. Enable Split Testing
First, select the flow and decide which step you want to test. For that, click on the vertical three dots and choose the A/B Test. Once the split testing is enabled, click on ‘Update’ to save the setting.
#2. Create Step Variant
Now, you have two versions of the step — Control and Variation. Clone the Variation step, and then you can design the variation.
#3. Set the Traffic for the Variants
After designing the variations of the split test pages, set the traffic for each page. For that, go to the settings icon beside the Start Split Test button and set the traffic percentage to be sent to the particular pages.
#4. Start the Split Testing
After setting the traffic, you can start the split test by clicking on the ‘Start Split Test’ button.
You can create as many variations as you want. To see the split test result, simply go to the Analytics tab. There you will see visits on each page, conversions, and the revenue.
Flow / Step Clone
This is another unique feature of CartFlows.
This enables you to duplicate a flow or step and reduce the time of creating one from scratch. An exact copy of a particular step or flow is created when you select this option, although with different URLs.
Opt-In
Opt-ins are a good way to generate leads. You can do so by setting products to a price value of 0 to make them freely downloadable.
CartFlows has a simple way for that.
From the Flows option, choose a Flow and edit it to import the Opt-in page. You can either choose from the available templates or select “Opt-in Woo” under the ”Create your own” option. Next, edit the Opt-in page and select a product.
All information filled in the opt-in form will be recorded in your favorite autoresponder’s mailing list.
Cart Abandonment
Cart Abandonment is a common issue for online business owners. On average, about 80% of sales are lost to cart abandonment. This causes businesses to lose a lot of money. With CartFlows’ cart abandonment feature, you can recover your lost customers.
CartFlows integrates itself with your CRM and sends emails to the customers who have not completed the purchase process, using the saved name and email address details.
Integrations
CartFlows does not offer integration because WooCommerce already offers lots of integrations and extensions to link with it.
Since CartFlows sits on top of WooCommerce, you can use all of them.
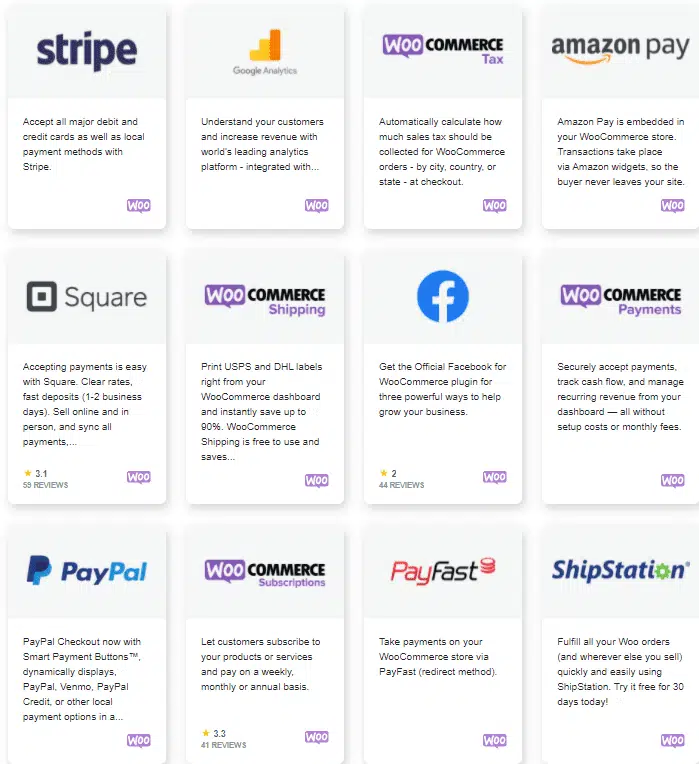
There are several providers of membership sites, subscriptions, payments, shipping, and enhancements. As of now, WooCommerce has 617 free and paid extensions.
A small list of extensions:
- Stripe
- PayPal
- Authorize.net
- Google Analytics
- ShipStation
- FedEx
- MailChimp
- MailPoet
- HubSpot
- Jetpack
- Freshdesk
- Zapier
Product
Initially, CartFlow had no process to create the product; however, now they have allowed it.Adding products to WooCommerce is a straightforward process.
Adding a product
Click on the plug-in on the left-hand side, then click on “Add products.” You get several options to choose from. You can choose the readymade templates, or if you have a small store, you can create a product manually. For larger stores, you can import products via CSV file.
You can create physical, digital, or variable products. As an example, we will show you the process of creating a physical product below.

Naming and Pricing the Product
After selecting the product type, you will be asked to add in the Product name, description, and product data.
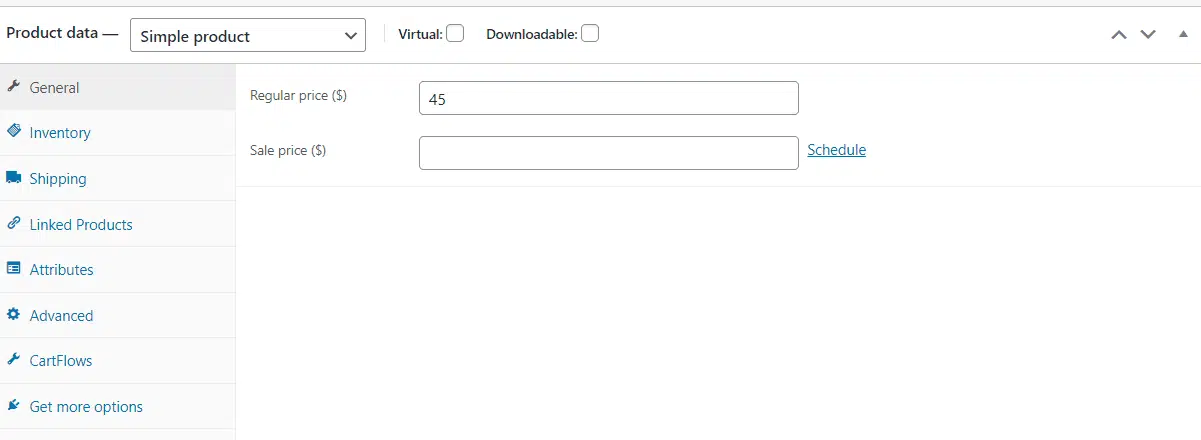
Under the product data, you have some settings:
General – Here, you set the price of the product. You can also set a sale price on the product and set a date for how long it is available.

Inventory – You can set the stock keeping unit, manage stock quantity, allow backorders, and more.
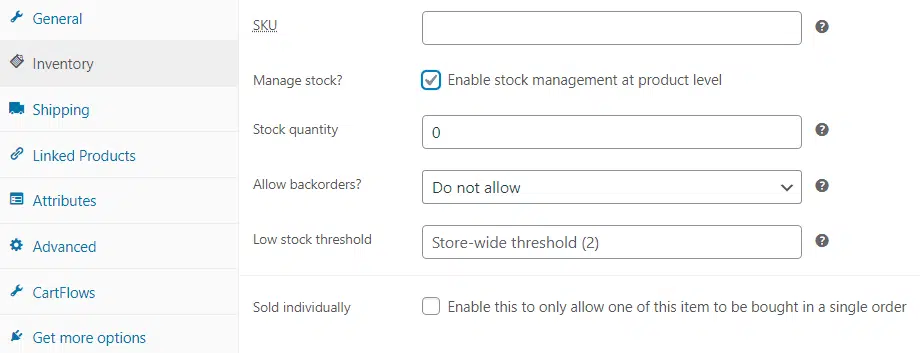
Shipping – You can add the shipping information in terms of weight and dimensions.

Linked Products – Can set the link to upsell or cross-sell.Attributes – Set the attributes like color or size.

Advanced – Set a purchase note to be sent to the customers after making a purchase, and you can also set a custom ordering position.
CartFlows – Here, you can choose a flow that you have created in the CartFlows plug-in. You can also set the text that appears in the “Add to cart” button.
Get more options – Here, you will get a couple more options like adding images for each variation, “name your price” (which is helpful in case of donations), specifying the maximum or minimum quantities of product, and one-page checkout.

Add Product via URL
This is a newly added feature where CartFlows lets you add a product to the checkout page via URL. It gets a bit technical here. There is a parameter that you need to use in the URL — ?wcf-add-to-cart=product_id
You can get the product ID by hovering the cursor above the product created in WooCommerce.
Although this is optional, you can also add the quantity in the URL with another parameter — &wcf-qty=1If you want to select multiple products with different quantities, you can separate the numbers by a comma (,).Eventually, the URL stands at:www.yourdomain.com/checkout-page/?wcf-add-to-cart=product_id&wcf-qty=1You can set this link in the permalink setting under the main Settings tab.
Checkout page
You have created a product; now, you can customize the checkout page. Create a flow, and then edit the checkout page.
Design
Now you have to design the checkout page. Clicking on ‘Edit with Elementor,’ you will be directed to the following page.
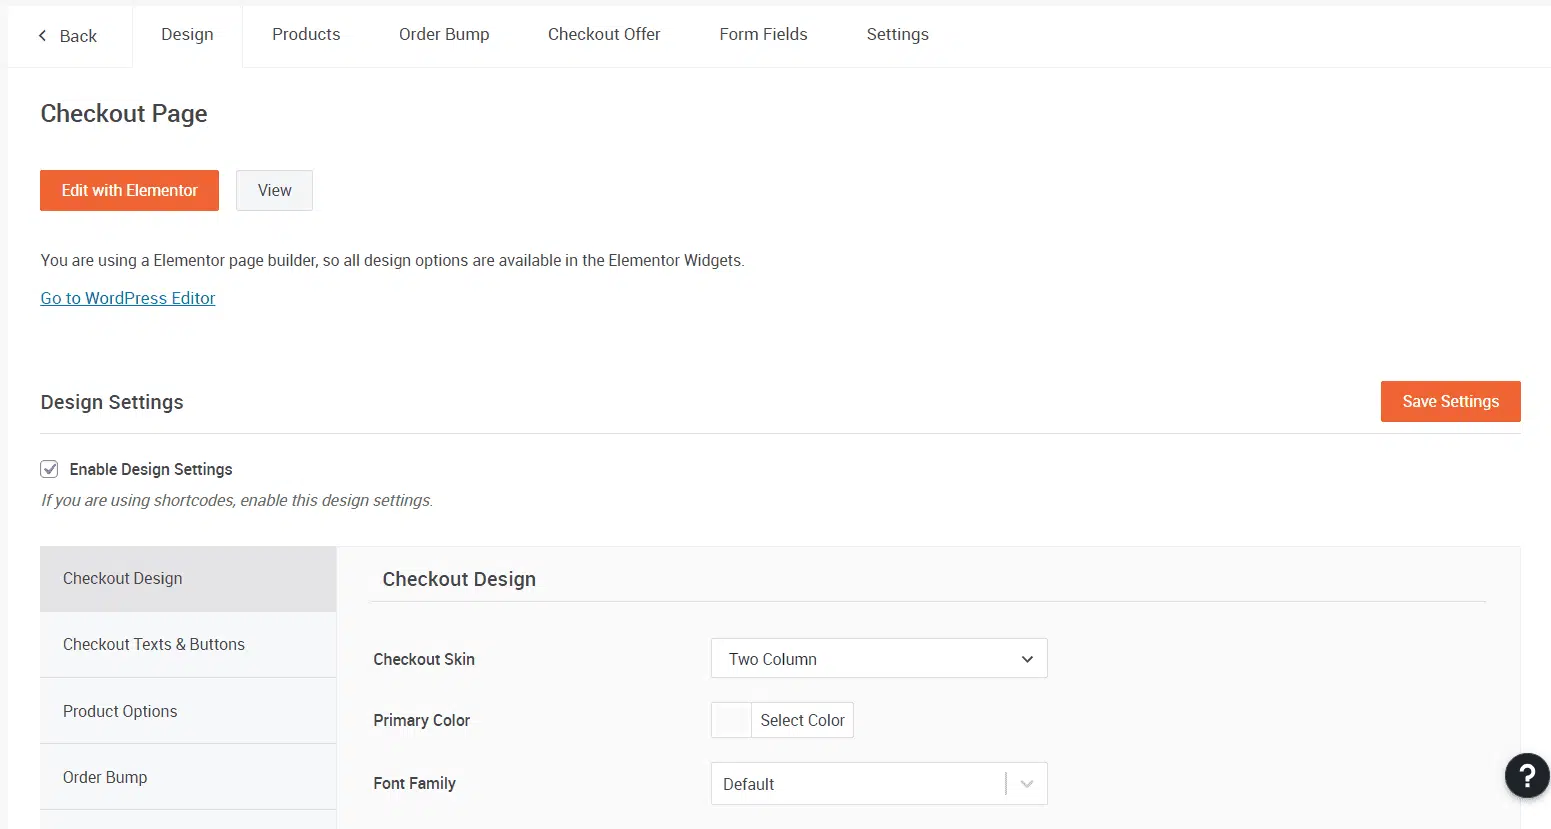
Here you can see widgets such as heading, images, videos, etc. If you have the Pro account, you have extra options like call-to-action, media carousel, testimonial carousel, countdowns, Facebook embed, among others. You can edit these widgets to suit your taste.
Checkout Design
After you are done setting the page, you can now set the design for the checkout. You can change the skin to one-column, two-column, or two-step checkout. You can also change the color and the font.
Checkout Texts & Buttons
Once you enable this setting, you will get a list of settings. Under primary settings of Heading, Input Field, and Buttons, you can change the text style, font family and weight, background, and border color, to name a few.
Products
Here you can create a new product or add the product you have created in WooCommerce.
You can add coupons too if you want.
You also have the products option. This lets your customers add products or the product quantity. Once you enable this option, you can set the conditions, enable variations and quantity and order bumps.
Checkout Offer
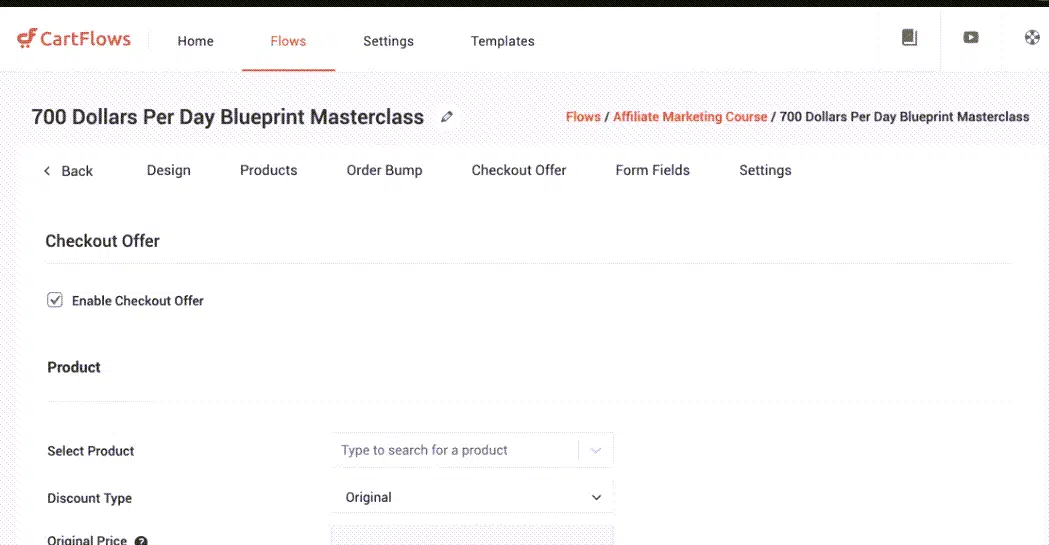
CartFlows lets you make special offers on the products at checkout. Once you select the product, you can set the discount type as a percentage or price. Since the original price is already set, the selling price is automatically calculated.
Next, you can set the title text, sub-title, order button and skip button, and the product description in the settings. Save the settings once you are done.
Form Fields
You have control over the fields on the checkout page, where you can arrange them according to your preference.
Under the form field tab, you have a coupon field, an additional field, and also a custom field editor. Under the custom field editor, you can adjust the field width, label, and the default value. It is also here where you have the ‘Add Custom Field’ option (we have already discussed this earlier).
That is all we have under the Checkout Page tab. Let’s check out the most anticipated part of this article — the pricing.
CartFlows Pricing Plans
CartFlows has two versions: CartFlows Core and CartFlows Pro.
As you already know, the Core version is free. The Pro version is currently offered as a choice of two licenses — the Lifetime Licence, fixed at 999 USD, and the Annual Licence at 299 USD.

As you can see, the annual plan is currently offered at a discounted rate of 239 USD, which won’t be available for long.
If you consider the annual plan, it is cheaper than other popular similar apps. Tools like SamCart, Kartra, and PayKickStart, come at a very steep cost. Also, not all the features are available in their lower plans.
As compared to its competitors, CartFlows does not have many features. But all features are available in annual and lifetime plans.
A Free CartFlows Alternative
Now, I would like to introduce you to a free CartFlows alternative: GrooveSell. It’s in beta, but if you join it for free now, you can use it for free for life with all premium features.
Read my GrooveSell Review.
To use GrooveSell, you will need to subscribe free account of GrooveFunnels.
Who is CartFlows for?
It’s for everyone. No matter what kind of business you do or how large your business is, you can use CartFlows.
CartFlows sits on top of WooCommerce, so you can sell whatever you want. We have seen that though some software (SamCart or ThriveCart) is flexible when selling digital products, there are certain restrictions when dealing with physical products.
Here there is no such case. So it doesn’t matter if you’re selling subscriptions, membership, clothes, or even plants. With CartFlows selling, anything is possible.
CartFlows Pros and Cons
This CartFlows review would be incomplete if we didn’t talk about CartFlows’ pros and cons.
CartFlows Pros
- Easy to learn and navigate
- User-friendly interface
- Works with the major page builders
- A good number of checkout templates to choose from
- You can add as many upsells and downsells as you want
- Let customers checkout with multiple products
- Whatever works with WooCommerce, works for CartFlows
- Other than digital and physical products, you can also sell variable products
- Affordable annual plan
- It’s both a sales funnel platform and checkout page builder
CartFlows Cons
- Lacks in-built affiliate marketing program
- The knowledge base lacks an in-depth tutorial
- Could add some more features
- Certain extensions cost extra money
Conclusion
CartFlows is an easy-to-use shopping cart tool. It may not be up to the mark with its competitors, but it gets the job done.
If you are new to online business, I will suggest you give this plug-in a try as this is beginner-friendly software. The core version is free, and even though it doesn’t have some advanced features, you can still use it to sell your products.
You can upgrade to the Pro plan if you are happy with it.
I hope this CartFlows review has helped you understand this WordPress shopping cart software.
Have you used CartFlows?
If you have, I would love to know about your experience. Let me know through the comments section.

