This blog post will provide you with my detailed ThriveCart Review inlcuding pricing, pros, cons and top feature.
Let’s get started.
If you purchase products online, you know about the shopping carts. Just like the ones we get in department stores, online shopping carts also have carts where you keep your selected products till you checkout.
Most online shoppers never cared about the purchase process, and I didn’t either. I only noticed these intricacies when I planned to open an online store and checked out all the ‘hows’ and ‘whats’ of the entire process.
After some research, I found a great deal of information on shopping cart tools. Here, I will dive deep into this topic using this
ThriveCart review post.
ThriveCart Review
Let’s say you have built an eye-catching website, your marketing campaign has paid off, and you are attracting more traffic than ever. People browse products, like and add them to the cart, but leave the site without making the purchase.
Studies show that as many as 80% of carts are abandoned, i.e., buyers leave before purchasing their order, and the reason could be anything. The cart page might not seem trustworthy, the complex process, or forms with too many fields to fill, etc.
This is where ThriveCart comes in.
Founded in the year 2016, ThriveCart is a self-hosted shopping cart platform that eases purchasing and selling digital and physical products online.
There’s more to ThriveCart than just receiving payments.
With ThriveCart, you will get ‘beautifully designed and optimized’ checkout pages that boost conversions, reduce cart abandonment, and maximize profit. You can convert the clicks into sales using upsells, down sells, or bumps.
ThriveCart integrates with many platforms and services. Be it payment processors, membership platforms, or email marketing tools like autoresponders, etc.
You can sell your product using ThriveCart on your website, Facebook page, or anywhere. You only need to share the cart link or embed the code into your website.
ThriveCart Review Summary
Below is a short brief of ThriveCart Review
Pros
Cons
Overall rating : 4.5 / 5
Conclusion
ThriveCart is one of the best shopping cart software platform that is easy to use and provide all necessary features for online selling and marketing. Its pricing is best among its competitor. If you are looking for an affordable shopping cart tool, ThriveCart can be a good choice.
Getting Started with ThriveCart
Signing up
To sign up with ThriveCart, select the plan, and proceed with the checkout.
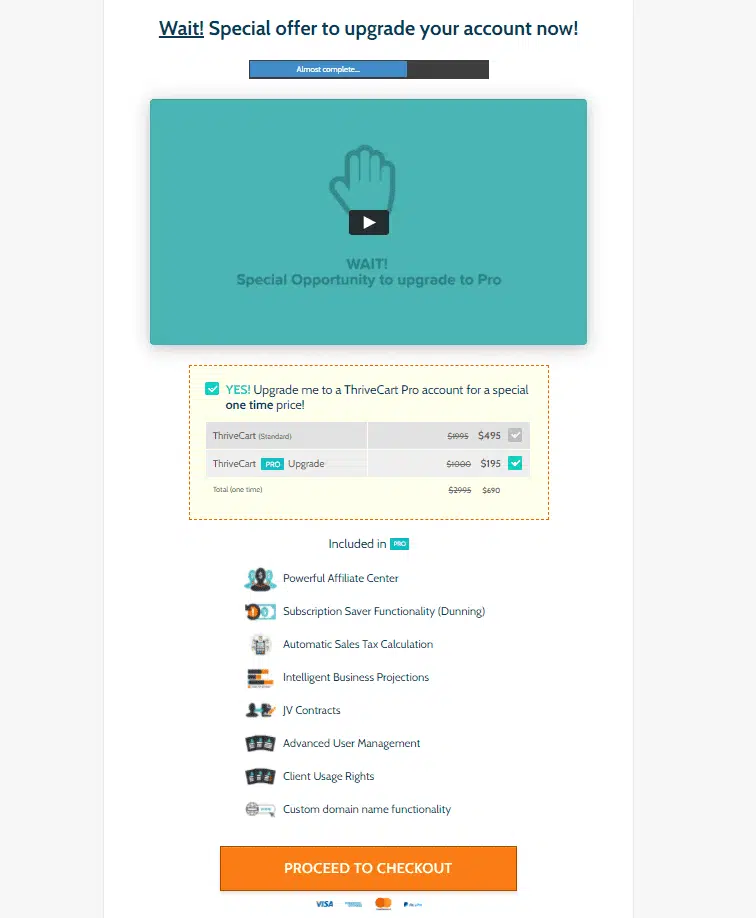
You’ll be then directed to the payments page.
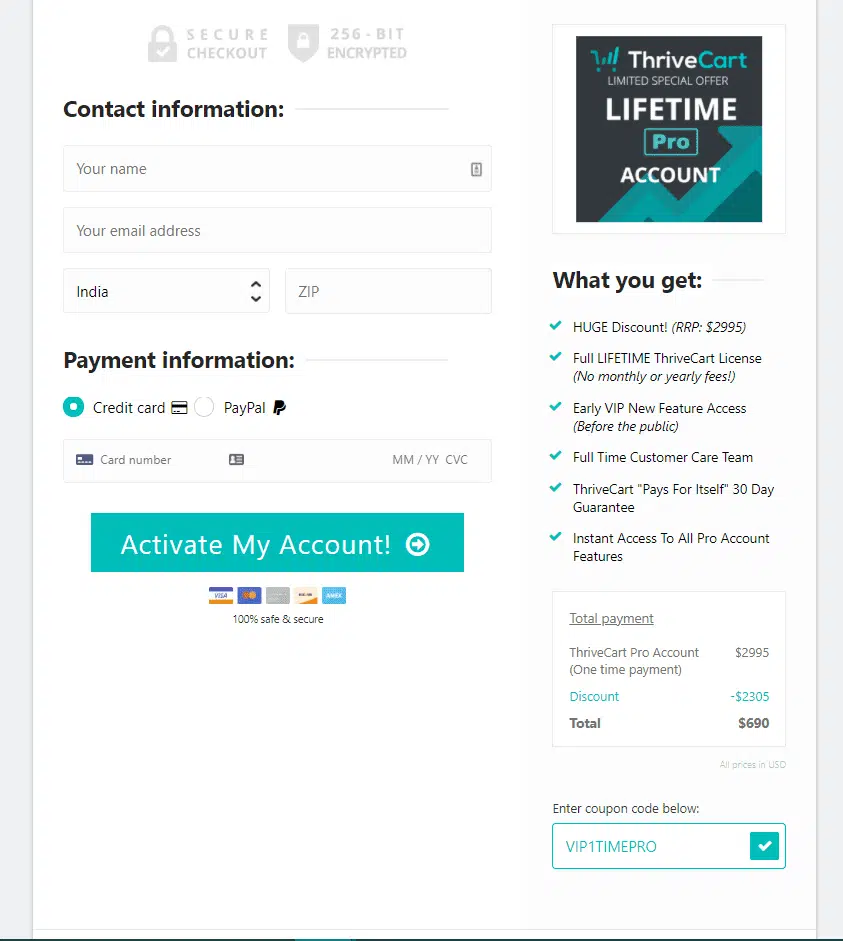
The checkout page looks good; it is minimal and easy to use. Fill in the details, make the payment, and you are signed up!
Congrats!
After logging in, you want to integrate the payment gateway first.
ThriveCart has a straightforward process of payment integrations, though it depends on your preferred gateway.
Before we discuss the payment gateway integration, I will take a little sidestep and give you an overall view of your account.
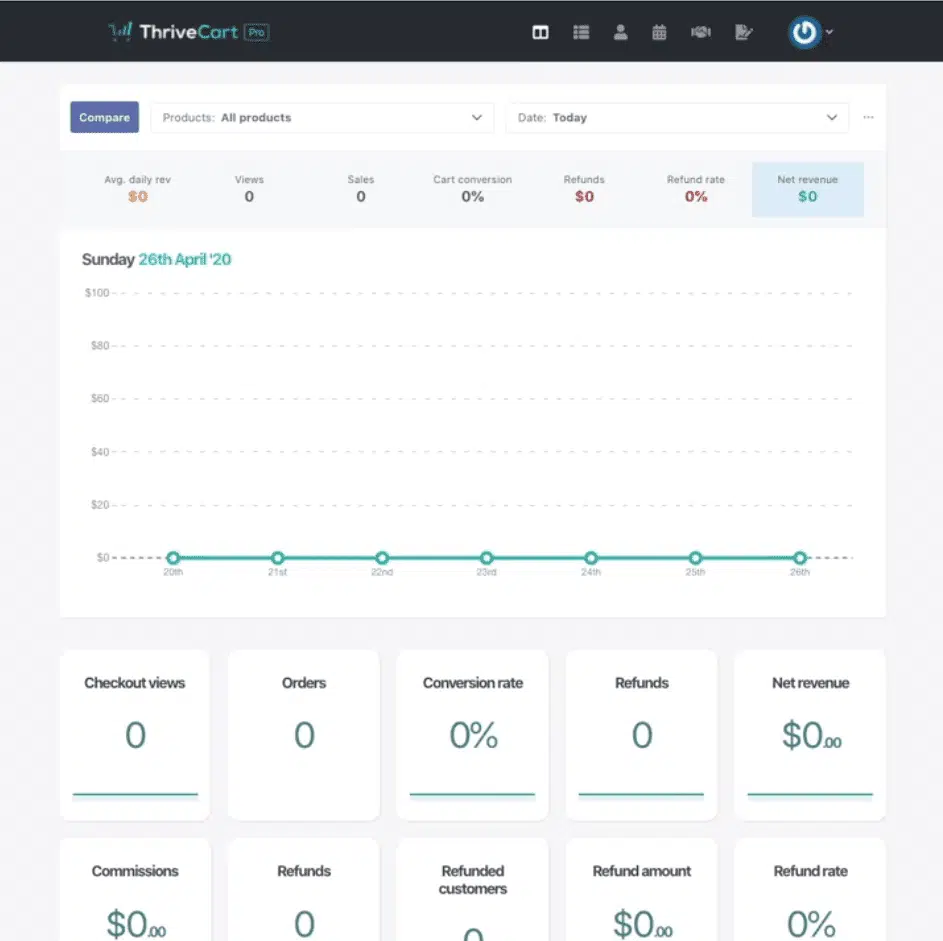
Dashboard and Insights
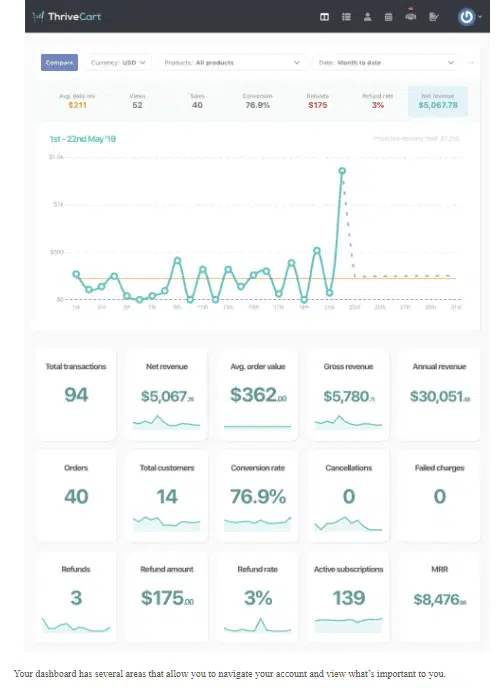
That’s how the dashboard looks. Once you have sold products and are generating revenue, you can see the changes.
Now, let’s move on to the payment processor part.
Connecting with a Payment Processor
At the time of writing this article, ThriveCart has three payment integration options – Stripe, PayPal, and Authorize.net. However, it does allow you to enable GPay, Apple Pay, and Strong Customer Authorization (SCA/PSD2) at your checkouts and accept payment through them.
When it comes to the payment processor, this software allows you to connect more than one account for each processor. You can have multiple accounts for Stripe and PayPal and connect them with your ThriveCart.
This allows you to process the payments of your products by different accounts in your processors.
I don’t know if any other ThriveCart competitor offers this feature.
Here’s how you can do that: Go to the settings in the upper right corner of the dashboard menu.

Then click on ‘View Integrations’.
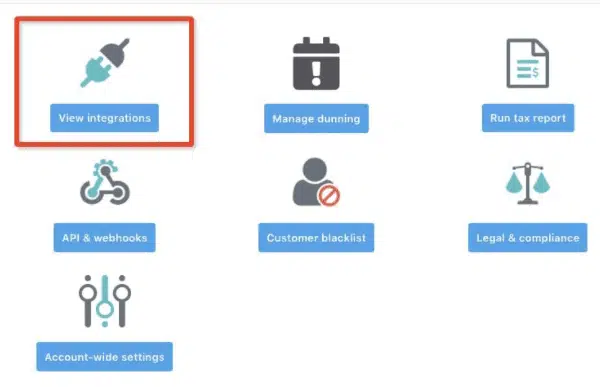
There you get the ‘Payment gateways’ option, and you need to click on the ‘View settings’ button.

You can choose your preferred platform and you can connect multiple accounts to each of these gateways.
- Strip
- PayPal
- Authoriz.net
You can connect PayPal and Stripe with one click. However, for Authorize.net, you will fill in a few fields.
Once you are done with setting up your payment processor, you are ready to go!
A Few Key Features of ThriveCart
ThriveCart has many features and that sets it apart from its competitors in the market. I will list the more popular ones.
High Conversion Rates
One of the key features of ThriveCart is that it allows you to create and add customized shopping cart pages to your website.
You can convert clicks into sales using 1-click upsell, downsell, or order bumps.
1-Click Upsells
In upsell, a seller tries to sell a purchaser an expensive item besides their purchase. The up-sell product could be an add-on product or an upgraded product.
For example, you enter a store to purchase a new phone. You know which phone you want you to buy, but the seller shows you a newer model with better features. This new model has a high price, but you eventually end up buying it.
That’s how upsell works.
When it comes to upsells, ThriveCart offers you two options – you can either use their default upsell page, or you can customize your own. I recommend you opt for the latter as you have better knowledge and control over your website and the upsell page.
Also, the upsell automatically cancels the initial product payment and replaces it with the new upselling product, or if the upsell is like an add-on, it’ll just be added next to the base product.
1-Click Downsells
Taking the same example of the phone above. You intend to buy a phone but have no particular budget in mind. You visit an online store, browse products, and are about to leave as all the products are expensive. Not wanting to lose a customer, the seller shows you comparatively cheaper models. You eventually end up buying a phone.
That is a down-sell. When a seller suggests, the purchaser buys a product that is a less expensive or cheaper alternative to the product they want to buy.
Just like upsell, you can create a downsell for a product in ThriveCart.
It shows up when the customer declines to purchase an upsell.
The benefit of down selling is that the person buys something instead of nothing. This also ensures bringing in profits for the business.
ThriveCart lets you add up to five upsells or down-sells for a product.
Order Bumps
Adding order bumps to your checkout pages is a simple way to boost revenue.
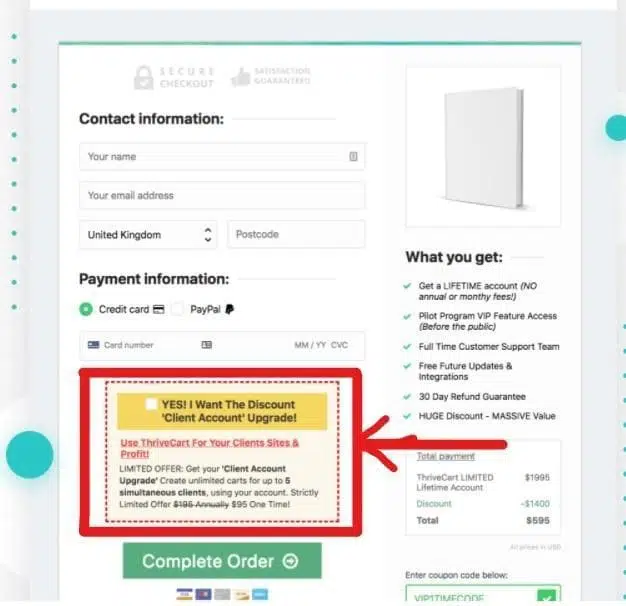
Not all shopping cart tools have the option to add order bumps at their checkout pages, but ThriveCart does.
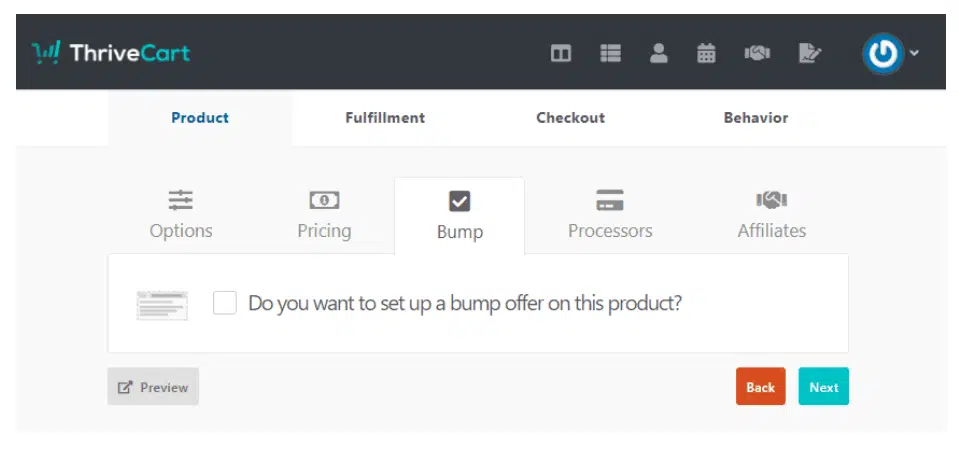
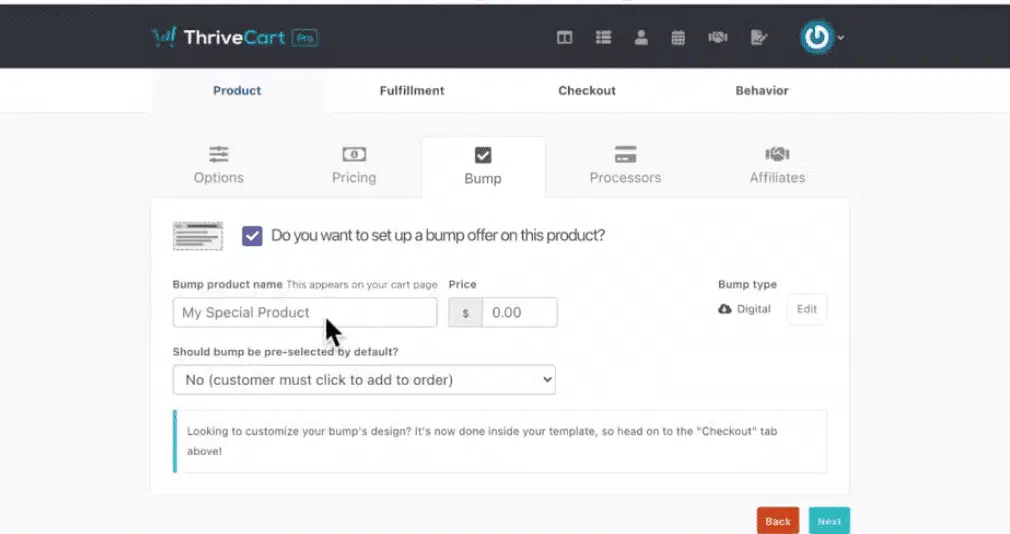
While creating a product (discussed later), you can see the ‘Bump’ option to offer a bump on your product.
Order bumps help you increase per order profit. The bump is highlighted on your checkout page, and the customers can see it quite clearly. Also, it’s a one-time checkout. A click on the box will add the add-on product to the cart.
A/B Testing
Also known as a split test, it is done by comparing two variants of a web page or an element and see which one converts better.
A/B testing is a great way to increase conversions and boost sales, which increases profitability.
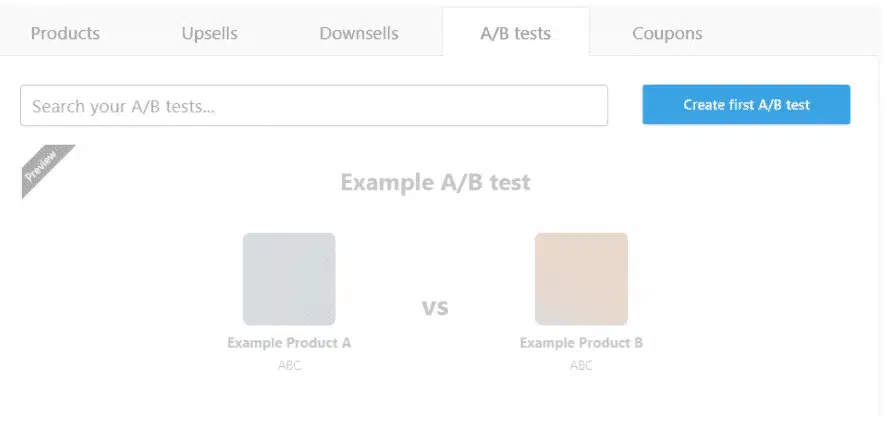
The A/B testing comes with options, such as:
- Pricing with options (one-time or recurring or pay what you can)
- Payment options
- Payment button color
- Guarantee vs. no guarantee
- Testimonials vs. no testimonials
- Which bump offer works best
- Logo vs. no logo
- Which image works best
- Money-back vs no money back
- Fields to be included at the checkout
- Which checkout page performs better
Checkout Pages
ThriveCart allows you to customize your checkout page with its easy-to-use templates. You can customize every element of your checkout page.
Affiliate System
Affiliates help boost sales, and ThriveCart has a powerful in-built affiliate system. This is a useful feature that saves you money, as you don’t have to purchase external affiliate software.
Integrations
ThriveCart’s other special feature is that it integrates with many platforms such as:
- PayPal
- HubSpot
- MemberPress
- Mailchimp
- WishList
- MailerLite
- Drip
- Teachable
- etc.
Payment Processors
The payment methods you can use with ThriveCart are:
- Stripe
- Paypal
- Authroize.net
- Apple Pay
- GPay
GPay and Apple Pay support only selected devices and are not available for mobiles.
Autoresponders
Setting autoresponders with your product is one way to create repeated sales. After the purchase, your customers are added to your email lists, enabling you to build the relationship, and this helps to maintain a profitable business.
Some examples of autoresponders are:
- ActiveCampaign
- AWeber
- ConvertKit
- Drip
- GetResponse
- HubSpot
- Infusionsoft
- MailChimp
- MailerLite
- Moosend
- Ontraport
- Sendy
When you are done integrating your autoresponder, you can manage your contacts under product settings using ThriveCart’s behavior rules.
It also supports HTML embed codes, so even if you don’t see your favorite autoresponder, you can just embed the codes.
Membership platforms
ThriveCart integrates with a range of membership platforms. It integrates with:
- Teachable
- MemberMouse
- Wishlist Member
- MemberPress
- OptimizeMember
- Digital Access Pass
- Thrive Apprentice
- LifterLMS
- Thinkific
Using ThriveCart’s API you can connect other membership platforms:
- MemberSonic
- EverLesson
- ProductDyno
- WPEP Content Sales Engine
- LearnDash
- MasterClassPlugin
Then you also have Zapier that allows you to integrate with:
- Kajabi
- Thinkific
- Podia
- Paid Memberships Pro
Webinar Platforms
Unfortunately, Demio is the only webinar platform that ThriveCart currently integrates with. Though if you integrate with Zapier, it does connect you with other webinar platforms.
Fulfillment Services
ThriveCart integrates with various fulfillment services that are automatic. With this, your product fulfillment gets the ultimate flexibility. You can also fulfill your orders manually.
- Disk.com
- Kunaki
- Lulu
- Printful
- Shippo
- Shipstation
- Shopify
- Vervante
- Google Sheets
Product – Creation, Setup, and Checkout
Another great feature of ThriveCarts is that it allows you to sell/market both physical and digital products. What makes it one of the top-rated shopping cart tools is the ease with which one can create a product page with it.
In this part, I will give a step-by-step tutorial on creating a new product, setting up the payments for it, and the final checkout page.
Let’s dive into it!
Creating the Product
Inside the dashboard, go to the ‘Products’ option from the top menu.

Next click on ‘Create Product.’

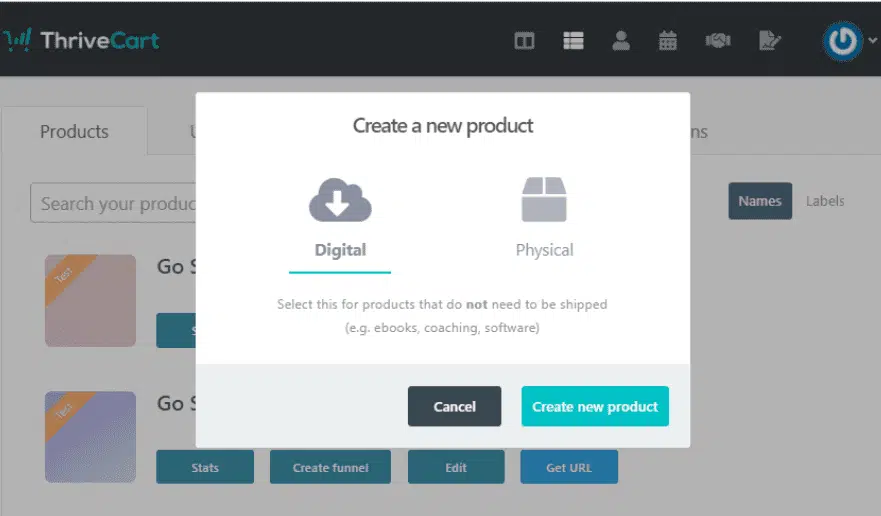
You’ll see a pop-up appear, and from there, you can select from either type of product you want to create, and then click on “Create New Product.”
The next thing that shows up on your screen are four options:
Naming the Product
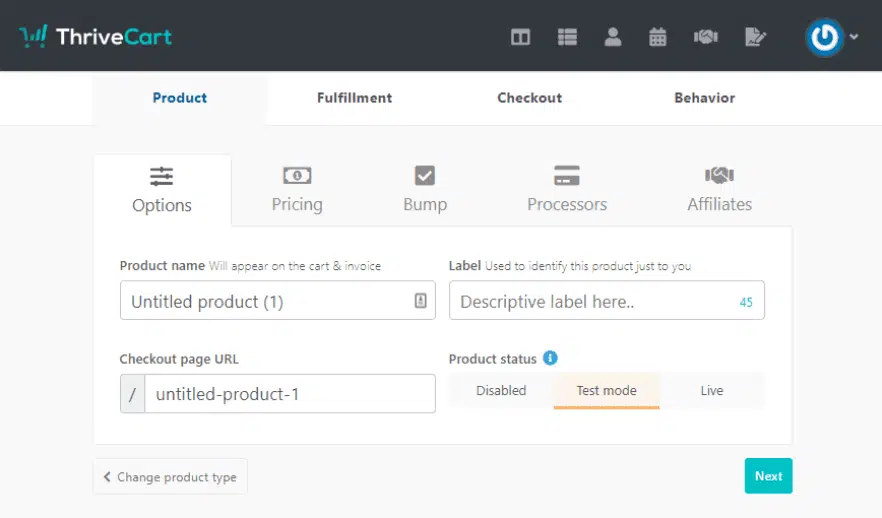
As you can see from the above image, under the product options, we have five tabs. In the ‘Options’ tab, you can:
- Add the product name
- Label the product.
- Give your checkout page URL
- Give the status of your product (Disabled, Test mode, or Live)
Product Pricing
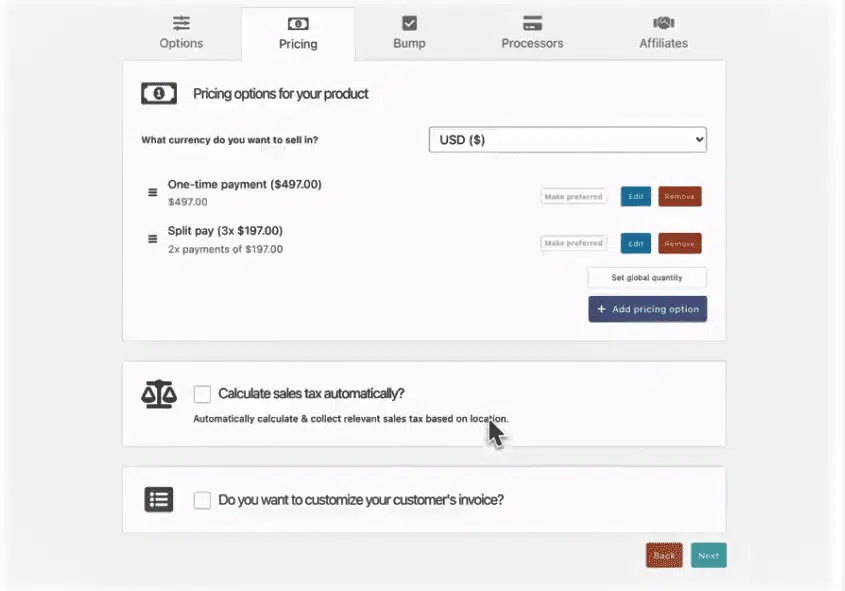
Next, we have the ‘Pricing’ tab.
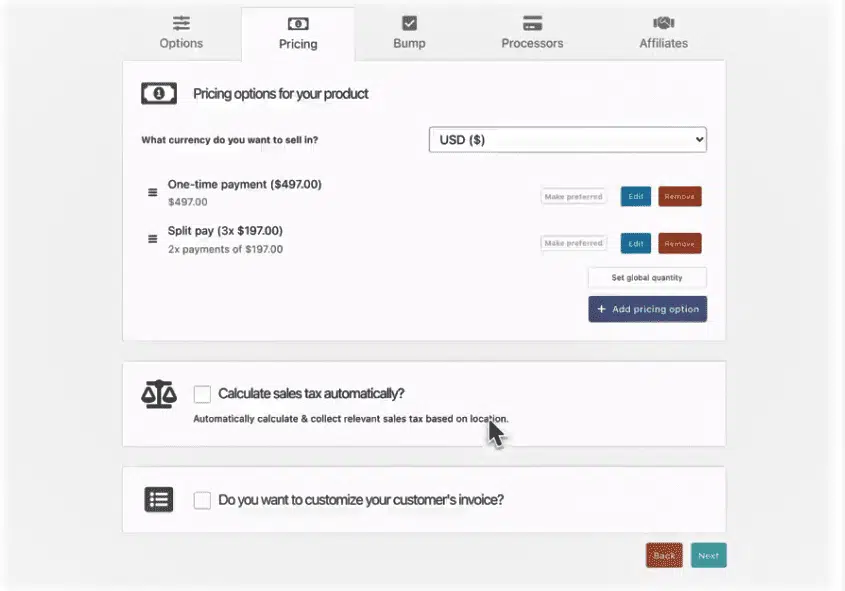
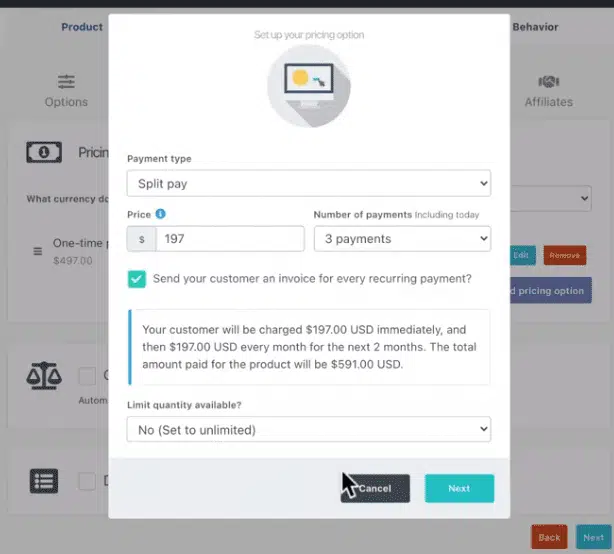
You can set your preferred pricing option as well.
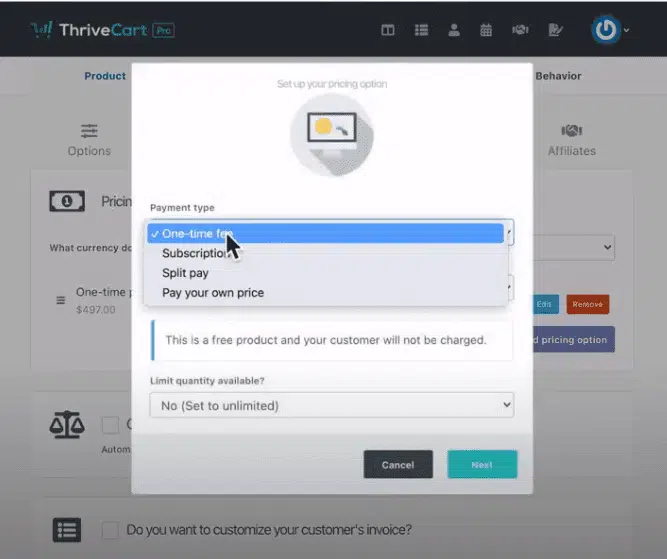
In the case of split payments, you can choose the number of payments you want. Your customer also gets an invoice for every recurring payment if you want them to.
The other noteworthy ThriveCart feature is an in-built tax calculator that automatically calculates the sales tax at the time of checkout.
Bump Offer
You can set up a bump offer on the product.
Payment Processor
Next, you have to set the payment processor for the product.
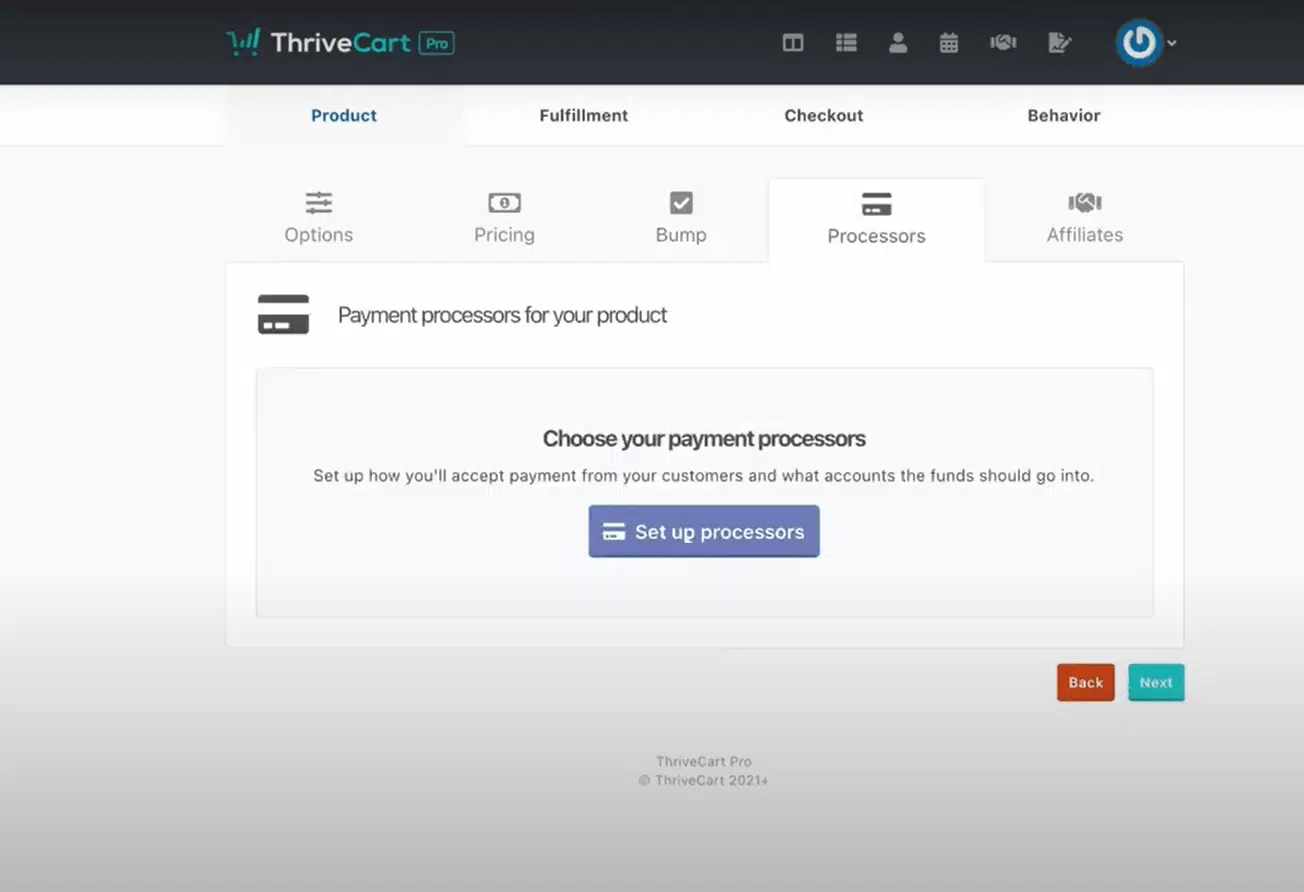
You can choose from Stripe, Authorize.net, or PayPal. Through Stripe integration, you can also accept payments via Google Pay and Apple Pay.
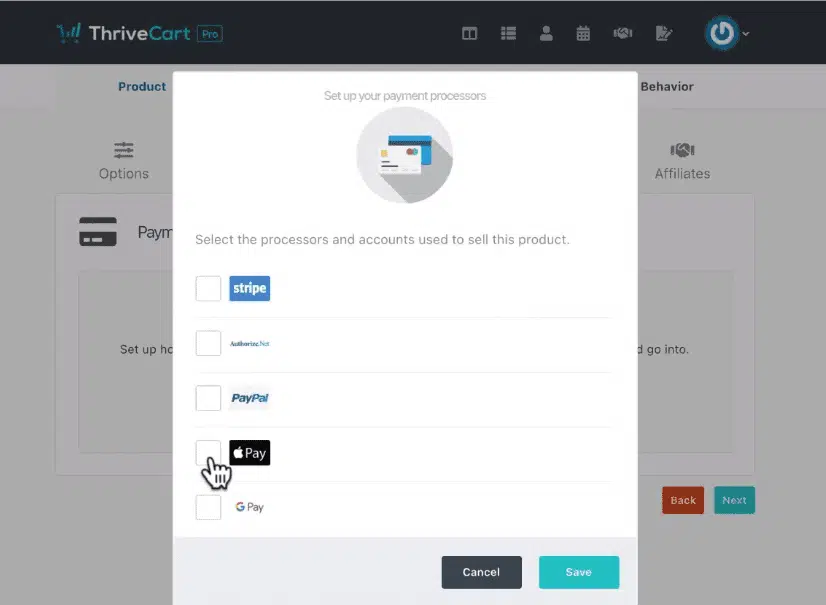
Once you have set up the payment processors, you can move on to the Affiliates.
Affiliates
With ThriveCart, you can set affiliate programs for your product.
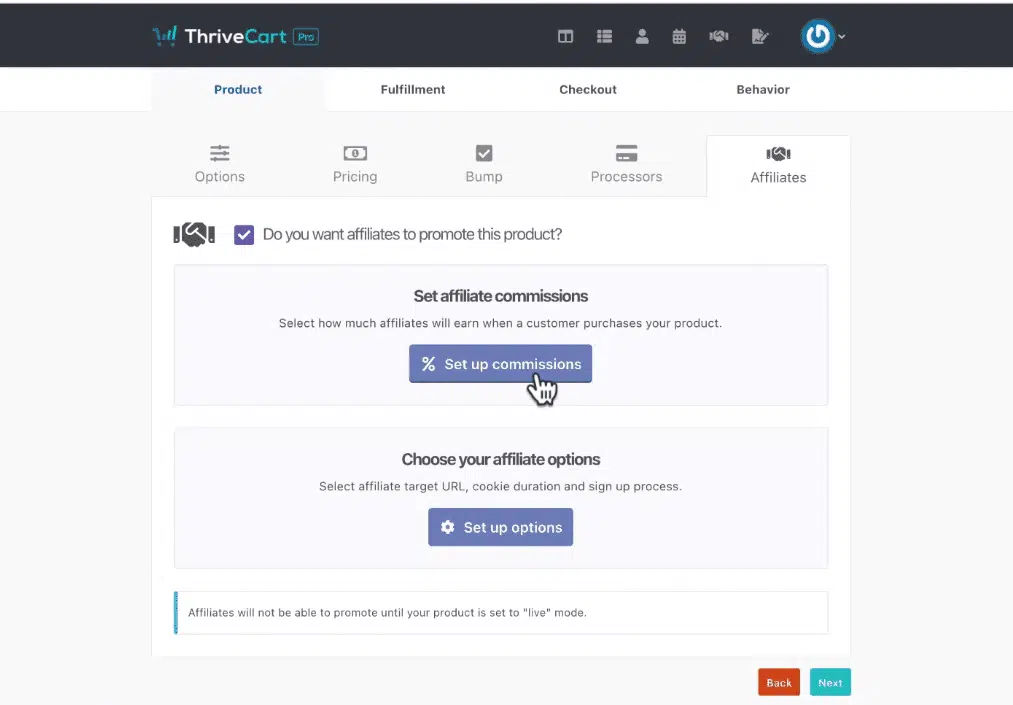
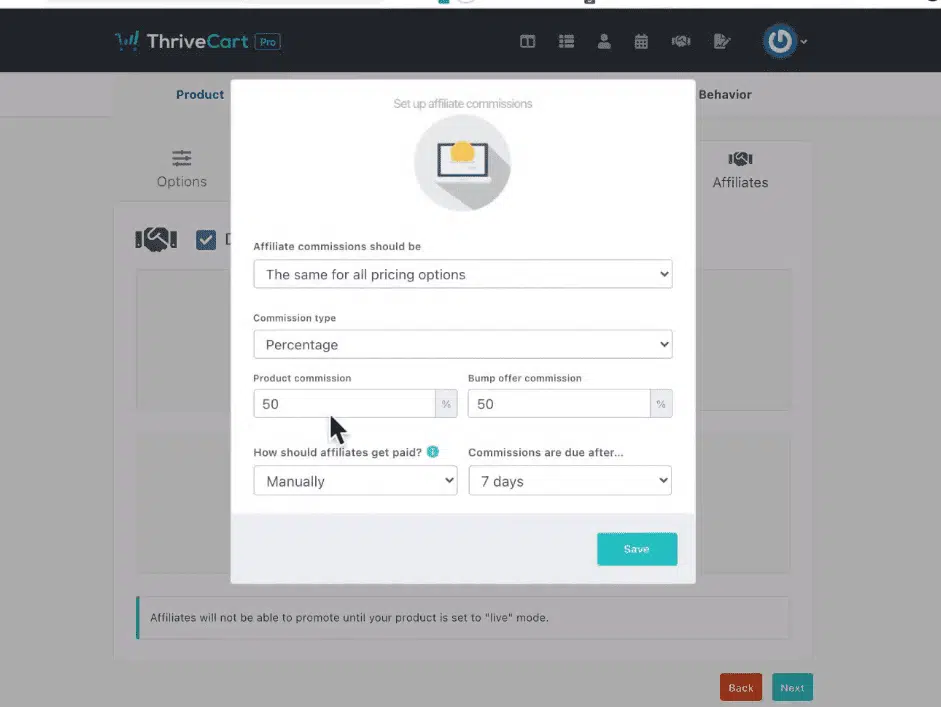
You can choose a commission type — percentage or fixed fee. You can set what percentage or the fixed amount of commission your affiliates should receive.
Fulfillment
Next comes the Fulfilment tab. This is where your cart integrates to a support page. It is necessary to add a support system to your cart before you sell anything.
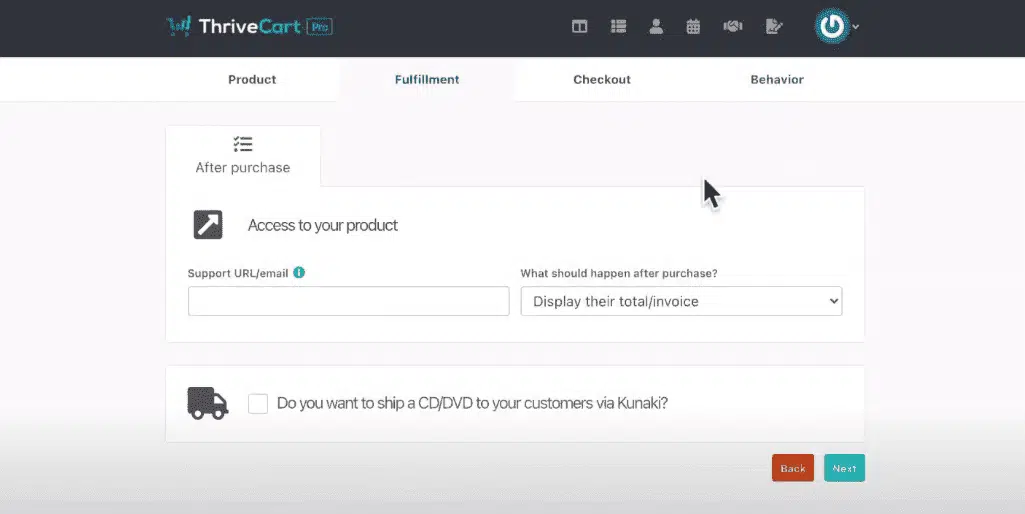
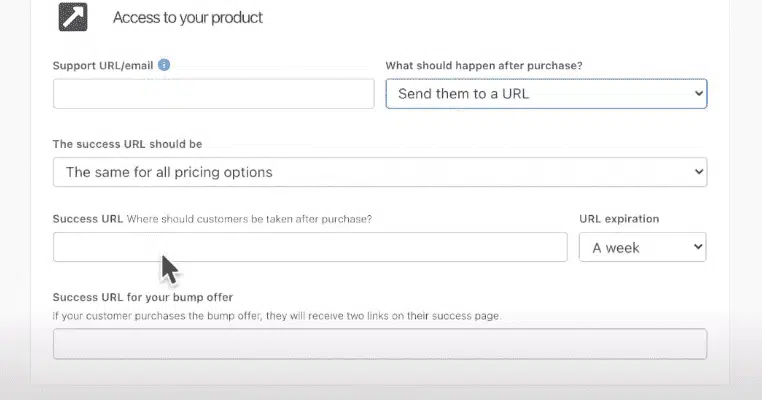
Decide what happens after someone purchases your product. You can just “Display their invoice.”

You can choose ‘Send them to URL,’ and you’ll see the following page:
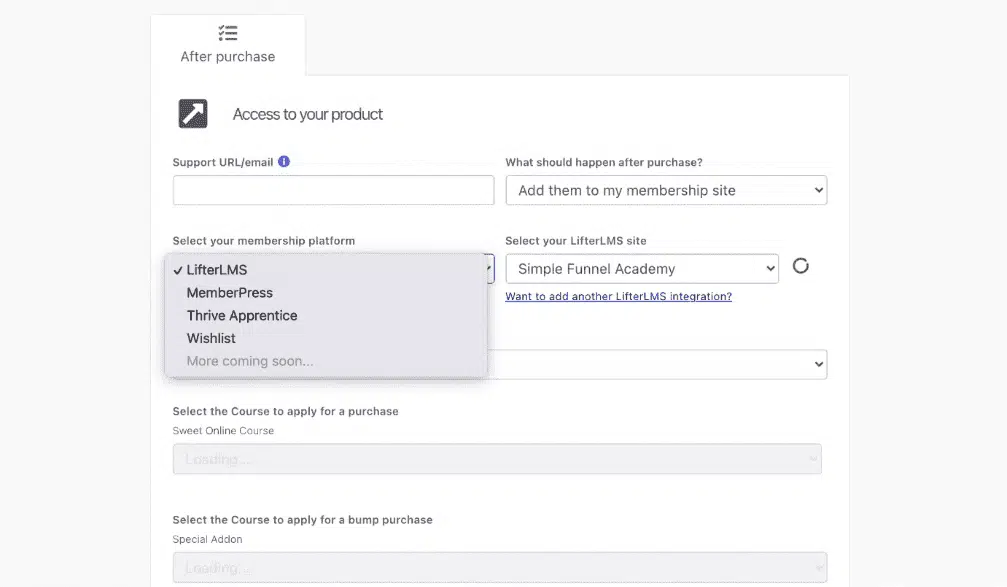
Choosing ‘Add them to my membership site’ sends you to this page. You can select from your list of membership platforms.
Clicking on the “Next” button brings you to the checkout page.
Checkout Page
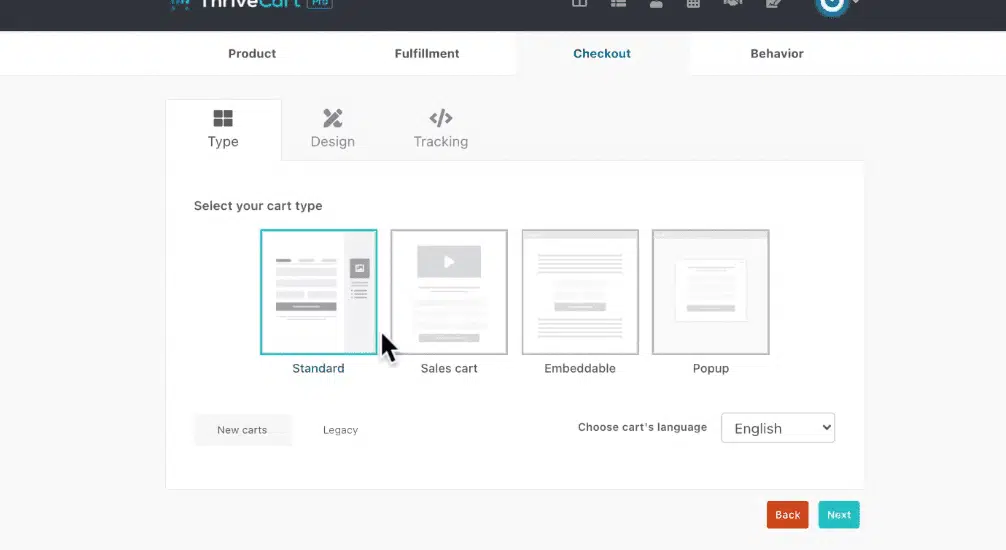
Type
You can choose from the following four template options:
- With the ‘Standard’ option, the checkout area is divided into two sections: the main content, and the sidebar. You can change the content for both sections. This is the area that ThriveCart uses as a checkout page.
- With the “Sales Cart” option, you can design your own checkout page.
- The embeddable option allows you to embed the shopping cart on your website.
- The “Pop-up” checkout page just pops out from the website.
Design
This tab works with the sales cart, and you use it to design your cart.
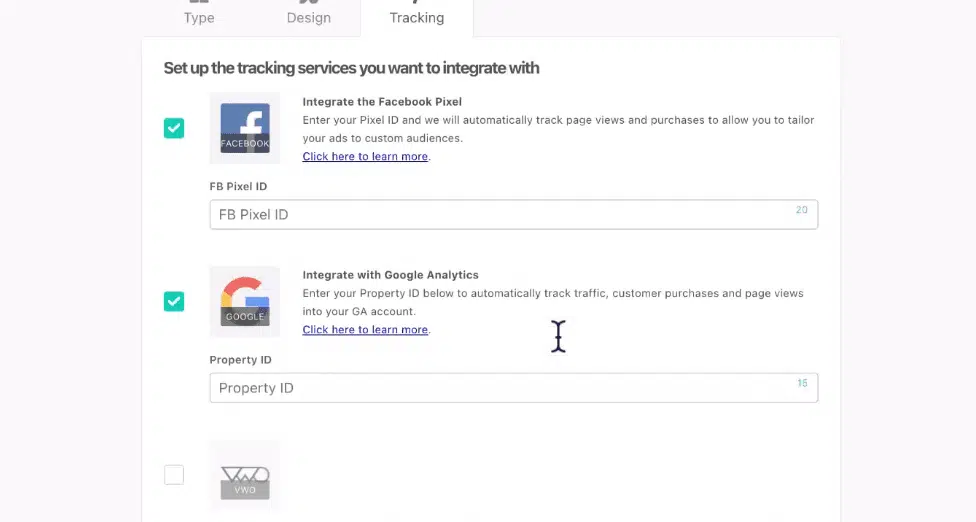
Tracking
You can choose from several tracking services you want to integrate with.
Behavior
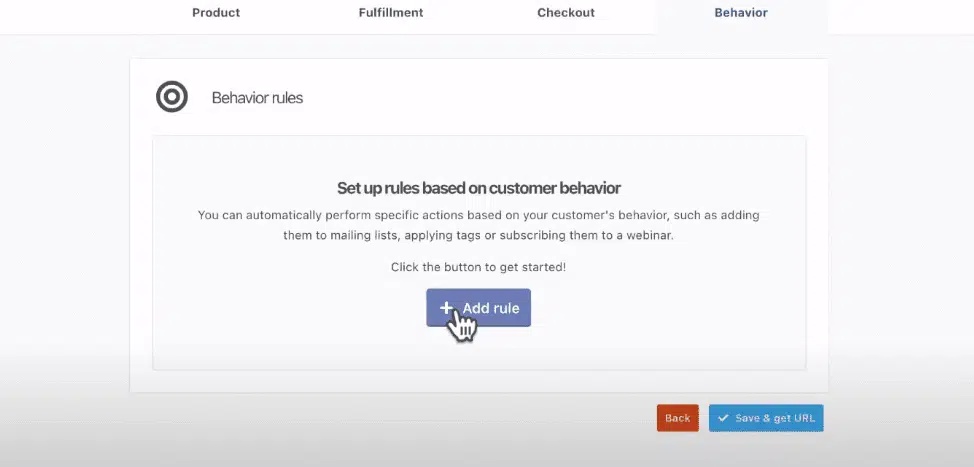
The final stage of this product-creating process is to set a rule that will create a trigger, and action will be taken, depending on a customer’s behavior. You can set up a custom email if a customer abandons their cart or if their payment is declined.
You need to click on “Add Rule” first.
A pop-up will appear. You have many choices, as shown in the below image:
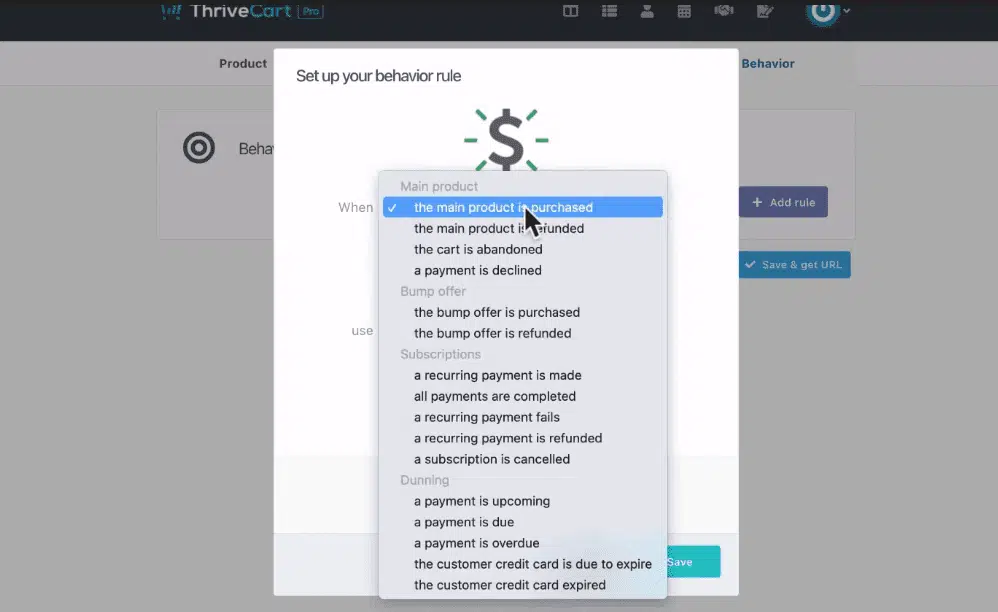
After that, you need to hit the “Save & get URL” button, which will save your product. With this, you have successfully created your product and the checkout page.
Upsell Creation
While discussing upselling and downsell, I mentioned that you can use this feature after creating the product. Once you have created the product, go to ‘Products’ on the top menu.
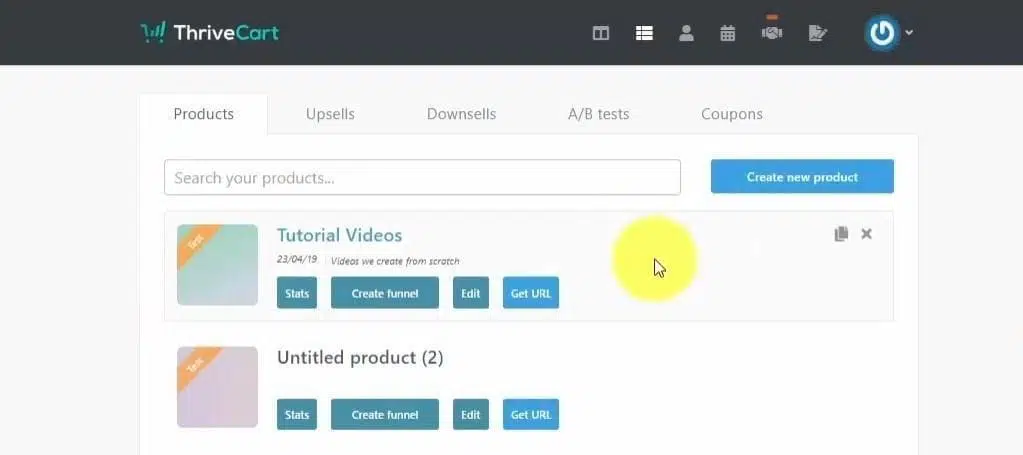
Clicking on ‘Upsells’ will open a new box, ‘Create a new upsell’. Here, you can choose if you want to upsell a digital product or a physical one.
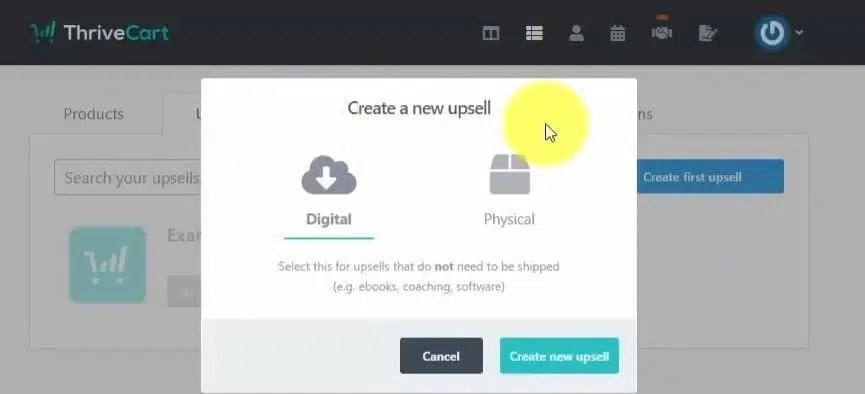
Now we will look into Upsell settings.
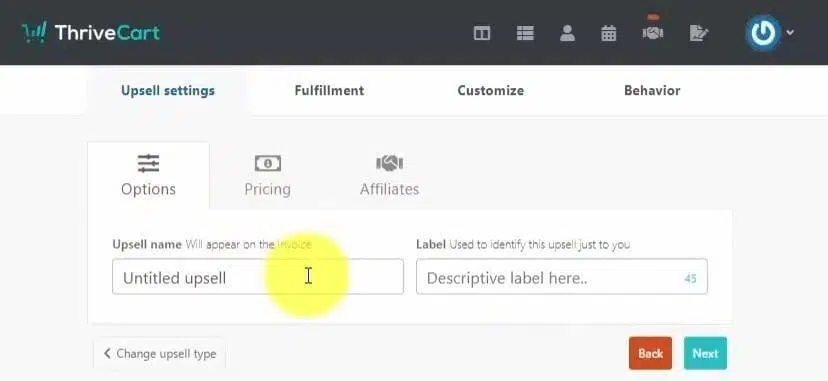
Options
Fill in the ‘Upsell name’ and ‘Label’ and proceed to the next page.
Pricing
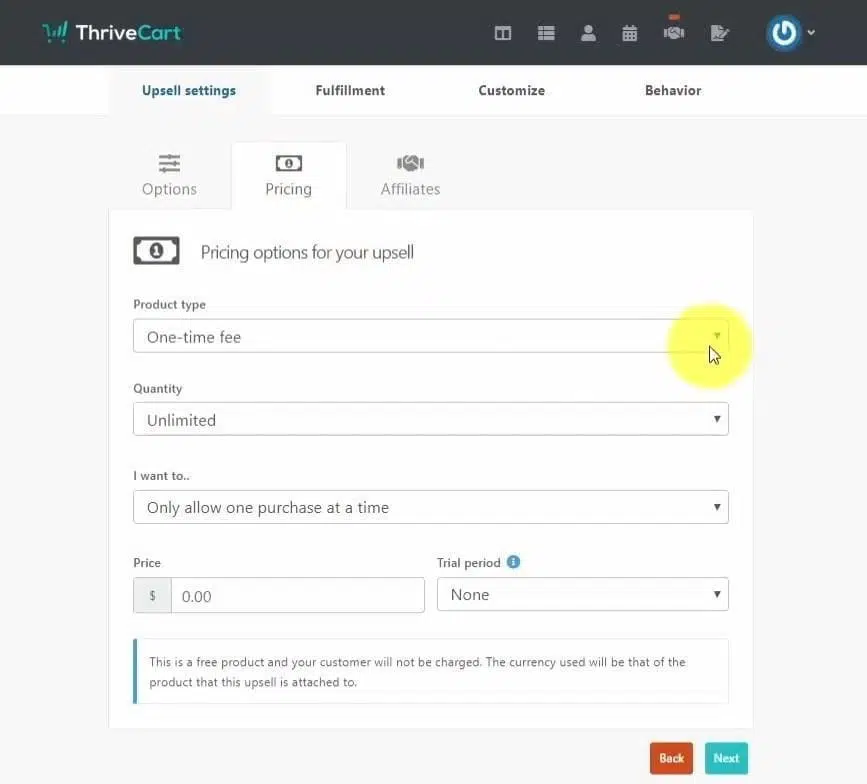
Here you can select the product type, quantity, and payment type such as onetime payment, recurring, etc.
Affiliates
Here, you can edit the percentage of commission you want to pay to your affiliates.
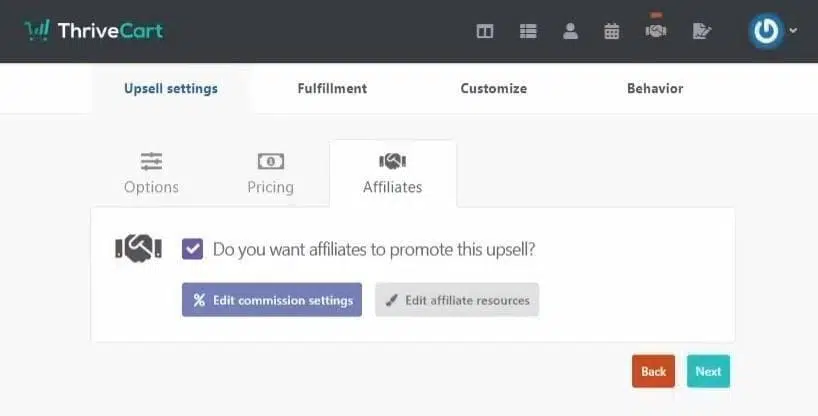
There is nothing much for the affiliate part, so we will skip to the ‘Customize’ part.
Customize Upsell Page
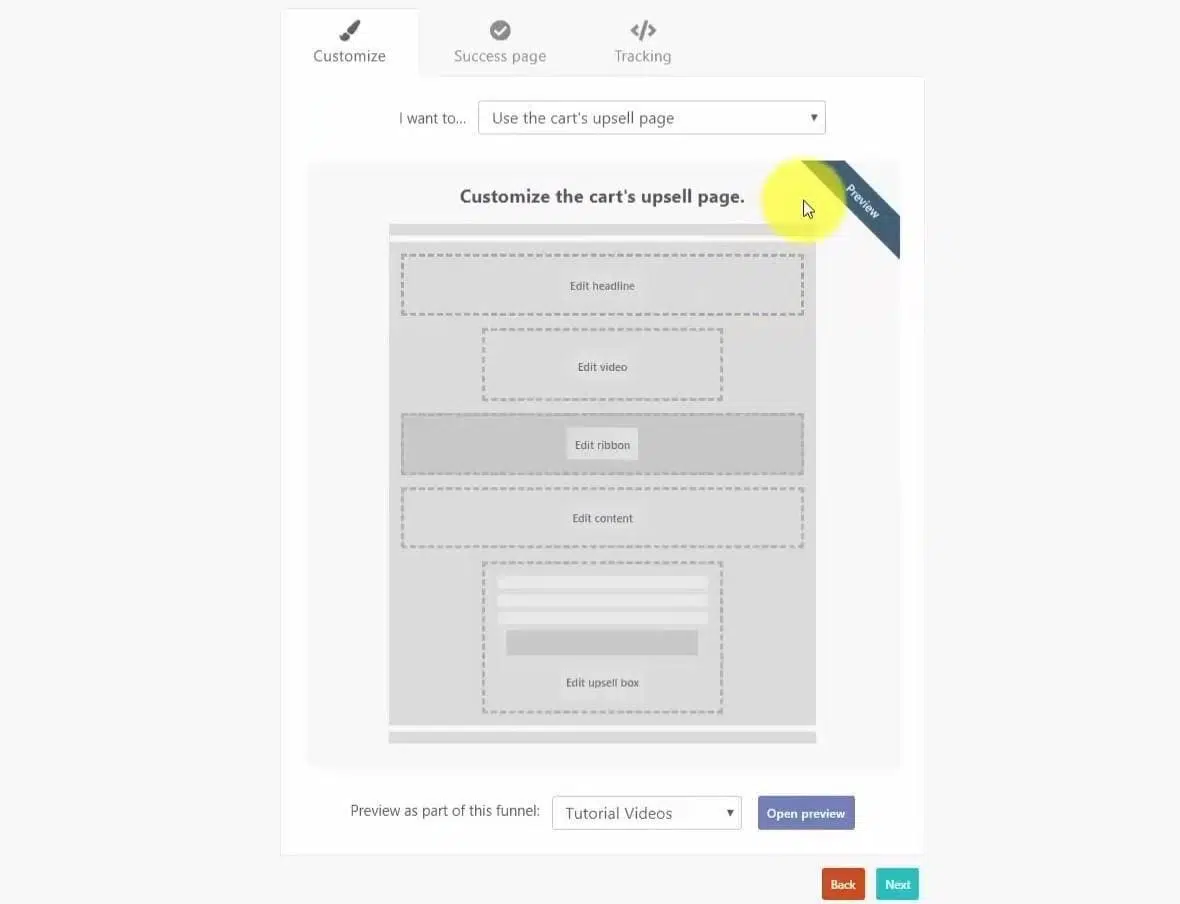
You can either use ThriveCart’s upsell page, or you can customize your own. There you can change the content that will appear on the upsell page.
Success
Here you can write the fill-in text that will appear as a message once someone successfully purchases your product.
Tracking
You may choose whether to track the offer page or not.
Behavior
You can add a behavior rule for when the upsell is purchased or not, and save it. Finally, click on ‘Save my upsell,’ and the page will be saved.
You can use this upsell page in the sales funnel of any product.
Customizing Checkout Page
After selecting ‘Sales Cart’ as your cart type, go to ‘Design’ and then click ‘Launch editor’.
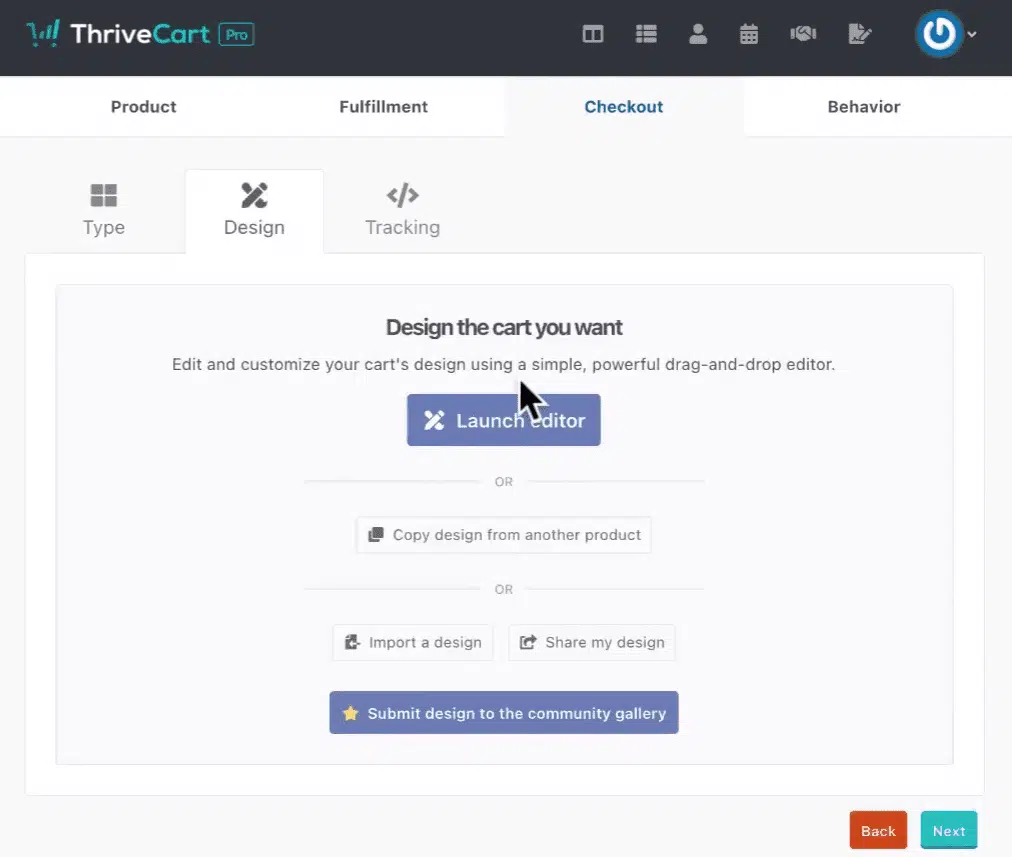
That brings us to this page:
You can see a lot of options. On the left side, you have page options, and under that, you have a slider to change the sidebar position. Then there is sidebar color and main area color, and you can use it to change the color of the sidebar and main bar respectively.
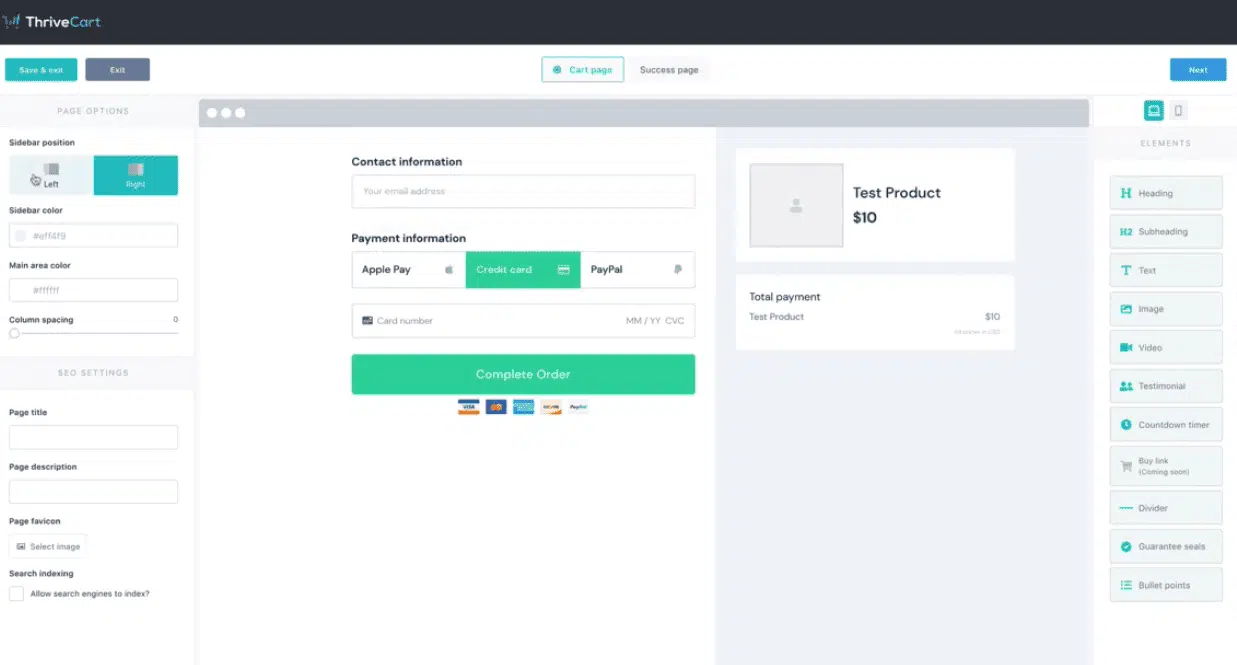
Next is the SEO setting. Under that, you have the page title, indexing, and favicon, and search indexing. This allows the page to pop up in the search results.
The right side has elements, and all you have to do is just drag them wherever you want them to be. So you have the heading, subheading, and that’s pretty much self-explanatory. You can choose from an image or video to be displayed on the page.
You can choose to add testimonials from your users You have a countdown that you can use to add some urgency for the user to take an action. Adding the ‘buy link’ takes the buyer directly to the checkout portion when they click on it.
You can see the mobile view of the cart page, after clicking on the mobile icon at the upper right corner.
Once you are done, click on ‘Next’, and you’ll be taken to the ‘Tracking’ tab.
ThriveCart Pricing Plan
It’s its price point that makes ThriveCart the unique and cost-efficient tool out there in the market. It offers you lifetime access, and you just have to pay once and never have to pay for it again!
While similar tools like SamCart charge a fee of 49 USD per month for the most basic plan, ThriveCart charges a one-time fee of 495 USD for the standard plan.
There is also a ThriveCart Pro account for which you just have to pay an additional amount of 195 USD. The Pro account includes some powerful features:
- Powerful Affiliate Center
- Subscription Saver Functionality (Dunning)
- Automatic Sales Tax Calculation
- Intelligent Business Projections
- JV Contracts
- Advanced User Management
- Client Usage Rights
- Custom domain name functionality
Both offers are available for a limited period. ThriveCart will soon move over to a monthly recurring plan, i.e., you will have to pay a monthly fee, or if you pay yearly, you’ll get a slight discount.
With the limited-time offer, you don’t ever have to worry about shelling out extra money for any future upgrades or features. No monthly or yearly fees. No extra charges per transaction.
ThriveCart also comes with a “pay for itself” guarantee. If you are not satisfied with the results, the ThriveCart team will work with you for free until you get the results. If that doesn’t work, your amount will be refunded within the first 30 days.695 USD for a checkout page might seem too much, but it’s worth it. It’s like a one-time investment — pay once and use it for a lifetime.
Doesn’t that sound great?
So if you want to access the tool along with all its premium features, you must act on it now, before the special offer period ends!
Who is ThriveCart for?
ThriveCart is best suited for people selling digital products. It is good for you if you:
- Are into consulting or coaching businesses
- Are a digital entrepreneur
- Own a membership site and sell subscriptions
- Sell information products like e-books, online courses, audiobooks, etc.
As of now, ThriveCart isn’t really flexible when it comes to selling physical products, especially if they have a lot of variations.
Take the example of a physical book. A book comes in one variant, no multiple sizes or colors to choose from. You can sell that kind of product. If you are into selling a range of products, you should opt for shopping carts like GrooveKart, Shopify, or WooCommerce. Don’t worry, though.
ThriveCart is working on it, and you might be able to use it to sell your physical products more freely in the near future.
Conclusion – ThriveCart Review
We have reached the final part of this ThriveCart review.
ThriveCart is definitely one of the best shopping cart tools on the market. The Pro version is packed with all the necessary features to increase sales. It is cheaper than any of its competitors as it comes at only 695 USD (including the Pro version) as a lifetime fee.
As I mentioned before, all this is available only for a limited time. ThriveCart plans to move to a monthly payment plan very soon, and though it is not yet confirmed, it might go as much as 95 USD per month. I am sure you wouldn’t like to miss out on that offer.
Check the tools out yourselves, and I am sure you won’t regret it.
I hope this ThriveCart review was useful to you.Have you used ThriveCart? Did you like it or dislike it? Please share your experience with using ThriveCart through the comments section.

