
Installing Google Analytics is the first task you should do after launching your WordPress blog. Google Analytics provides you with your audience’s data. You will know their behavior, which is crucial for your website’s growth.
Using Google Analytics is free; installation is an effortless and one-time activity if you do it correctly. Doing it the wrong way will make your life difficult. Many bloggers use the complicated method to install Google Analytics and recommend the same process.
In this blog post, I will show you how to install Google Analytics on your WordPress blog, even without a prior Google Analytics account. No lengthy process and no copying of any code; just a few clicks and you are done.
Before we discuss the Google Analytics installation process, let me explain what it is and its importance.
What is Google Analytics?
Traffic is a lifeline for your blog, and your goal is to bring traffic to your blog and convert them to subscribers or buyers.
Bringing traffic to your site is the first step. The next step for you is to find out their interaction, which page brings more traffic, how long they stay, etc.
So, how will you get this information?
Google Analytics provides you with all this information.
Google Analytics is a web analytics launched by Google in November 2005, and since then, it has been helping webmasters see their web traffic reports. It provides you with JavaScript code, and once you install it on your site, it will run on each page of your website, and you can track user activities on your sites.
This is a free service by Google.
Importance of Google Analytics
Business decisions are made based on objective data. Without data, you cannot see where you stand, you cannot measure your performance, and you cannot make decisions in a vacuum.
Google Analytics fills this vacuum and provides the information to help you see the results of your past actions and where you stand, and then you can take action for future growth.
Google Analytics provides you with a lot of information about your traffic, such as:
- Total traffic
- How did they come?
- Their behavior
- Their geography
- Etc.
This information helps you find what content is working and whatnot and create the content based on your users’ preferences. You will know from where your audience is coming, and so you can target that location through ads.
You can see which social media platform is sending you more traffic. This helps you tweak your social media campaign.
How to Install Google Analytics on Your WordPress Blog
It was challenging to install Google Analytics code on the WordPress blog at one time. Bloggers used to hire a developer to do the task. I spent hours trying to find the best way to do so.
However, these days installing Google Analytics on a WordPress blog is easy. After Google launched the Site Kit plugin, it is a matter of a few clicks, even if you don’t have a Google Analytics account.
I will discuss all the methods you can use to install the Google Analytics code on your WordPress blog, and you can select the best one.
How to Create Google Analytics Account
The first step to install the code is to have Google Analytics ready. (Please note that this step is not required if you use the Site Kit plugin. You only need to have a Google Account or Gmail ID.)Go to https://analytics.google.com/analytics/web/

Enter your Google credentials and click next. If you don’t have a Google account, you can create one. If you have a Gmail ID, you can use it to create a Google Analytics account.

You will see a welcome screen. Click on “Set up for free.”
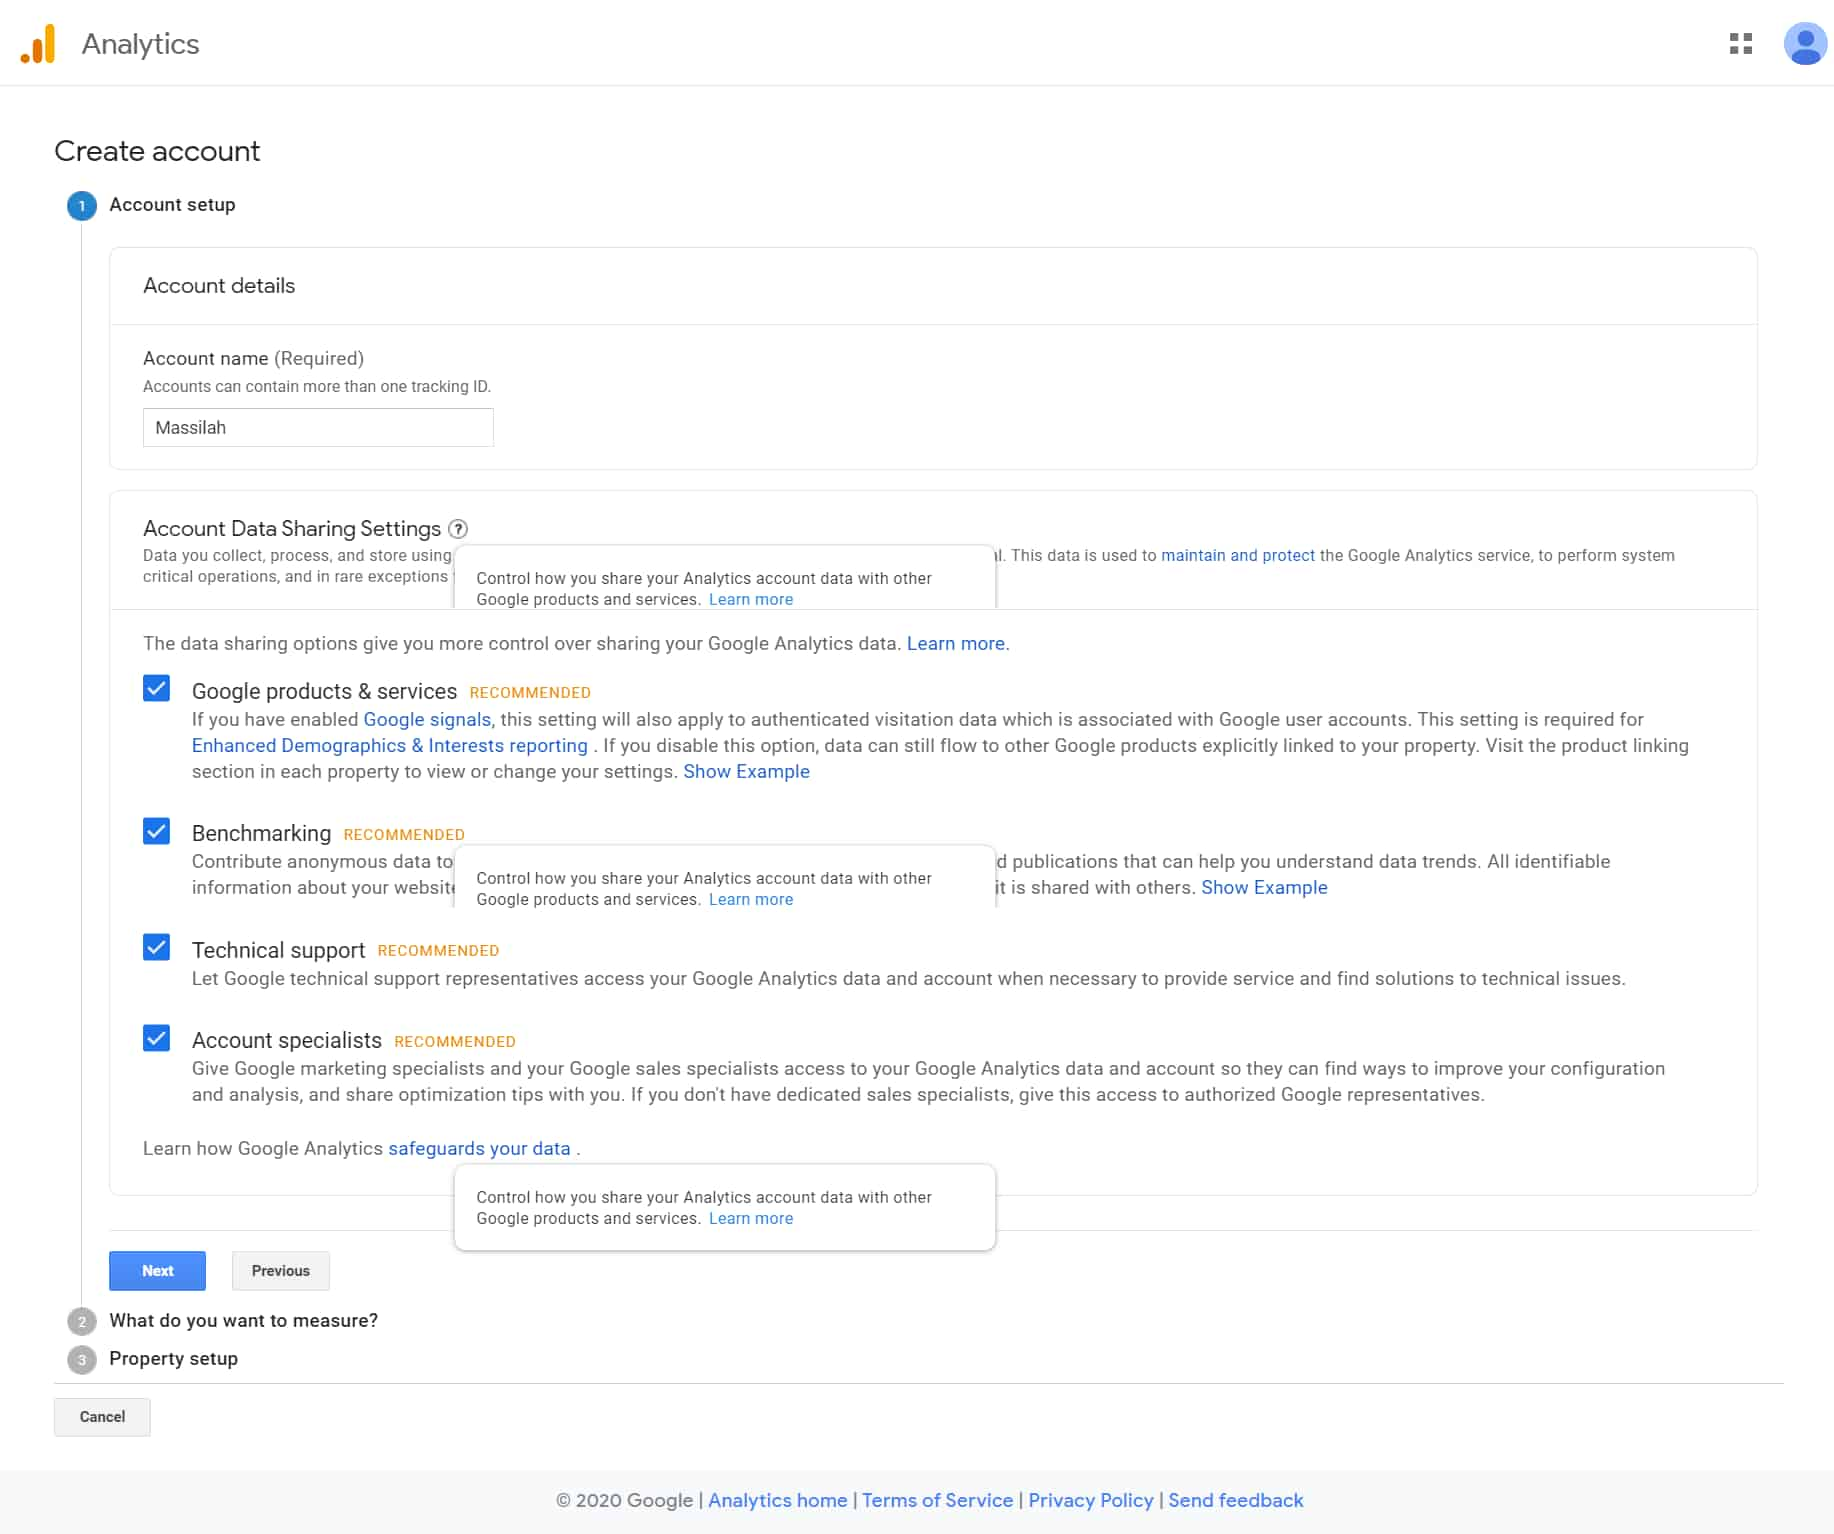
Here you can enter your account details, such as your account name. Fill it in and click Next.
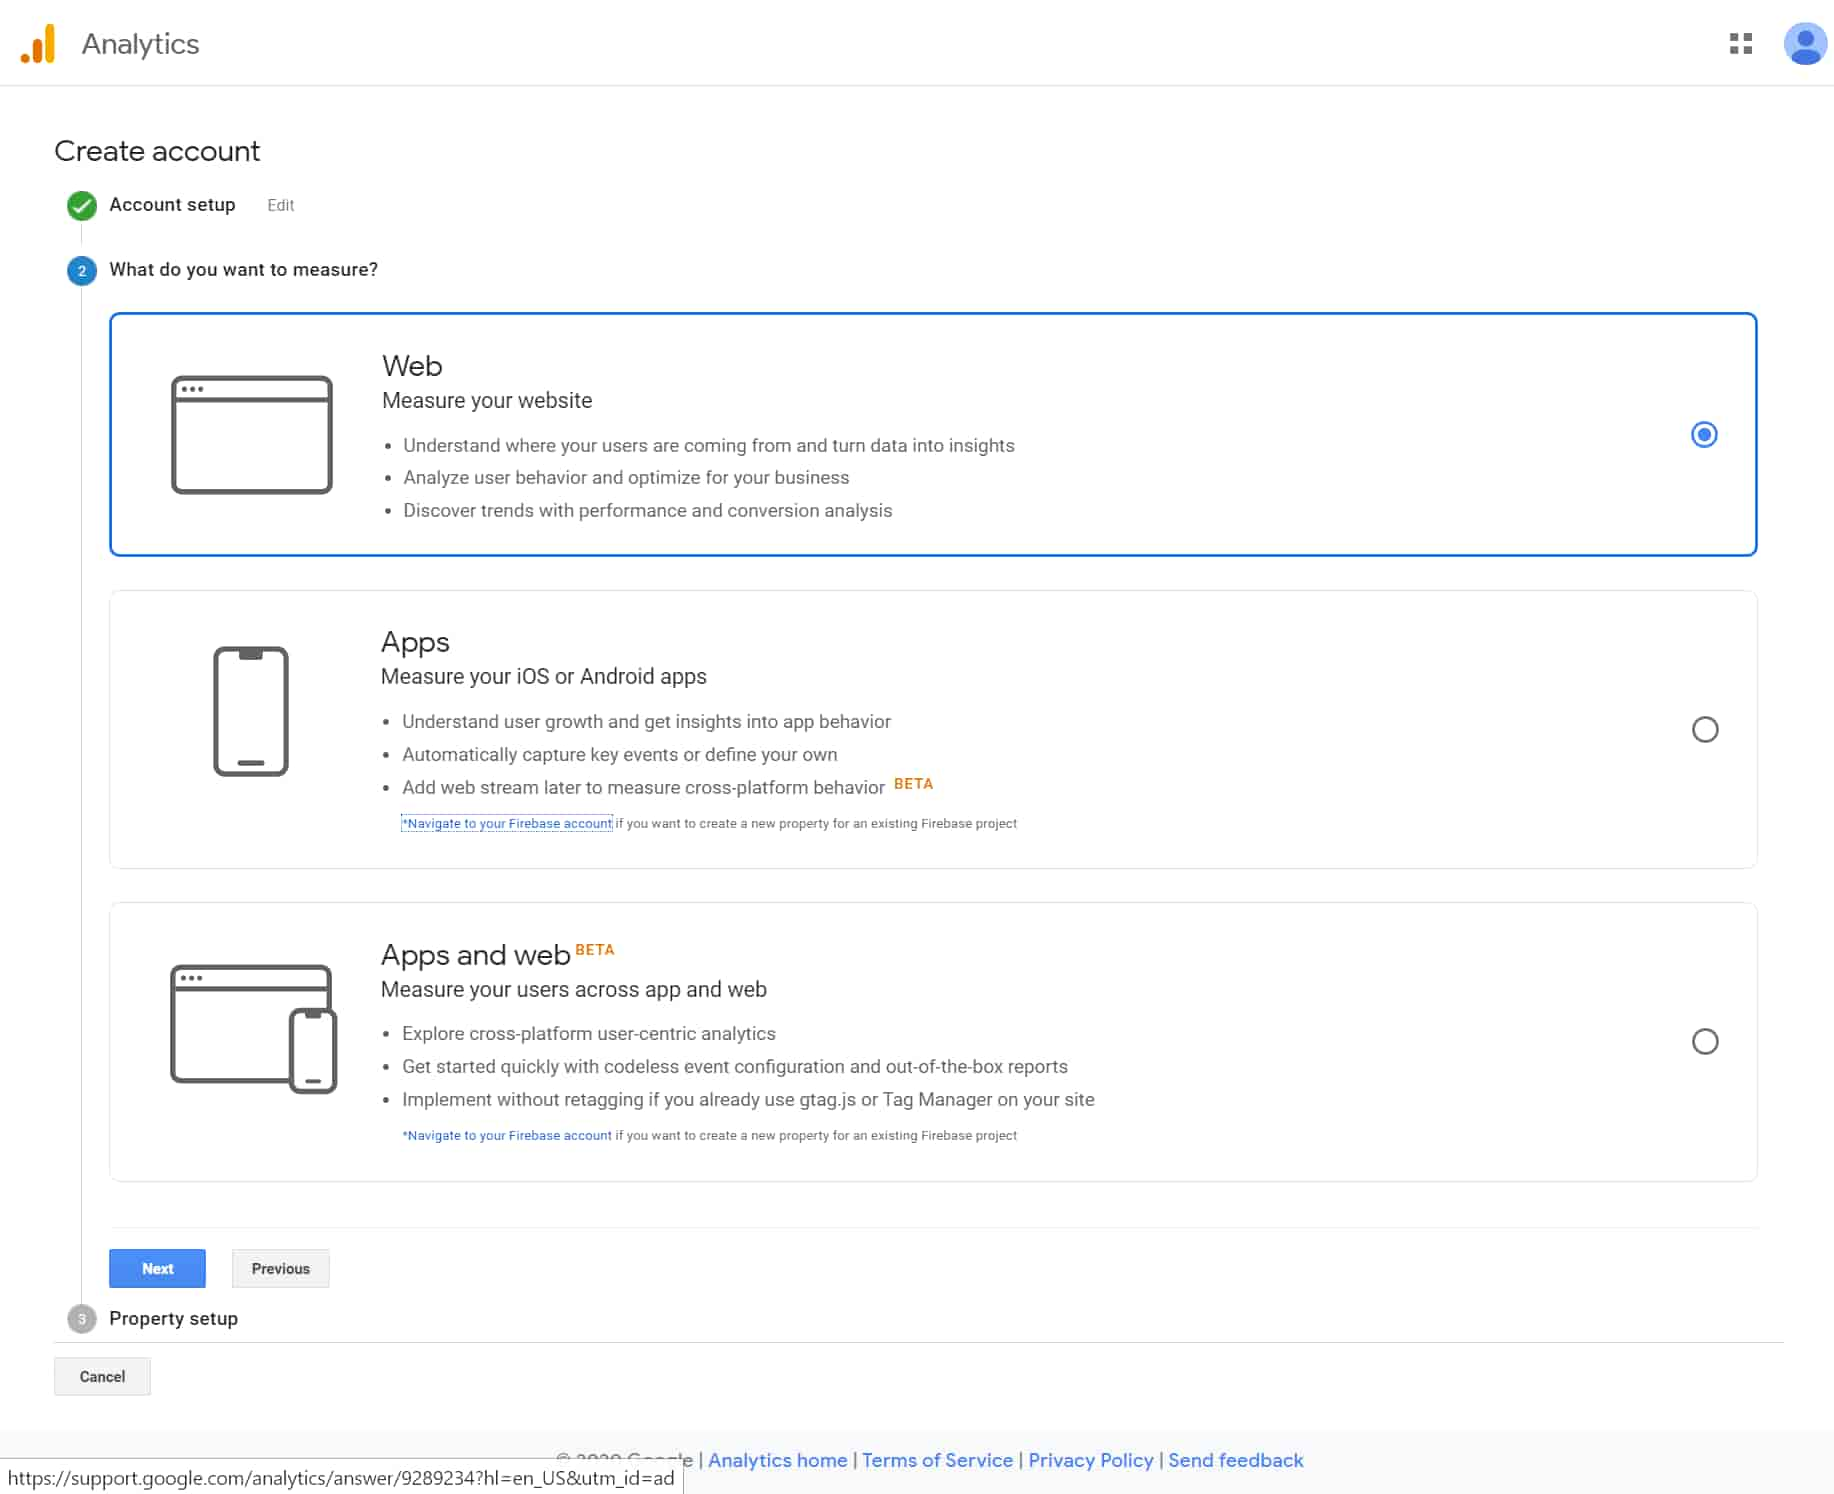
You can select whether to measure your website, app, or both. Since we are creating an account for a blog, select the first option, “Web.”
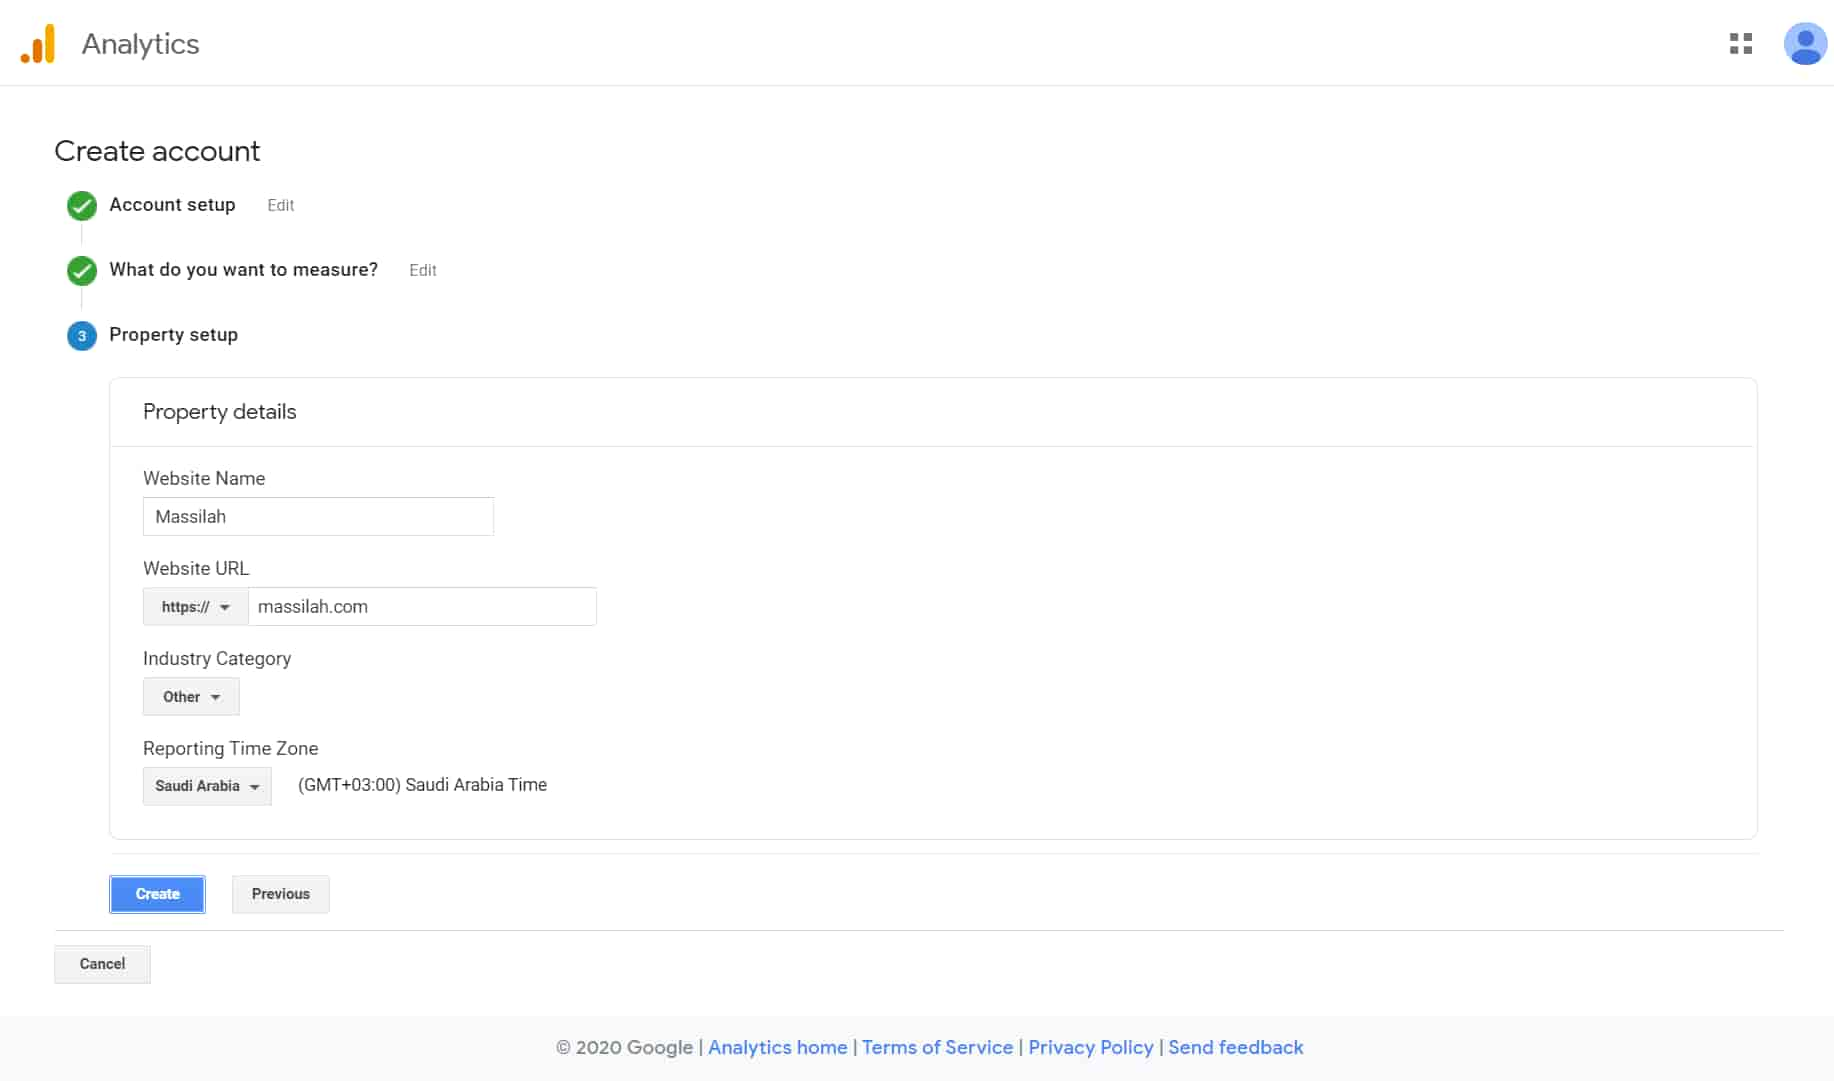
Enter your website name, URL (make sure it is https://), industry category, and time zone, and click “Create.”
Afterward, agree with the Google Terms and Conditions. Once you do that, your account is ready, and you will see your tracking code.
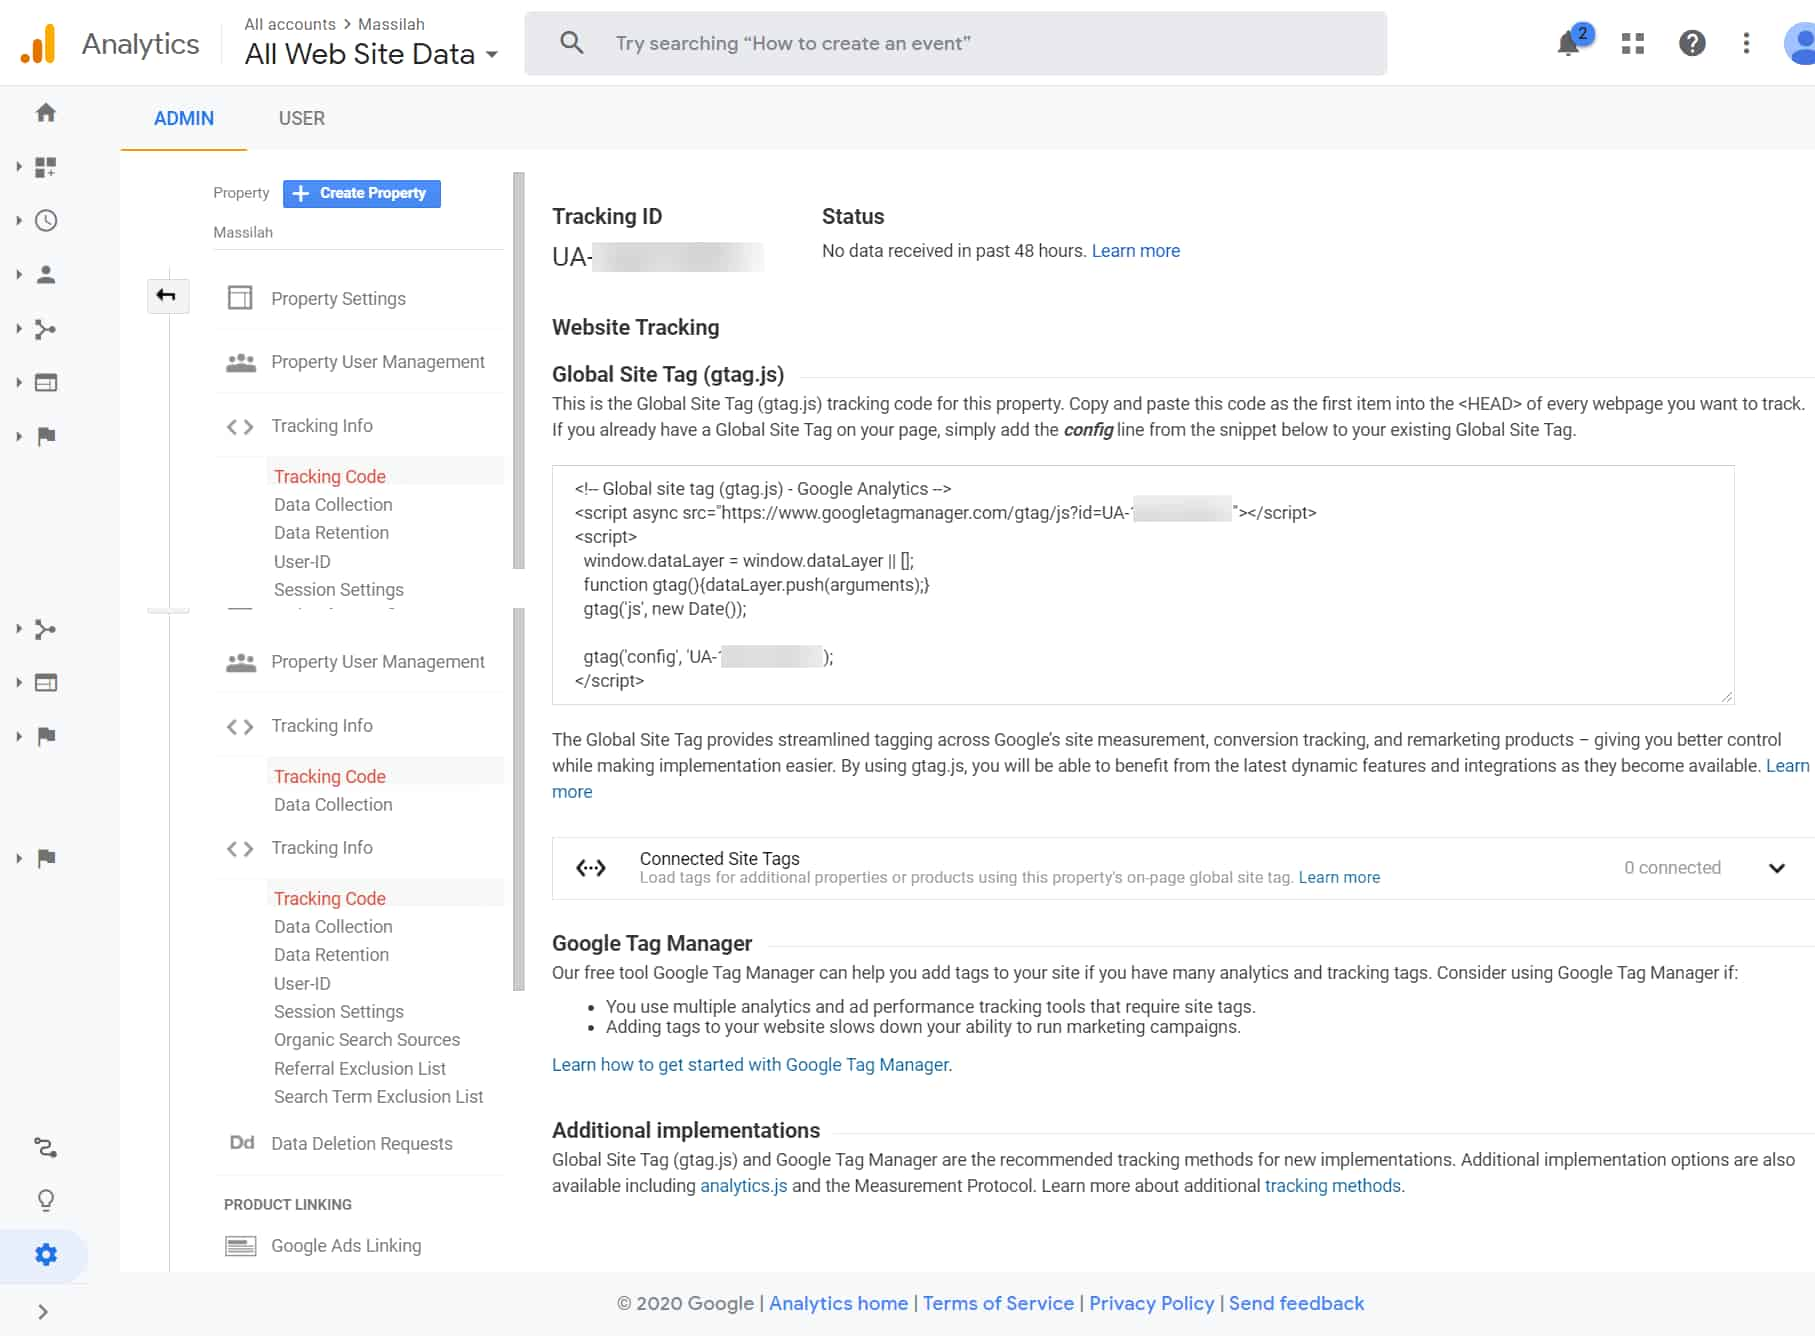
I suggest you copy this code and keep this window open.
The Google Analytics account is ready, and now we will discuss how you can install it on your WordPress site.
You have three methods to install Google Analytics on your site:
Using Google’s Site Kit Plugin
Site Kit is Google’s plugin to connect and view your traffic in your WordPress dashboard. They announced this plugin in WordCamp U.S. in 2018. The developer version was made available in June 2019, and in the first quarter of 2020, it came out for all users. Currently, it has over 300,000 active installations.
Installing Site Kit is easy.
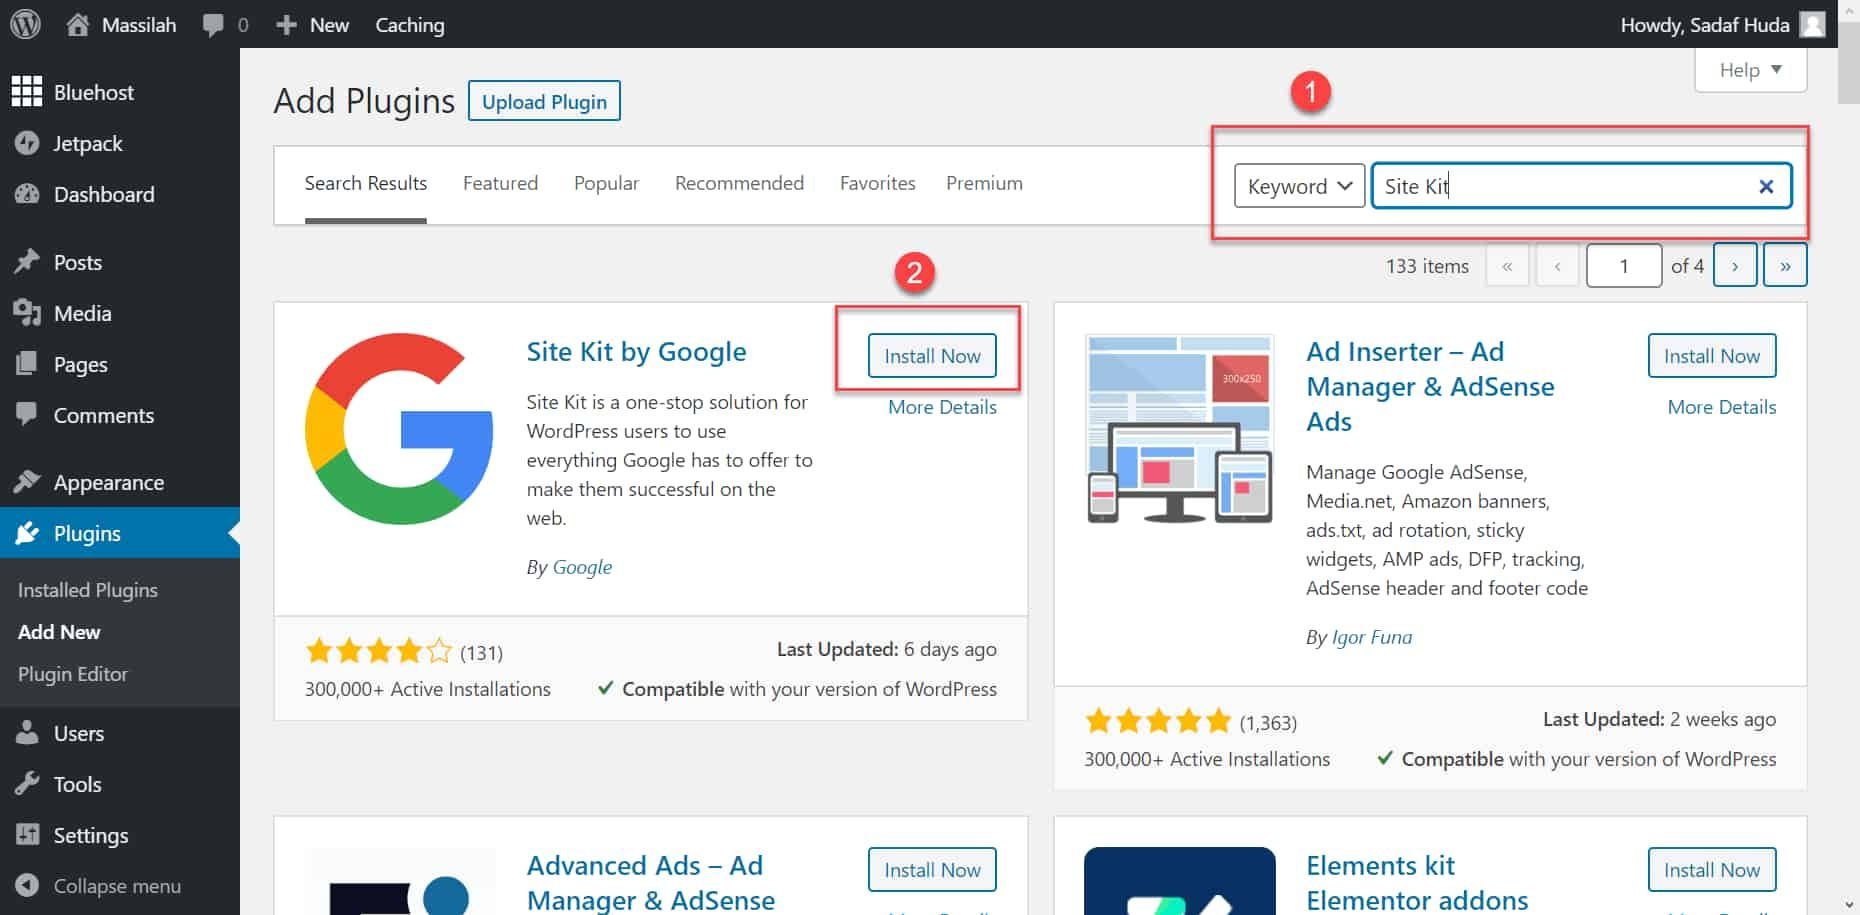
Go to your W.P. Admin Dashboard, click on Plugin → “Add New.”
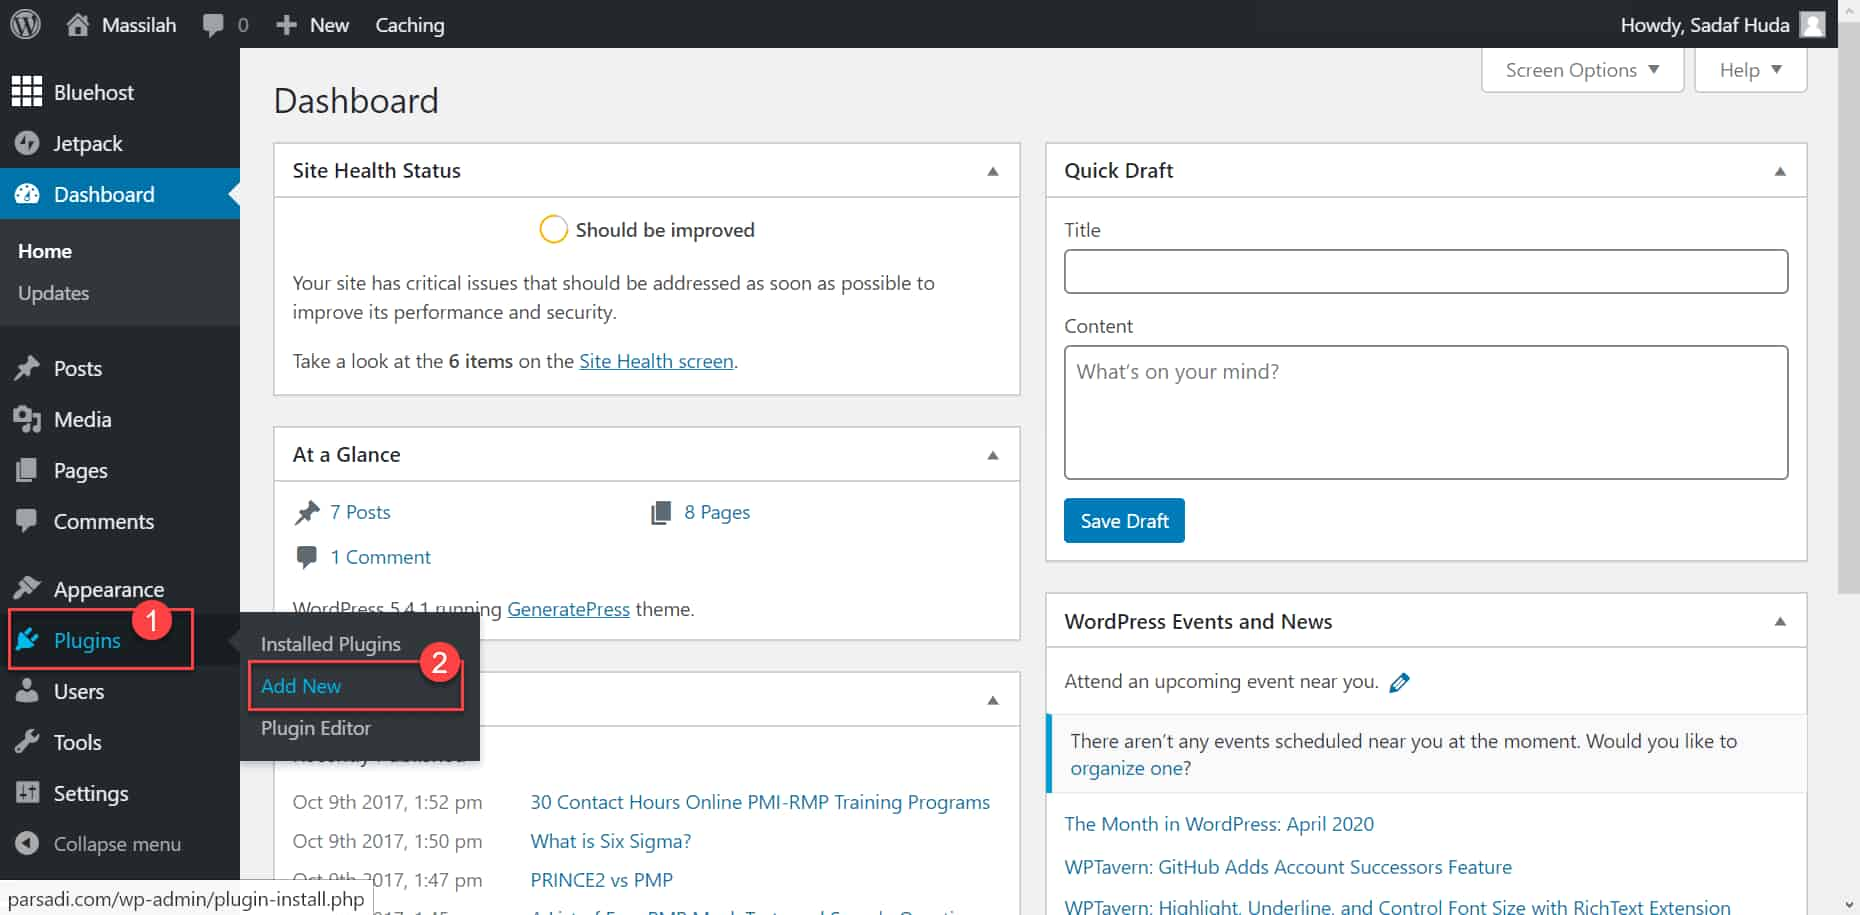
In the search bar, enter Site Kit. Site Kit will show up; install and activate it.
After you activate it, you will see a setup button. Click on it.
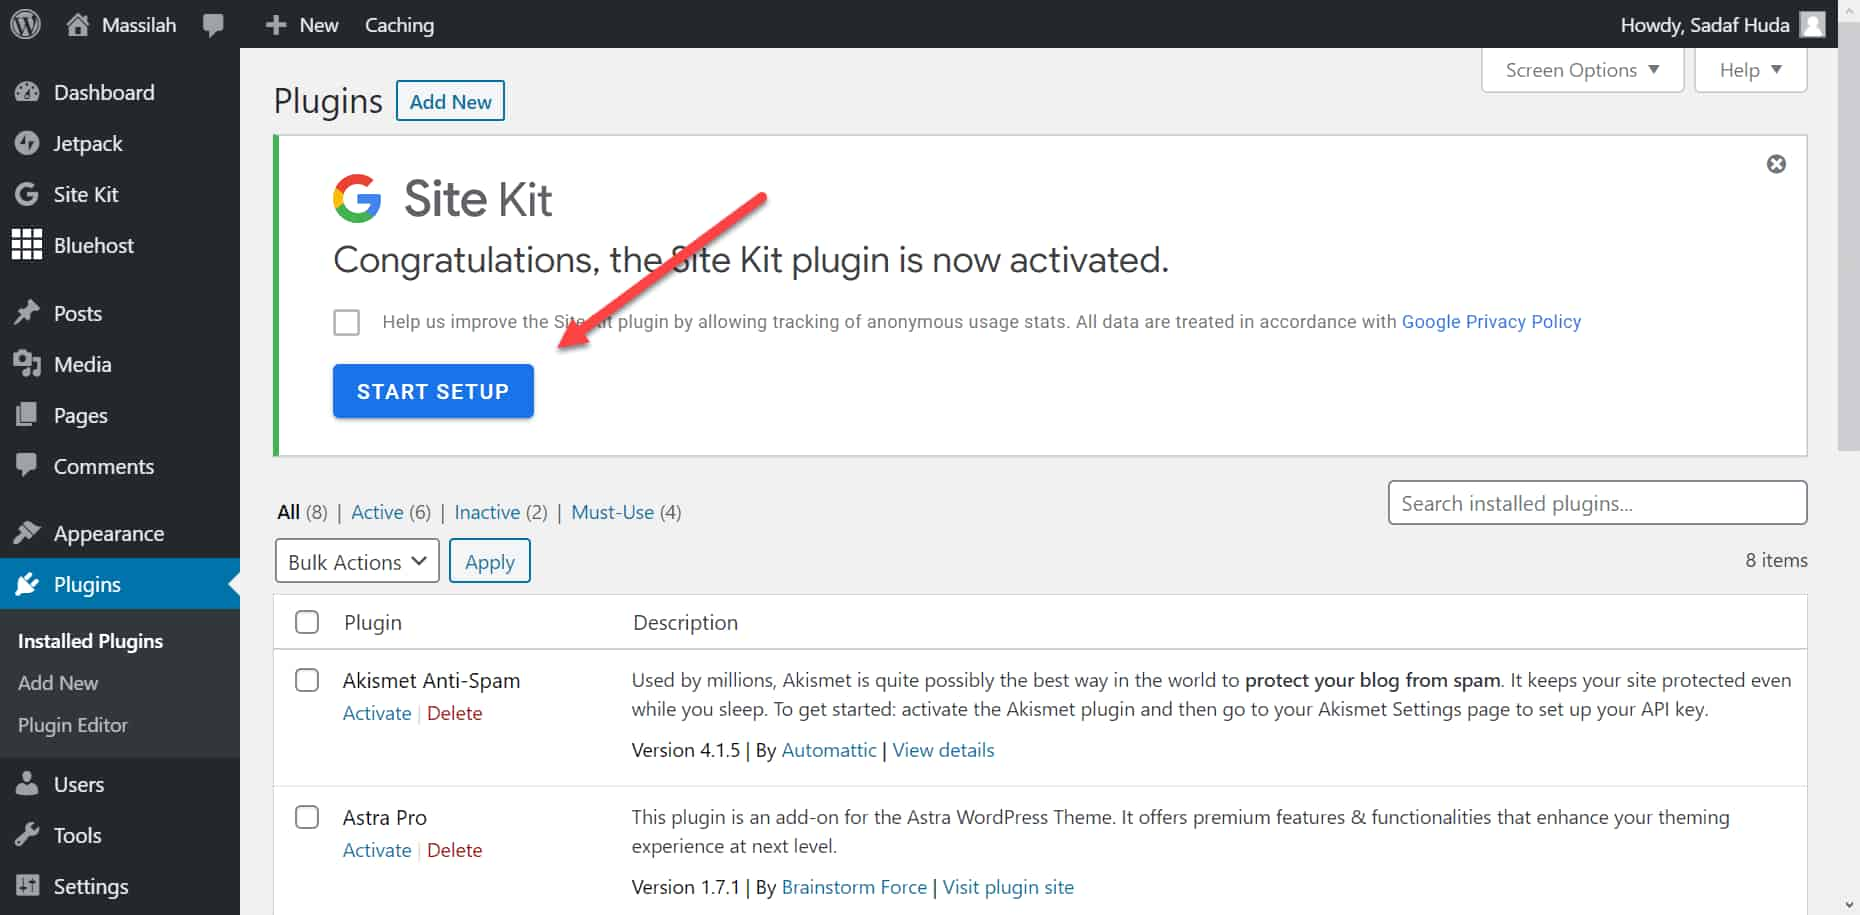
Your setup will start, and you will see the following page in a new tab.
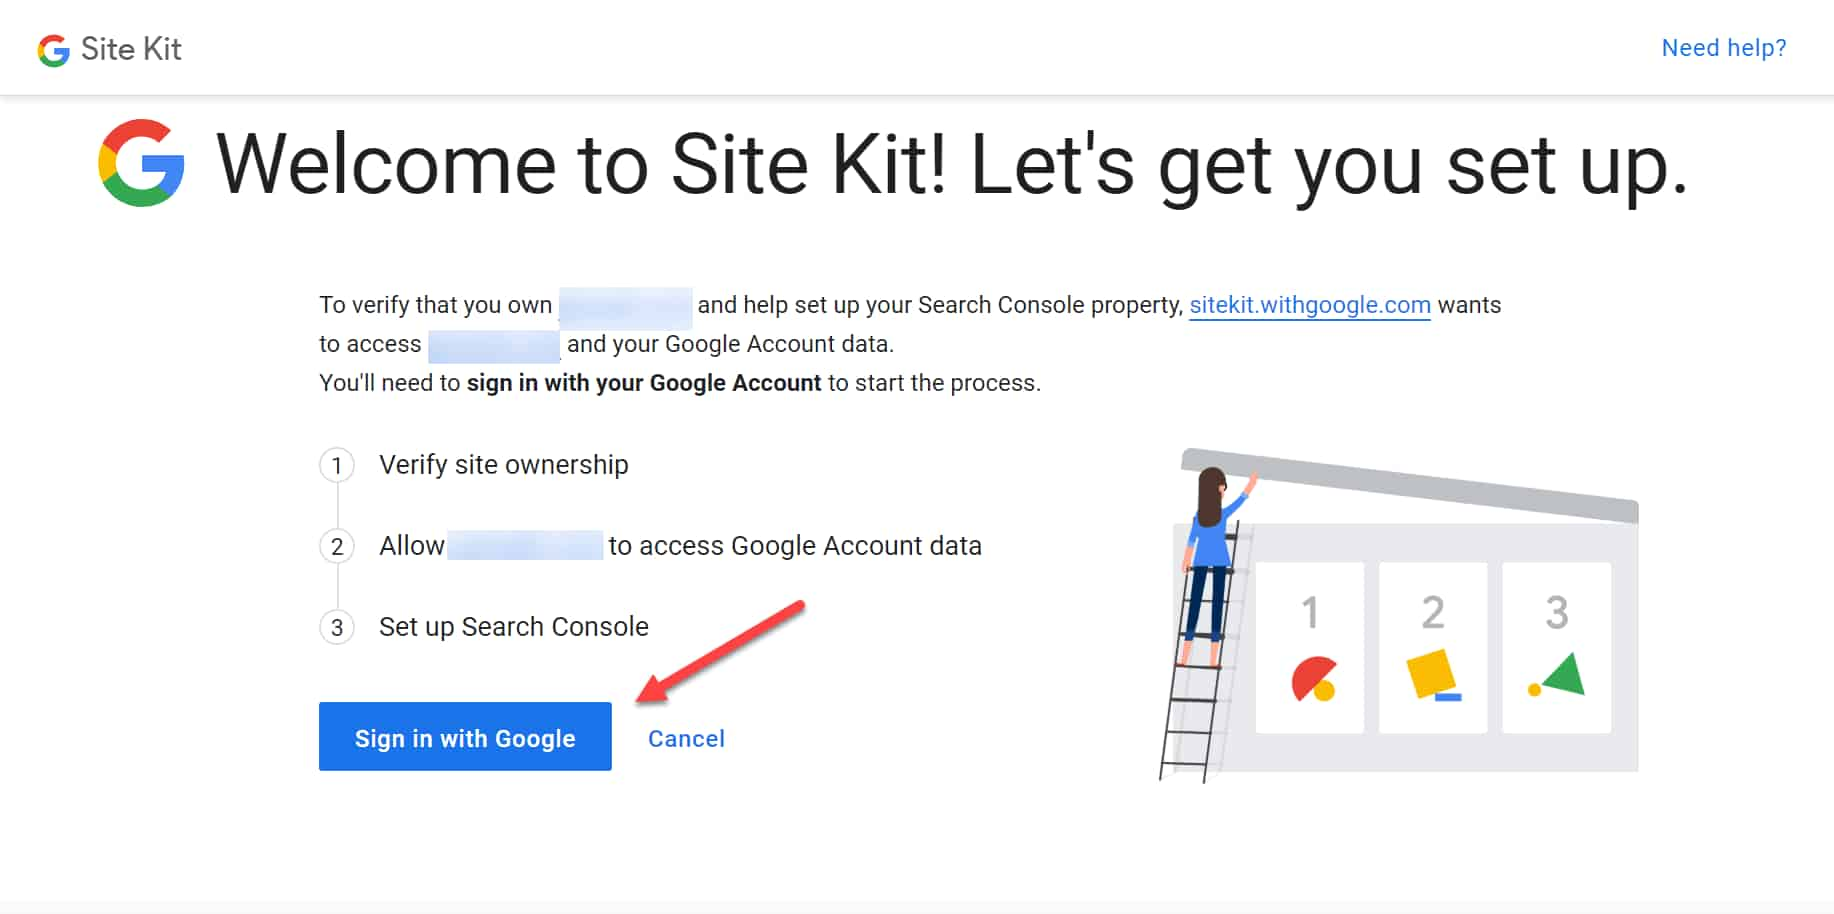
You can sign in with the same account you used to create the Google Analytics account here. Please note that it is okay if you did not create a Google Analytics account; Site Kit will create it for you.
Just log in using your Google ID (Gmail ID), and it will create your Analytics account. I did not create the Google Analytics account for massilah.com; I used Site Kit. The whole process was effortless.
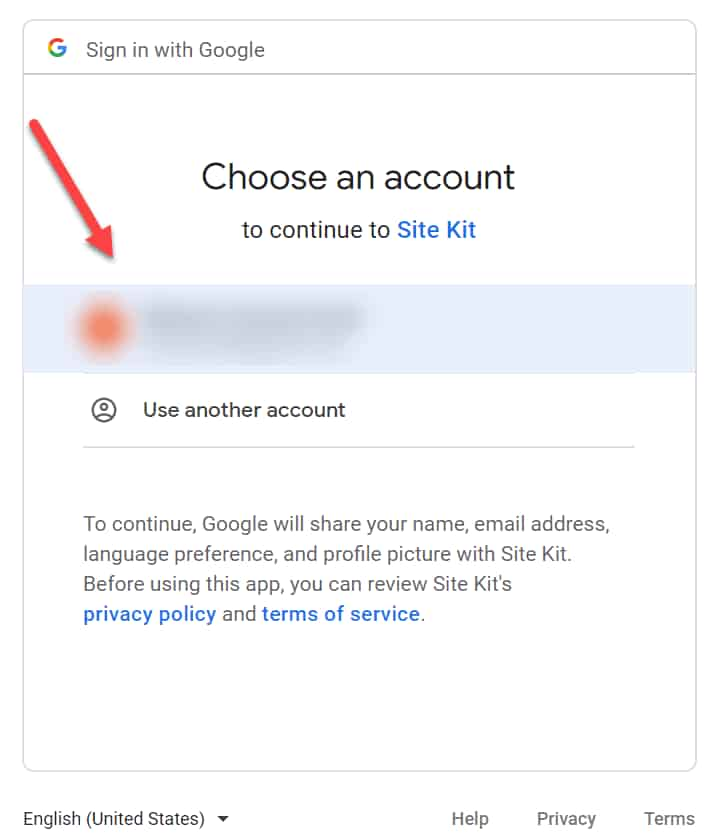
Click on the account I.D., and you will see the following window:
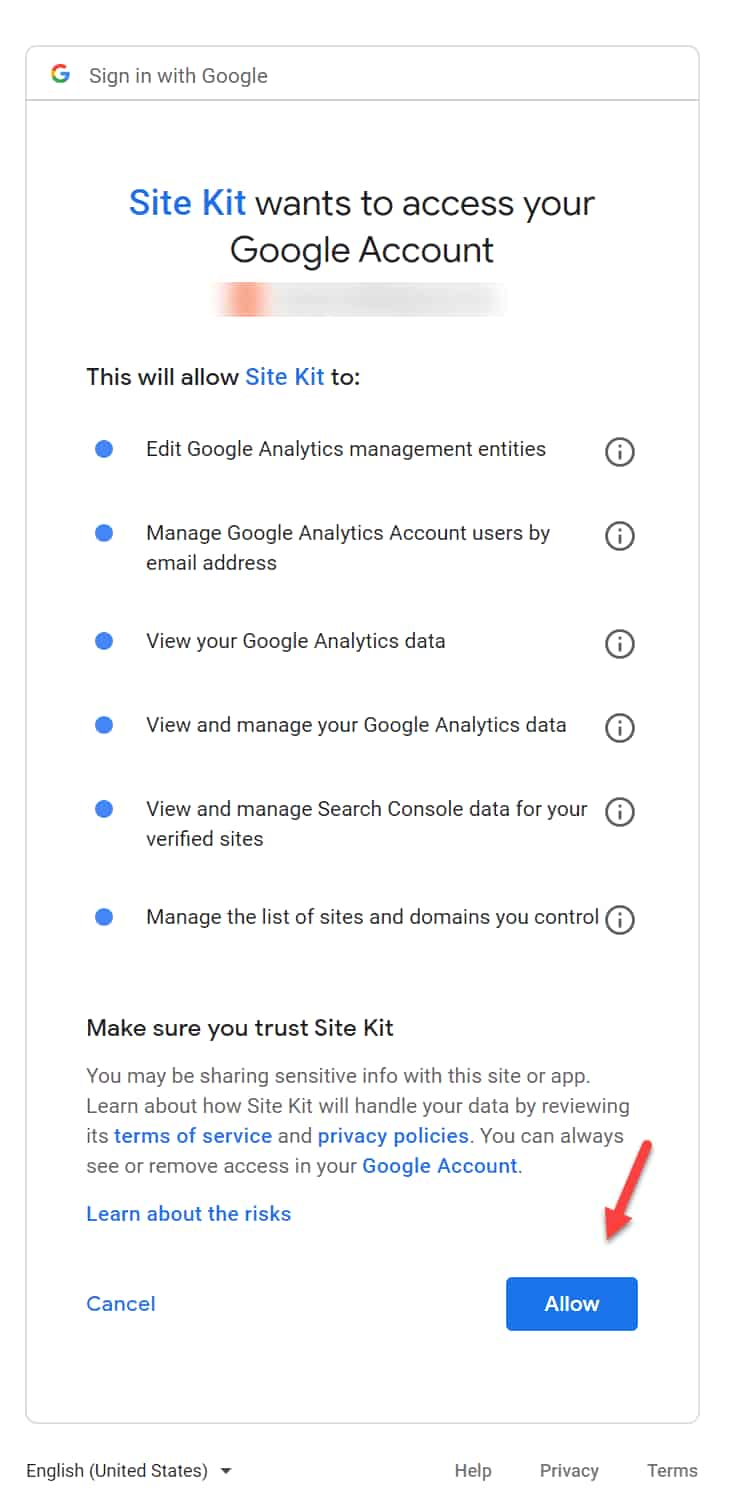
Google will inform you what data the Site Kit will see. Allow it.
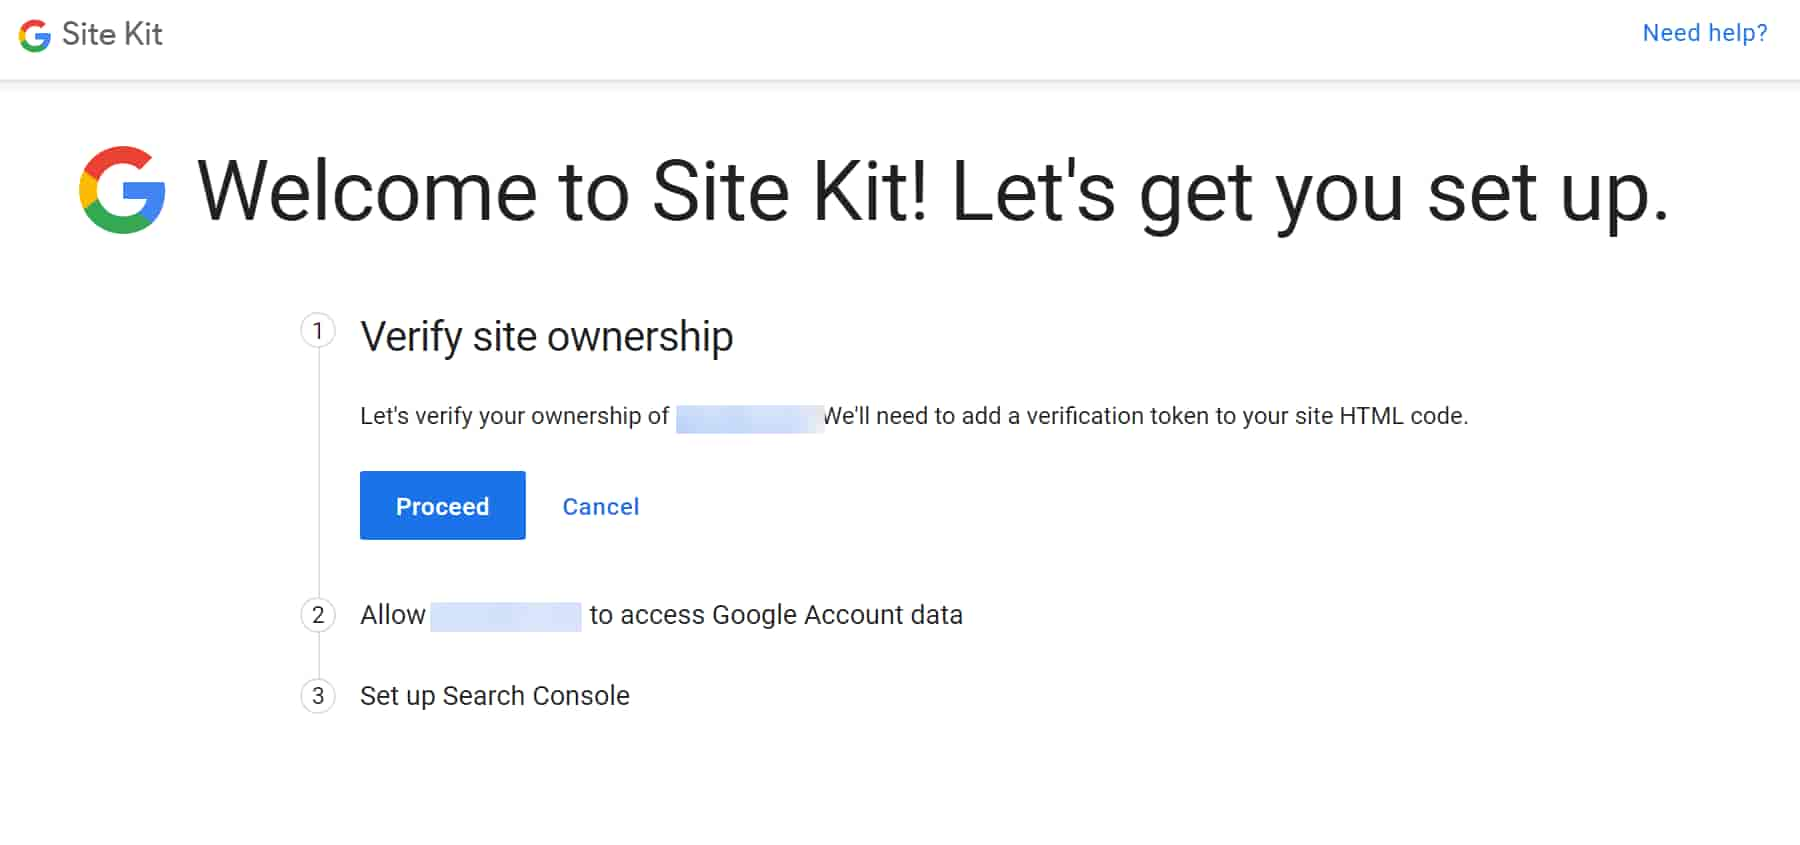
Click on “Proceed.”

Now, the site has been verified. Click “Allow.”
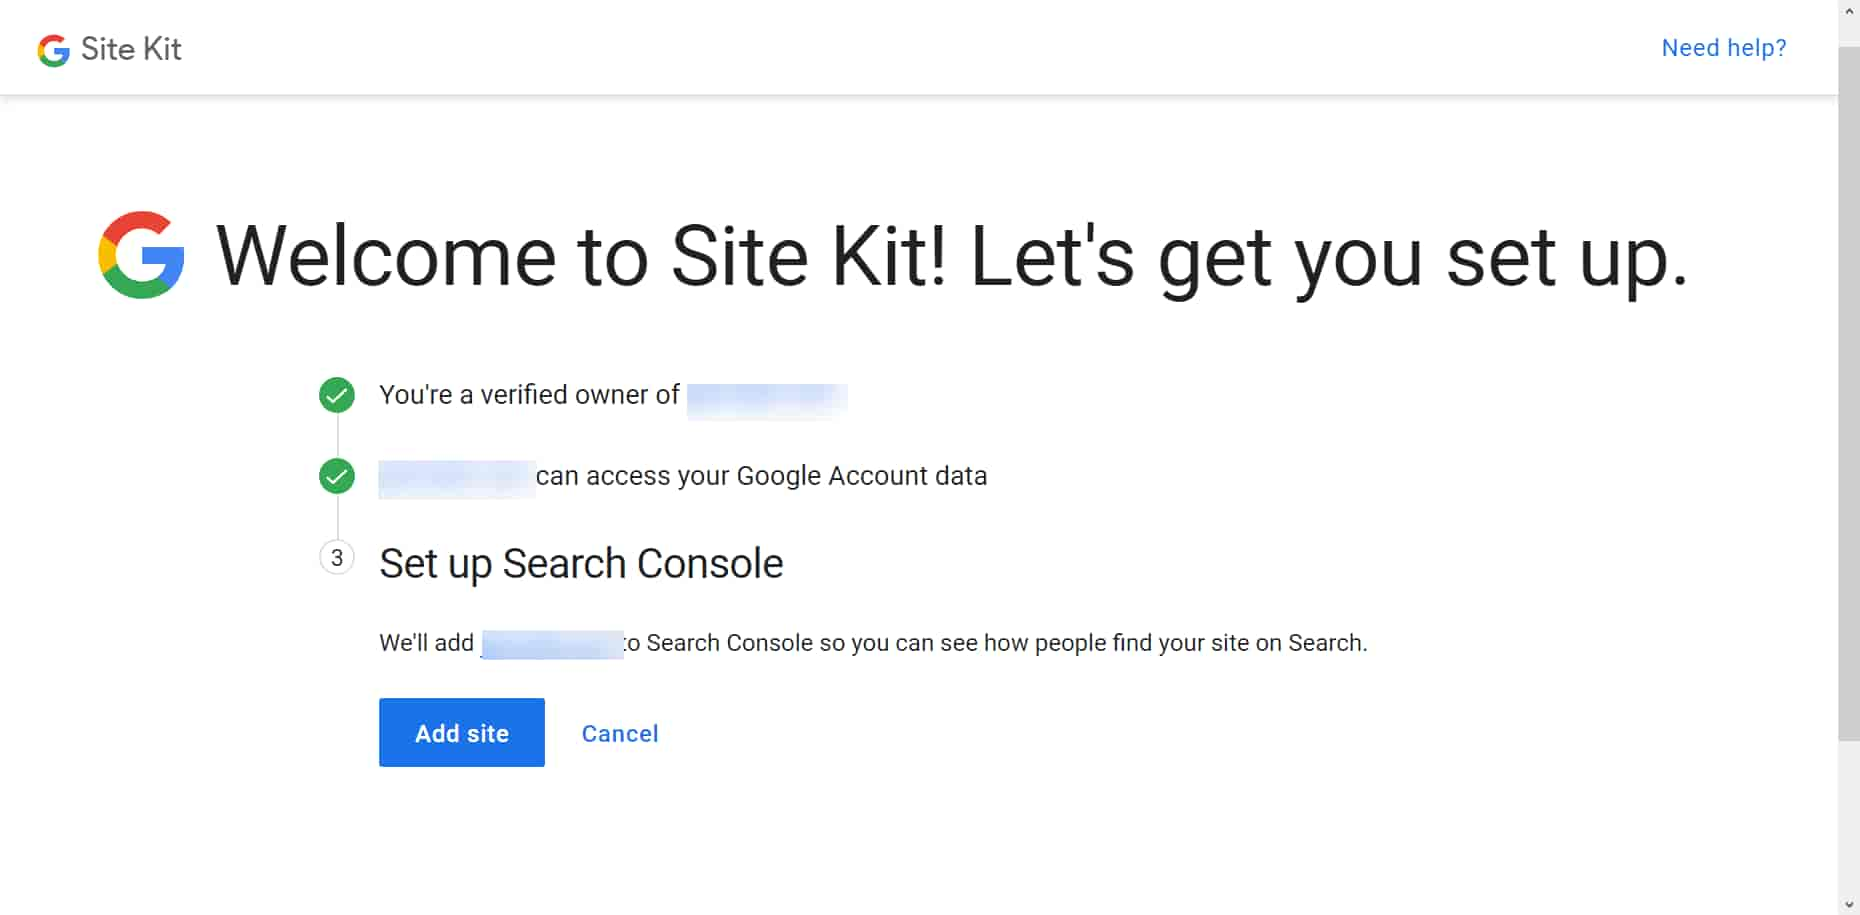
Your Google Analytics Account is connected, and if you wish, you can connect your Google Search Console.
To do so, click “Add site.”
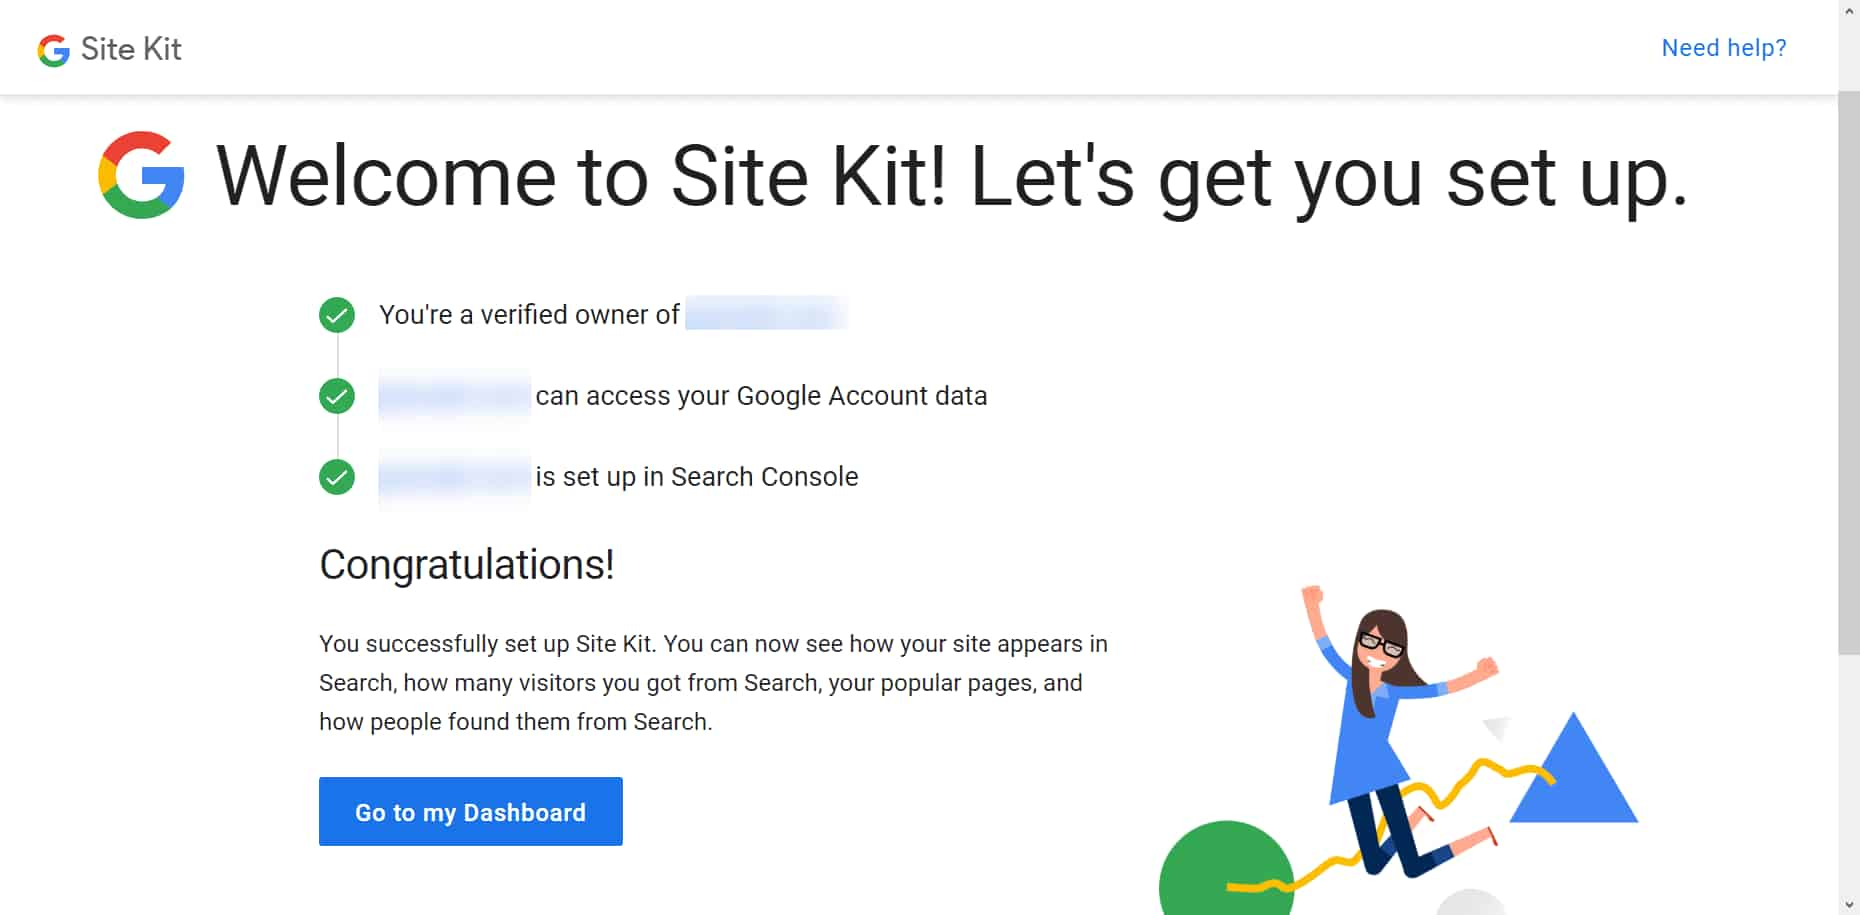
As soon as you click, your Google Search Console will be connected in less than a second, and you will receive the above message. Now click on “Go to my Dashboard.”
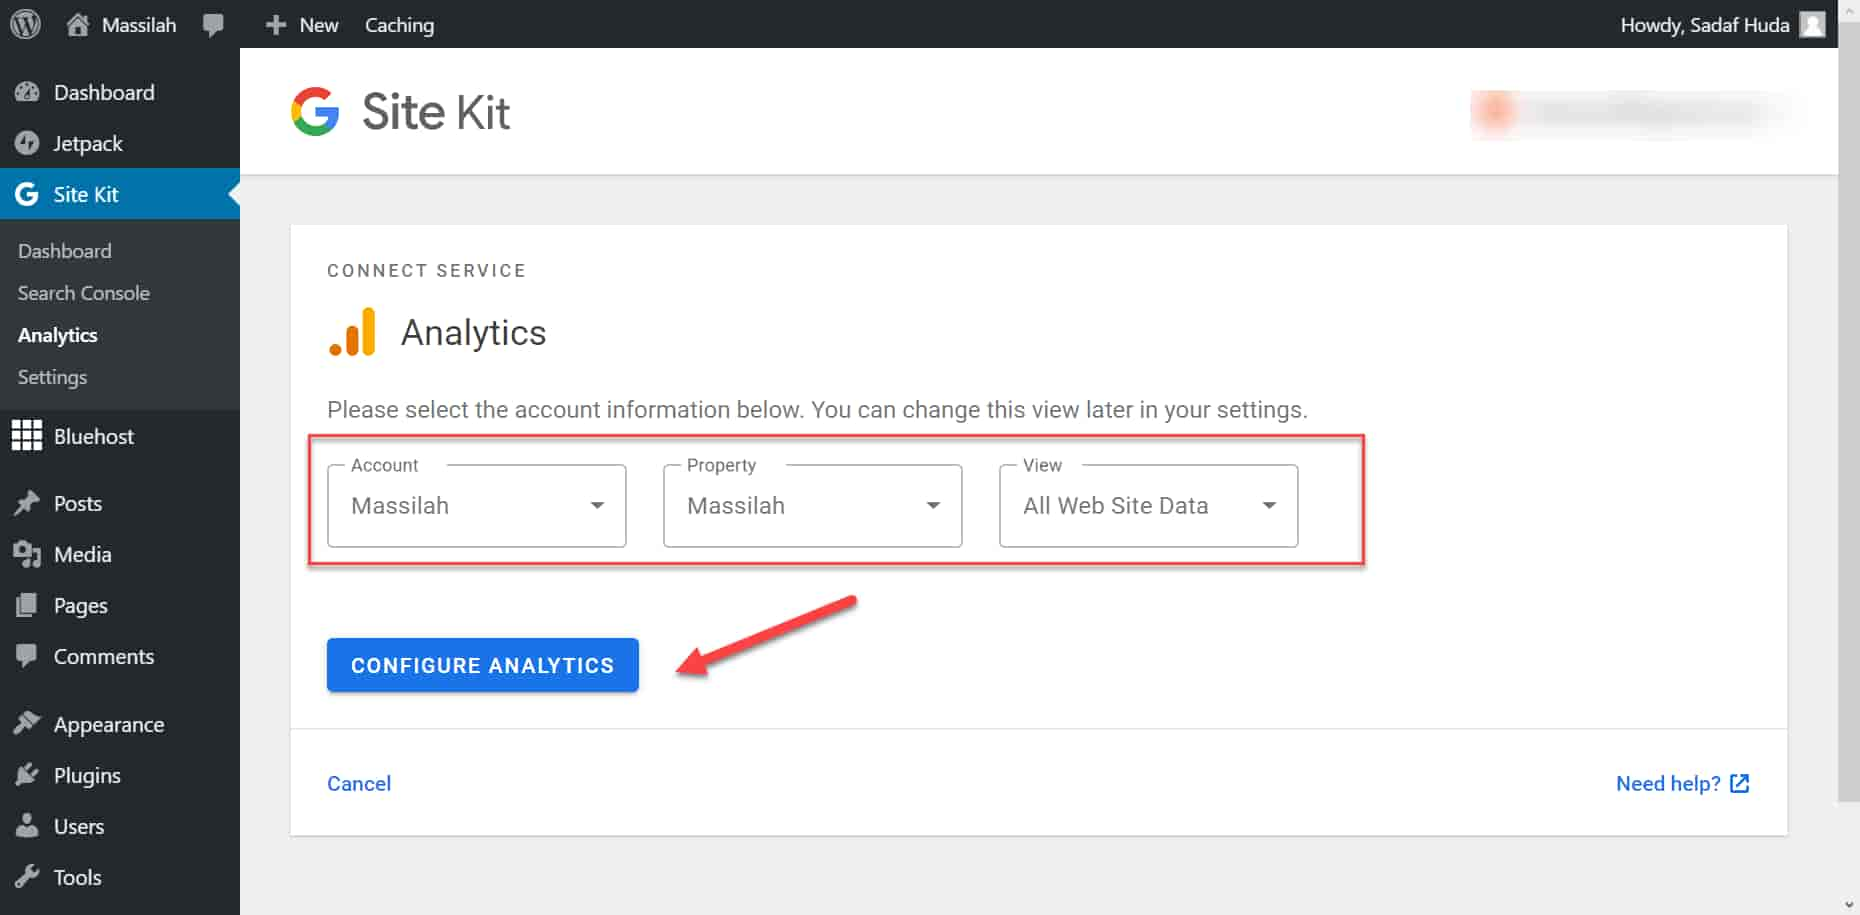
Once you click “Allow,” you will be returned to the WordPress Admin dashboard. Make sure all settings are right. Click “Configure Analytics” to complete the configuration.

Now your Google Analytics account and Google Search Console are connected with your WordPress blog, and you can see your traffic data right inside your WordPress admin. You can see the green arrows for the connected service. If it does not connect to any of these services, click on it again, and the issue will resolve.
Please know that the Site Kit may first connect with the Google Search Console, and then you must select the Analytics connection to connect to Google Analytics. Just click on the Google Analytics connection from the Site Kite panel, and in one or two clicks, it will connect to Google Analytics effortlessly.
Open your Site Kit admin panel, and you can configure your AdSense Account and PageSpeed Insights with a few clicks.
As of now, Site Kit is available for six Google Services:
- Google Analytics
- Google Search Console
- Google AdSense
- PageSpeed Insights
- Optimize
- Tag Manager
You can connect and disconnect these services from the Site Kit settings.
So, you have seen how easy it is to install Google Analytics code on your WordPress site. Google itself developed this plugin, so there is no question about the code quality of this plugin.
I use this plugin for this blog and recommend you do the same.
Another Premium Plugin that is similar to Site Kit is MonsterInsights.
This plugin lets you install the Google Analytics code the same way as Site Kit. MonsterInsights is available in a free and premium versions. Please note that this plugin does not help you create a Google Analytics account; it only helps you connect it with your blog.
I have used the free version and find it very limited in features. However, the premium version is useful and provides more in-depth reports than Google Site Kit. If you are a data analyst, I suggest you use this plugin.
This plugin has been installed on over two million WordPress blogs.
Using Another Plugin
Searching the WordPress repository for Google Analytics integration will show you hundreds of plugins, and discussing all those plugins is not possible.
Therefore, I will discuss one most reliable plugins that always works and is useful and multipurpose. This plugin is “Insert Headers and Footers.
“This popular plugin has been installed on over one million WordPress sites. Before using the Site Kit, I used this plugin to connect to Google Analytics.
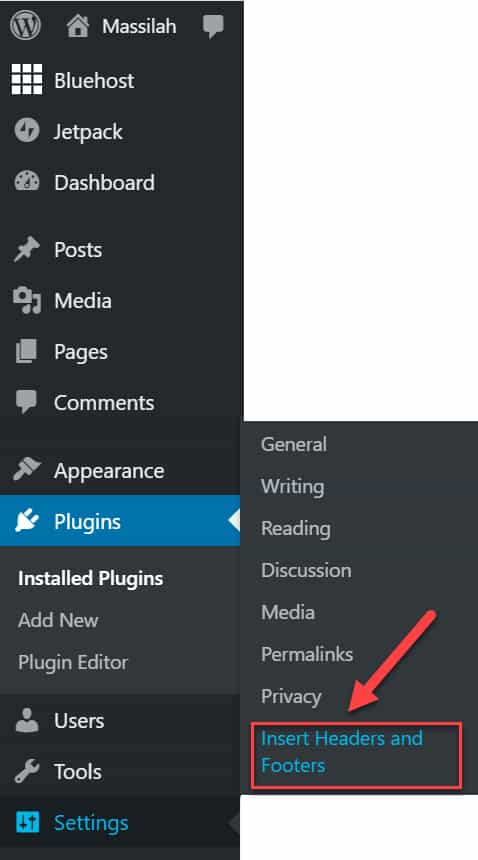
Install the “Insert Headers and Footers” plugin. After installation, activate the plugin, then go to the settings.
Paste the Google Analytics code that you saved while creating the Google Analytics account, as shown in the image below:
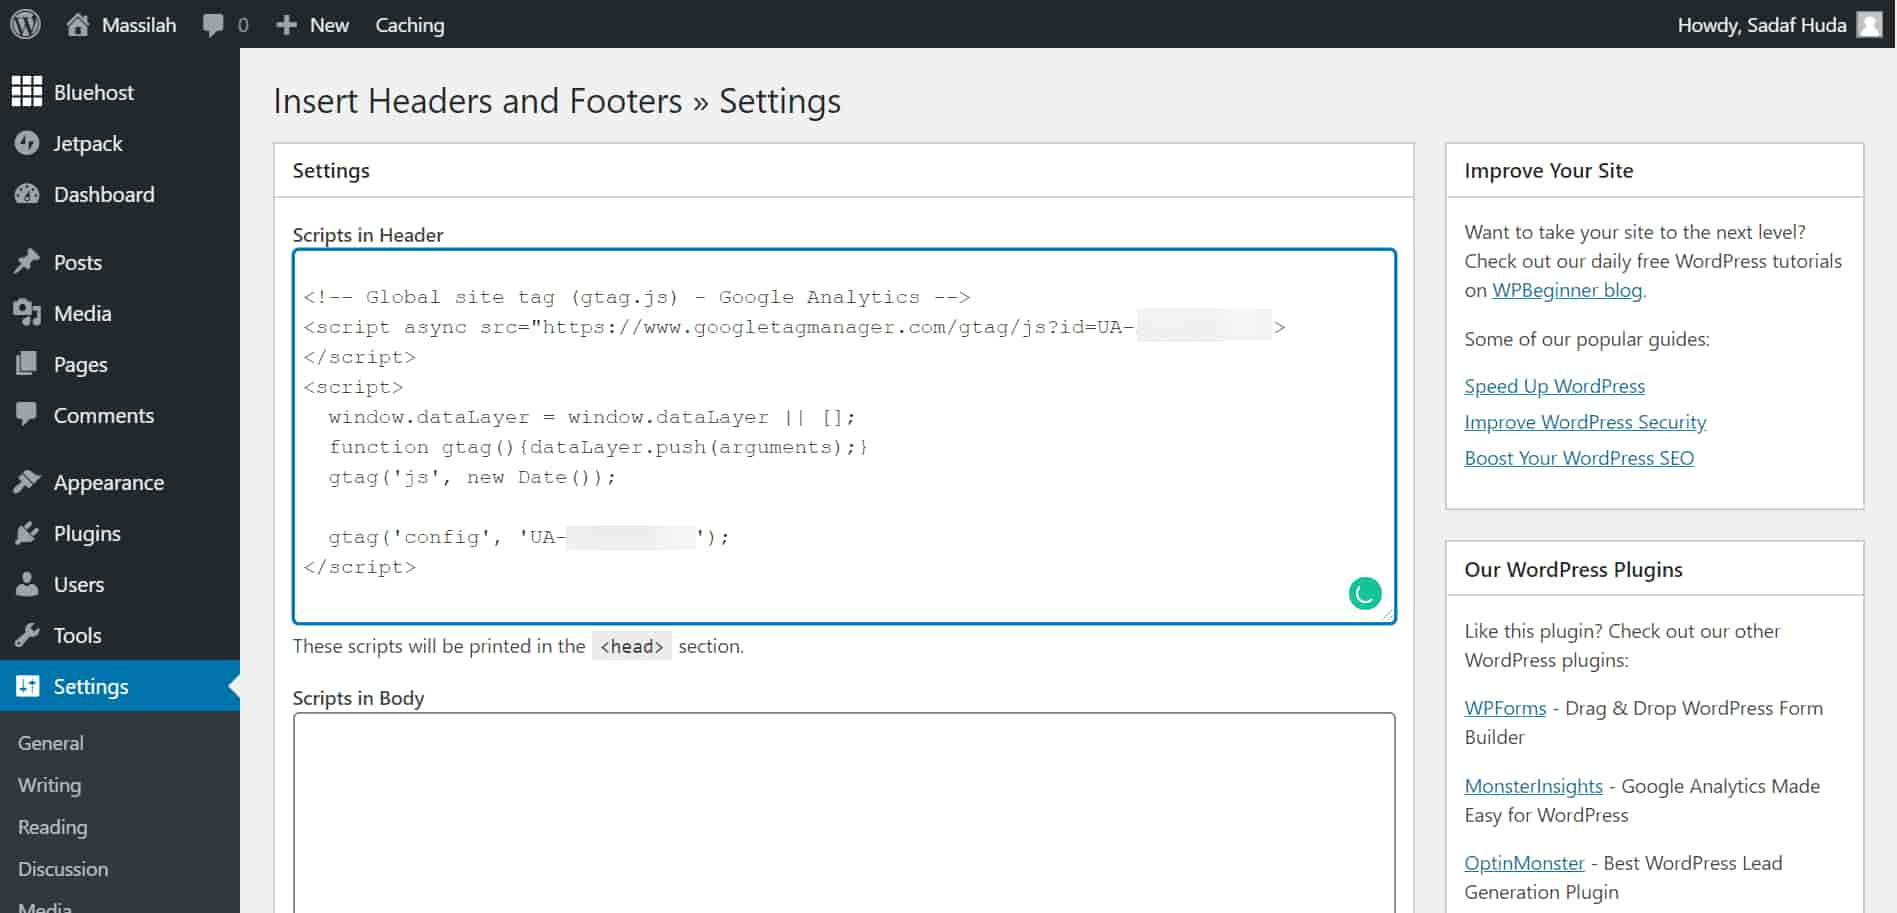
Save the settings, and you are done. Now you can see your traffic data in your Google Analytics. To see the data, enter your account to the Google Analytics site. This plugin does not show any traffic report in your WordPress Admin dashboard.
Using this plugin to install Google Analytics codes has many advantages:
It helps you avoid errors. If you install Analytics codes to your theme file and misplace a dot or semicolon, your blog may break. Using this plugin ensures that your theme files are safe.
If you have installed your Analytics code in your theme and you change the theme, you will need to install the Analytics code again, and you may lose data during this change. However, if you use this plugin, your code will be safe.
This is a multipurpose plugin. You can add as many scripts as you wish in the header or footer. Google Analytics code is just one example. You can add custom CSS across themes, insert Facebook pixel code, and insert any code or script, including HTML and Javascript.
Manual Installation
This is an advanced method to install Google Analytics code to your WordPress blog that no one recommends.
Developers used to use this method when there were no easy alternatives available. However, these days safer methods are available, so it is rare for anyone to install the code in the theme files manually.
This method has the following disadvantages:
If you switch the theme, your connection with Google Analytics will be lost. This has happened many times with us. We started our first blog with a free WordPress theme and inserted the Analytics codes in the theme file. Afterward, we switched to the Catalyst theme (no longer available) and Dynamic Website Builder, and we lost our connection with Google Analytics. We again used the same method to install the Google Analytics code.
A few years later, we shifted to the Genesis theme, which happened again, and unfortunately, we used the same manual method. A few years later, we moved to GeneratePress, but this time, we used the “Insert Headers and Footers Plugin.” The process was quick, and we were safe. However, once the Site Kit launched, we switched to that.
On this blog, we have been using Site Kit from day one. These days some themes are providing a means to add Google Analytics code. I am using the Thrive Theme Builder on this blog, and we only need to enter a number to connect Google Analytics to the blog, but we are using Site Kit to make the process theme independent.
If your theme is using a child’s theme, install Google Analytics script in your child’s theme’s header.php or function.php file because every few weeks when the theme gets an update, your script will remain safe.
You need to add a Google Analytics code in your header.php or function.php file, and a slight mistake will crash your blog, and you cannot access it. Therefore, it is in your best interest to avoid changing this file.
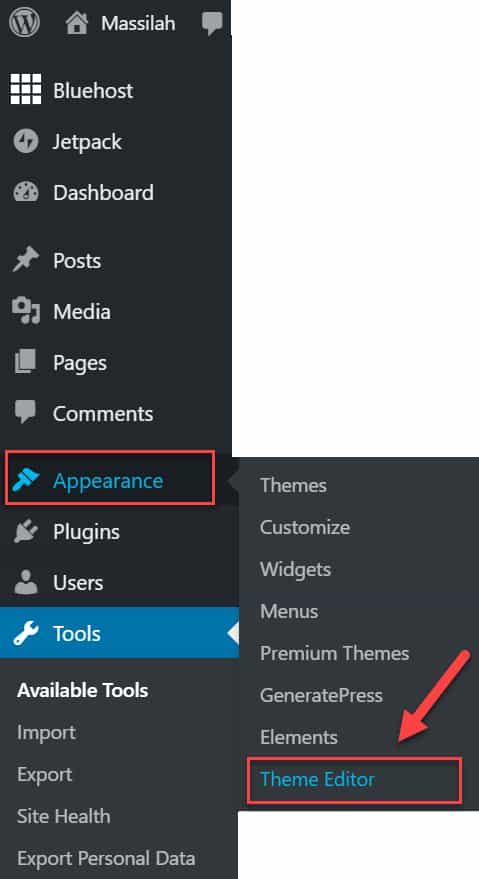
To install the code in the header.php file, follow the following steps:
Go to Appearance → Theme Editor
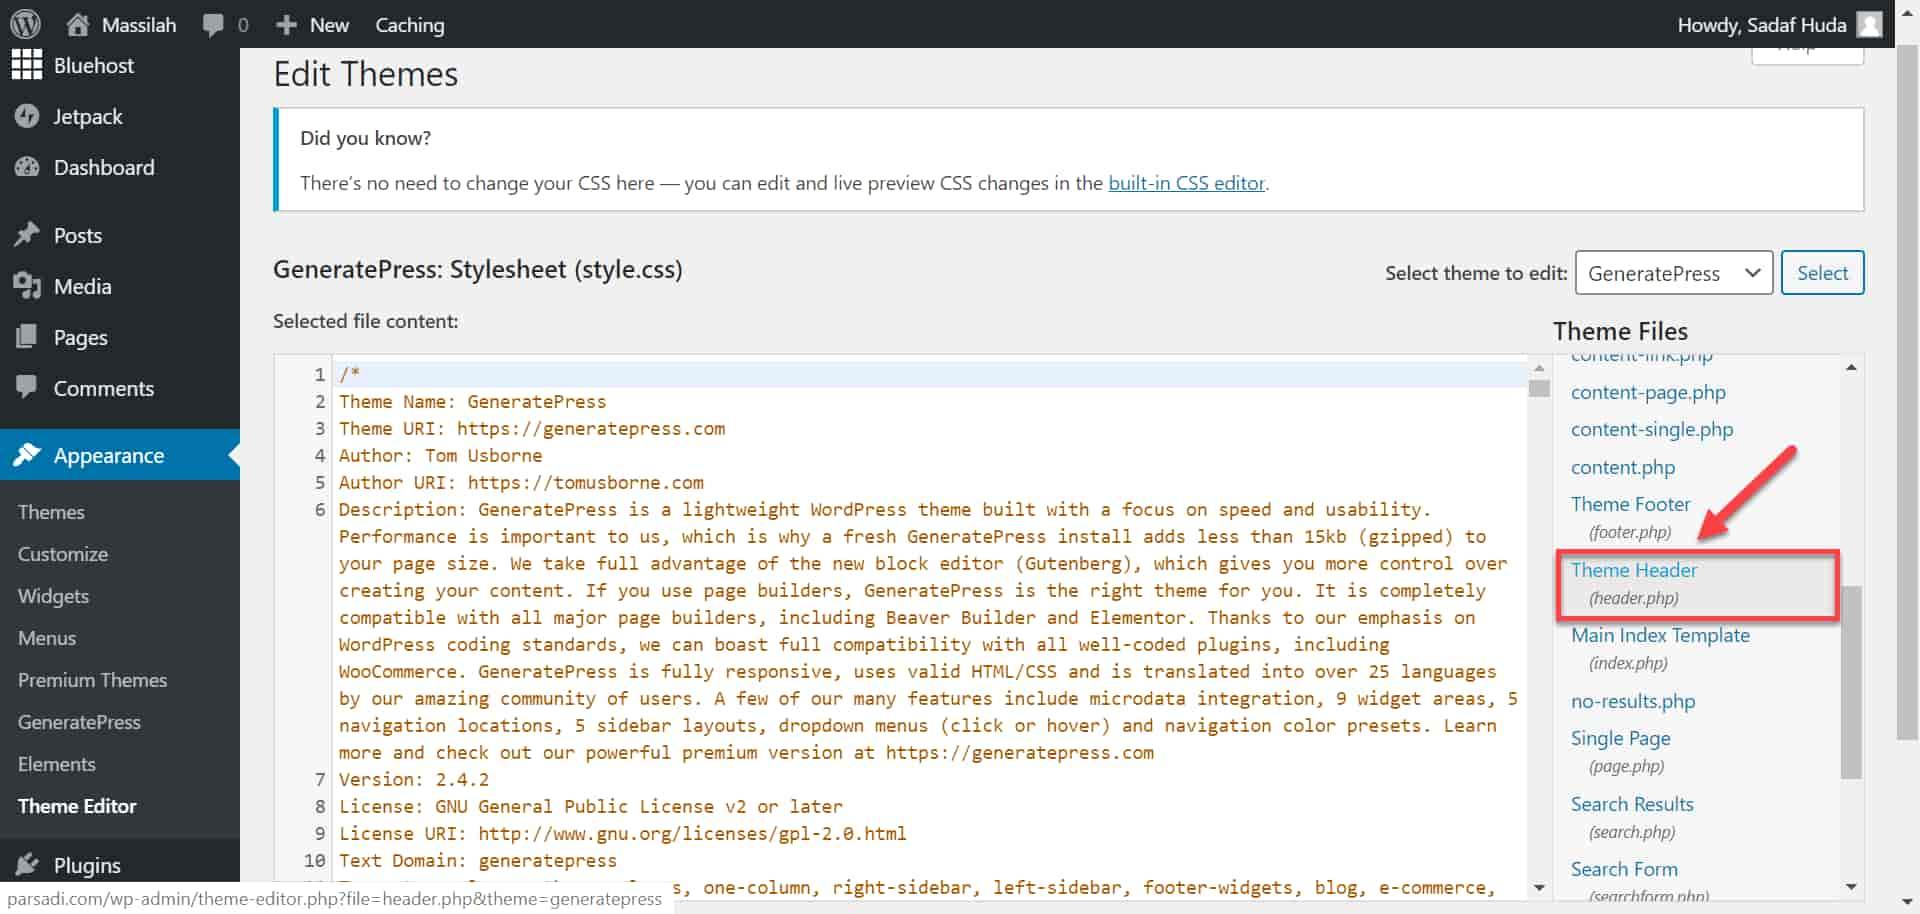
Then click on Theme Editor, as shown in the image below:
Now paste the Google Analytics script, as shown below.
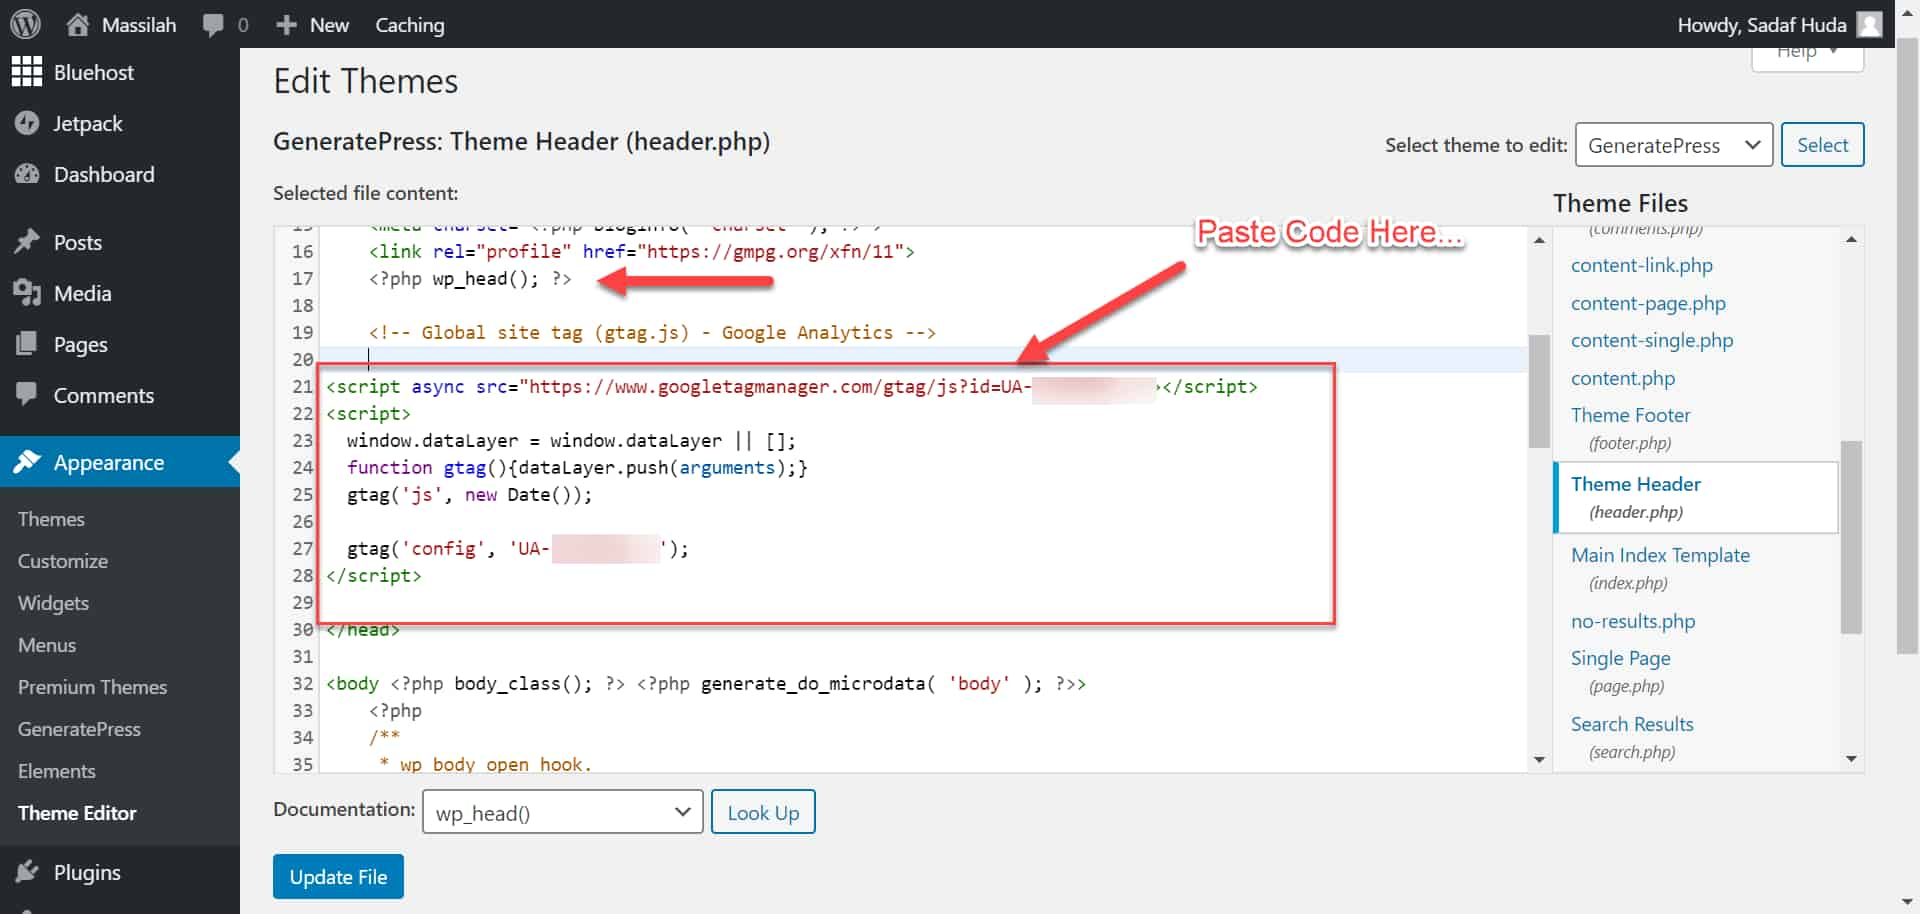
Click “Update File,” and your Google Analytics is installed on your site.
How to Get Google Analytics Tracking Code
Did you forget to copy the code or closed the window that has the code?
In that case, you can get the Google Analytics code again by following these steps.
Step-1
Login to your Google Analytics account
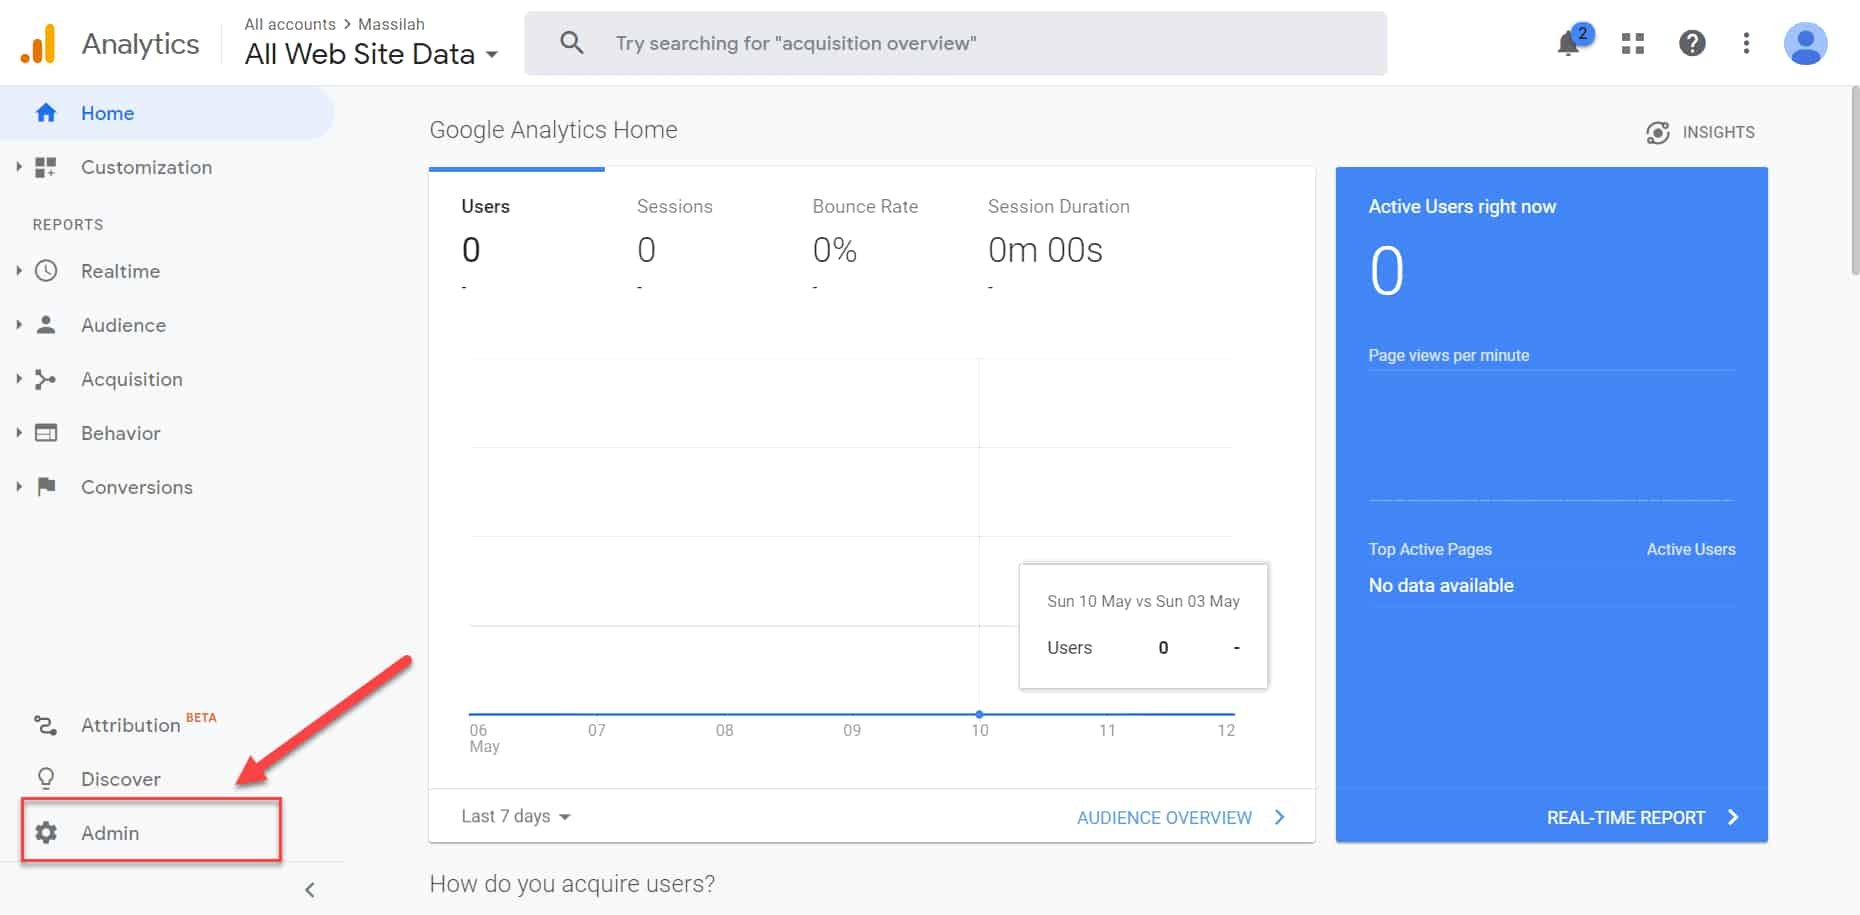
Step-2
Click on Admin

Step-3
Now click on “Tracking Info” and then “Tracking Code.”
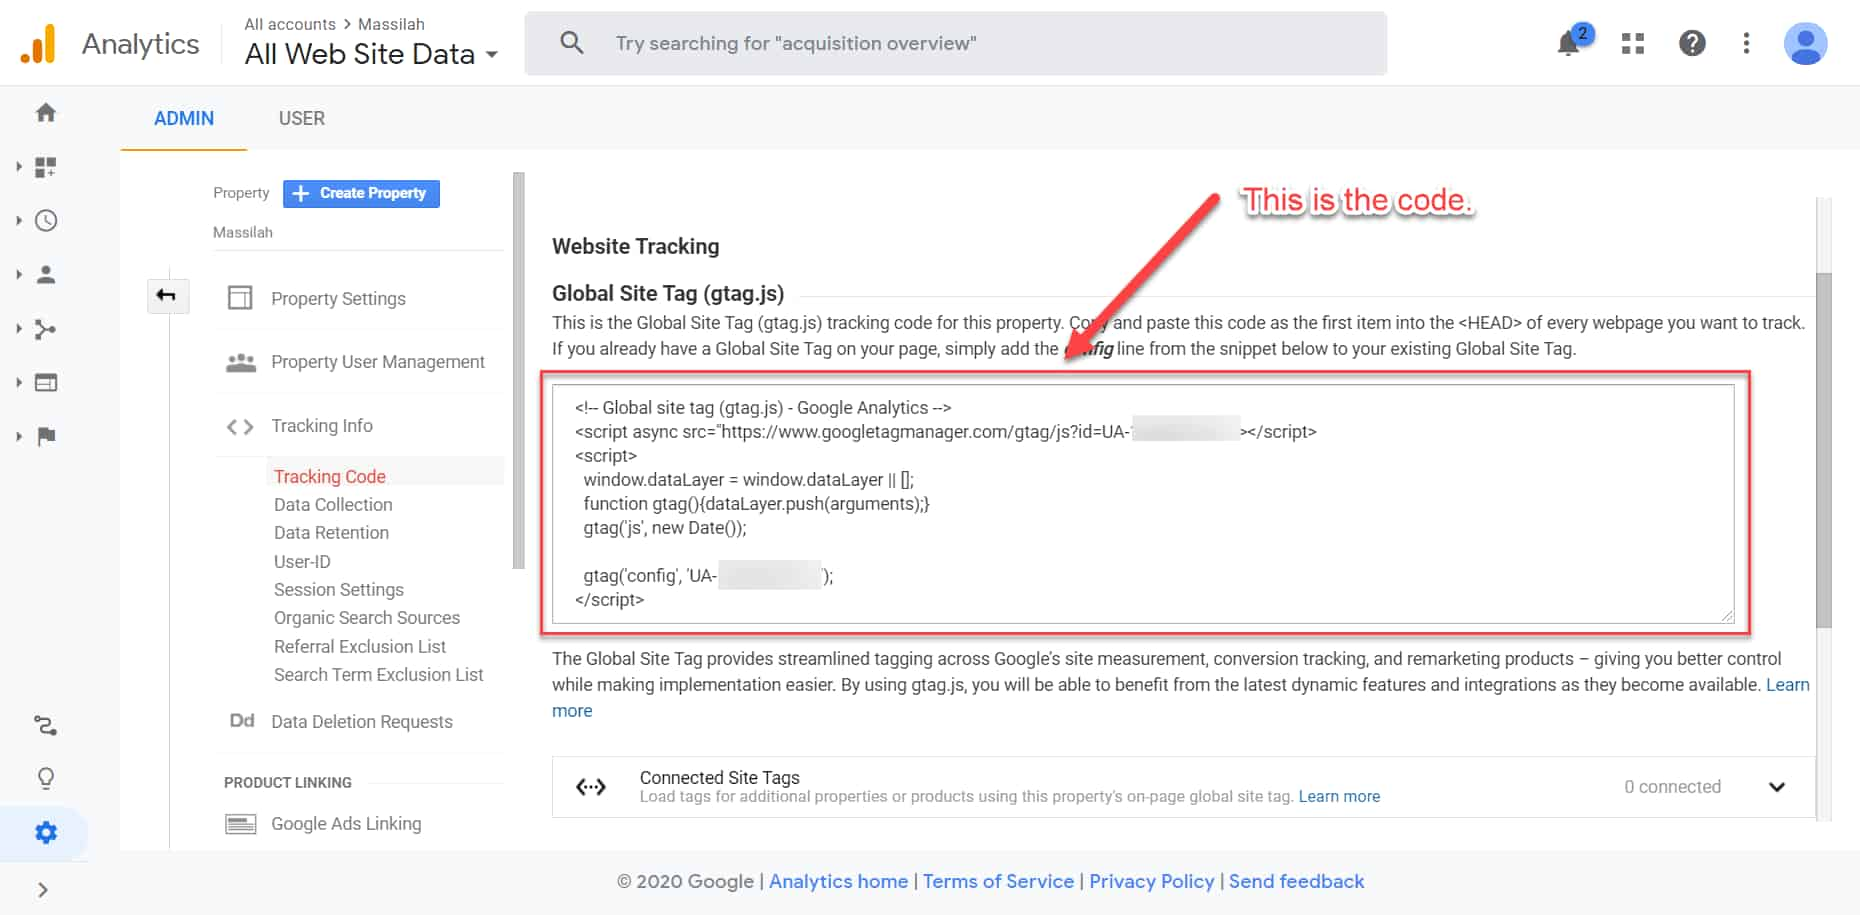
Now you can copy the code.
Basics of Google Analytics
Once your account is connected to your blog, you will get traffic reports within a few hours.
After logging in to your Google Analytics account, you will see the following dashboard:
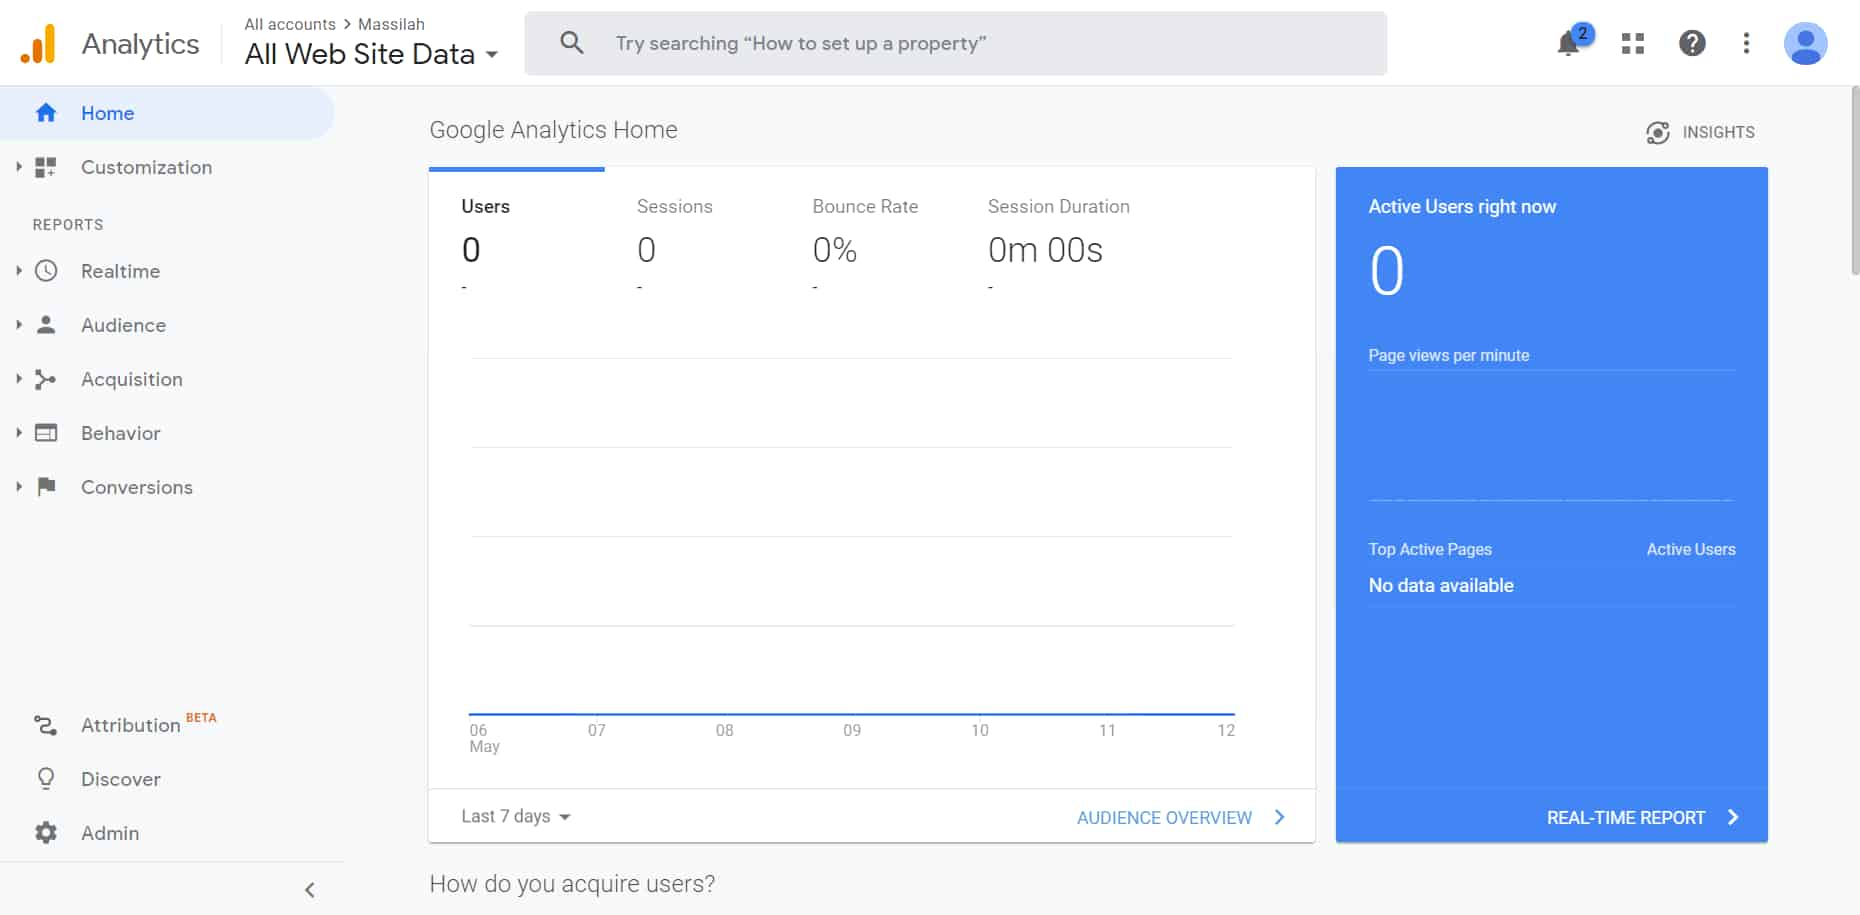
The left pane has report parameters, and the right side shows the report. You can see five reports in your Google Analytics.
1. Realtime
Here, you can see how many visitors are browsing your site. You can see their geographical location, what page they are viewing, etc.
2. Audience
Here, you will get a wealth of information about your audience. You will get information on the number of visits during a certain period, their geographic location, how long they stayed on a page, etc.
3 Acquisition
This report will show you how you gained your visitors. You can see if they come through Google Ads, search engines, social media, or an email marketing campaign.
4. Behavior
Here, you can see what visitors did after they arrived on your site. You can find out what pages they visited, how long they stayed, bounce rate, exit rate, what they search for on your page, etc.
5. Conversion
To see your conversion, you need to set up a conversion goal. For example, if you are selling an eBook, you can set a goal and see how many books you sell and the conversion rate.
Summary
Google Analytics is the most popular website analytics tool, and it helps you analyze your audience and their behavior on your site. You can then tweak your marketing strategy to align with your users’ requirements. Though you can install the Google Analytics script on your site using different methods, I recommend using Google’s Site Kit or the Insert Headers and Footers plugin to do the task and avoid amending your theme’s files.
I hope you can install Google Analytics on your WordPress blog without issue.
How did you install the Google Analytics code on your site? Please share your experiences in the comments section.